Andy's Adventures in Bookbinding
TLDR: If you're the type of person who needs a "too long didn't read" summary I suggest you go buy a cheap notebook somewhere!
However, if you just want to jump to the really good stuff, I've broken this page down into sections:
New to binding? Bet you're asking these two questions....
I'm pretty new to bookbinding, but if you're even newer, or currently thinking about starting out, two of the questions on your mind will be "what stuff do I need" and "how much is this going to cost me", I've tried my best to answer both questions on this page by listing the stuff in my bindery, and giving breakdowns of my costs.
You can make a book with next to nothing, for next to nothing, or you can go in much deeper and invest in paper guillotines; different types of presses and gilding tools, I'm somewhere between the two right now and am considering a guillotine for effortless edgings; and I'm keeping my eye out for an antique cast iron book press.
The groundwork before making Liber VII / Book 7
I am about to start creating my seventh book, the first was thrown together as a proof of concept, it's flexible and was made with stuff I had close to hand like standard 80 gsm printer paper, whilst it's naff, like covered in gift-wrapping paper naff, it cost me next to nothing! It's wonderful and I love it as it's inspired me to knuckle down on my focus, give this more attention and get more spectacular results. There was no vision behind it, no planning, it really was just cobbled together and it's so terrible looking I'm too ashamed to show it to you.
The second book I made is the large purple and gold edged hardback below which was made with a clear vision of what I wanted to acheive.
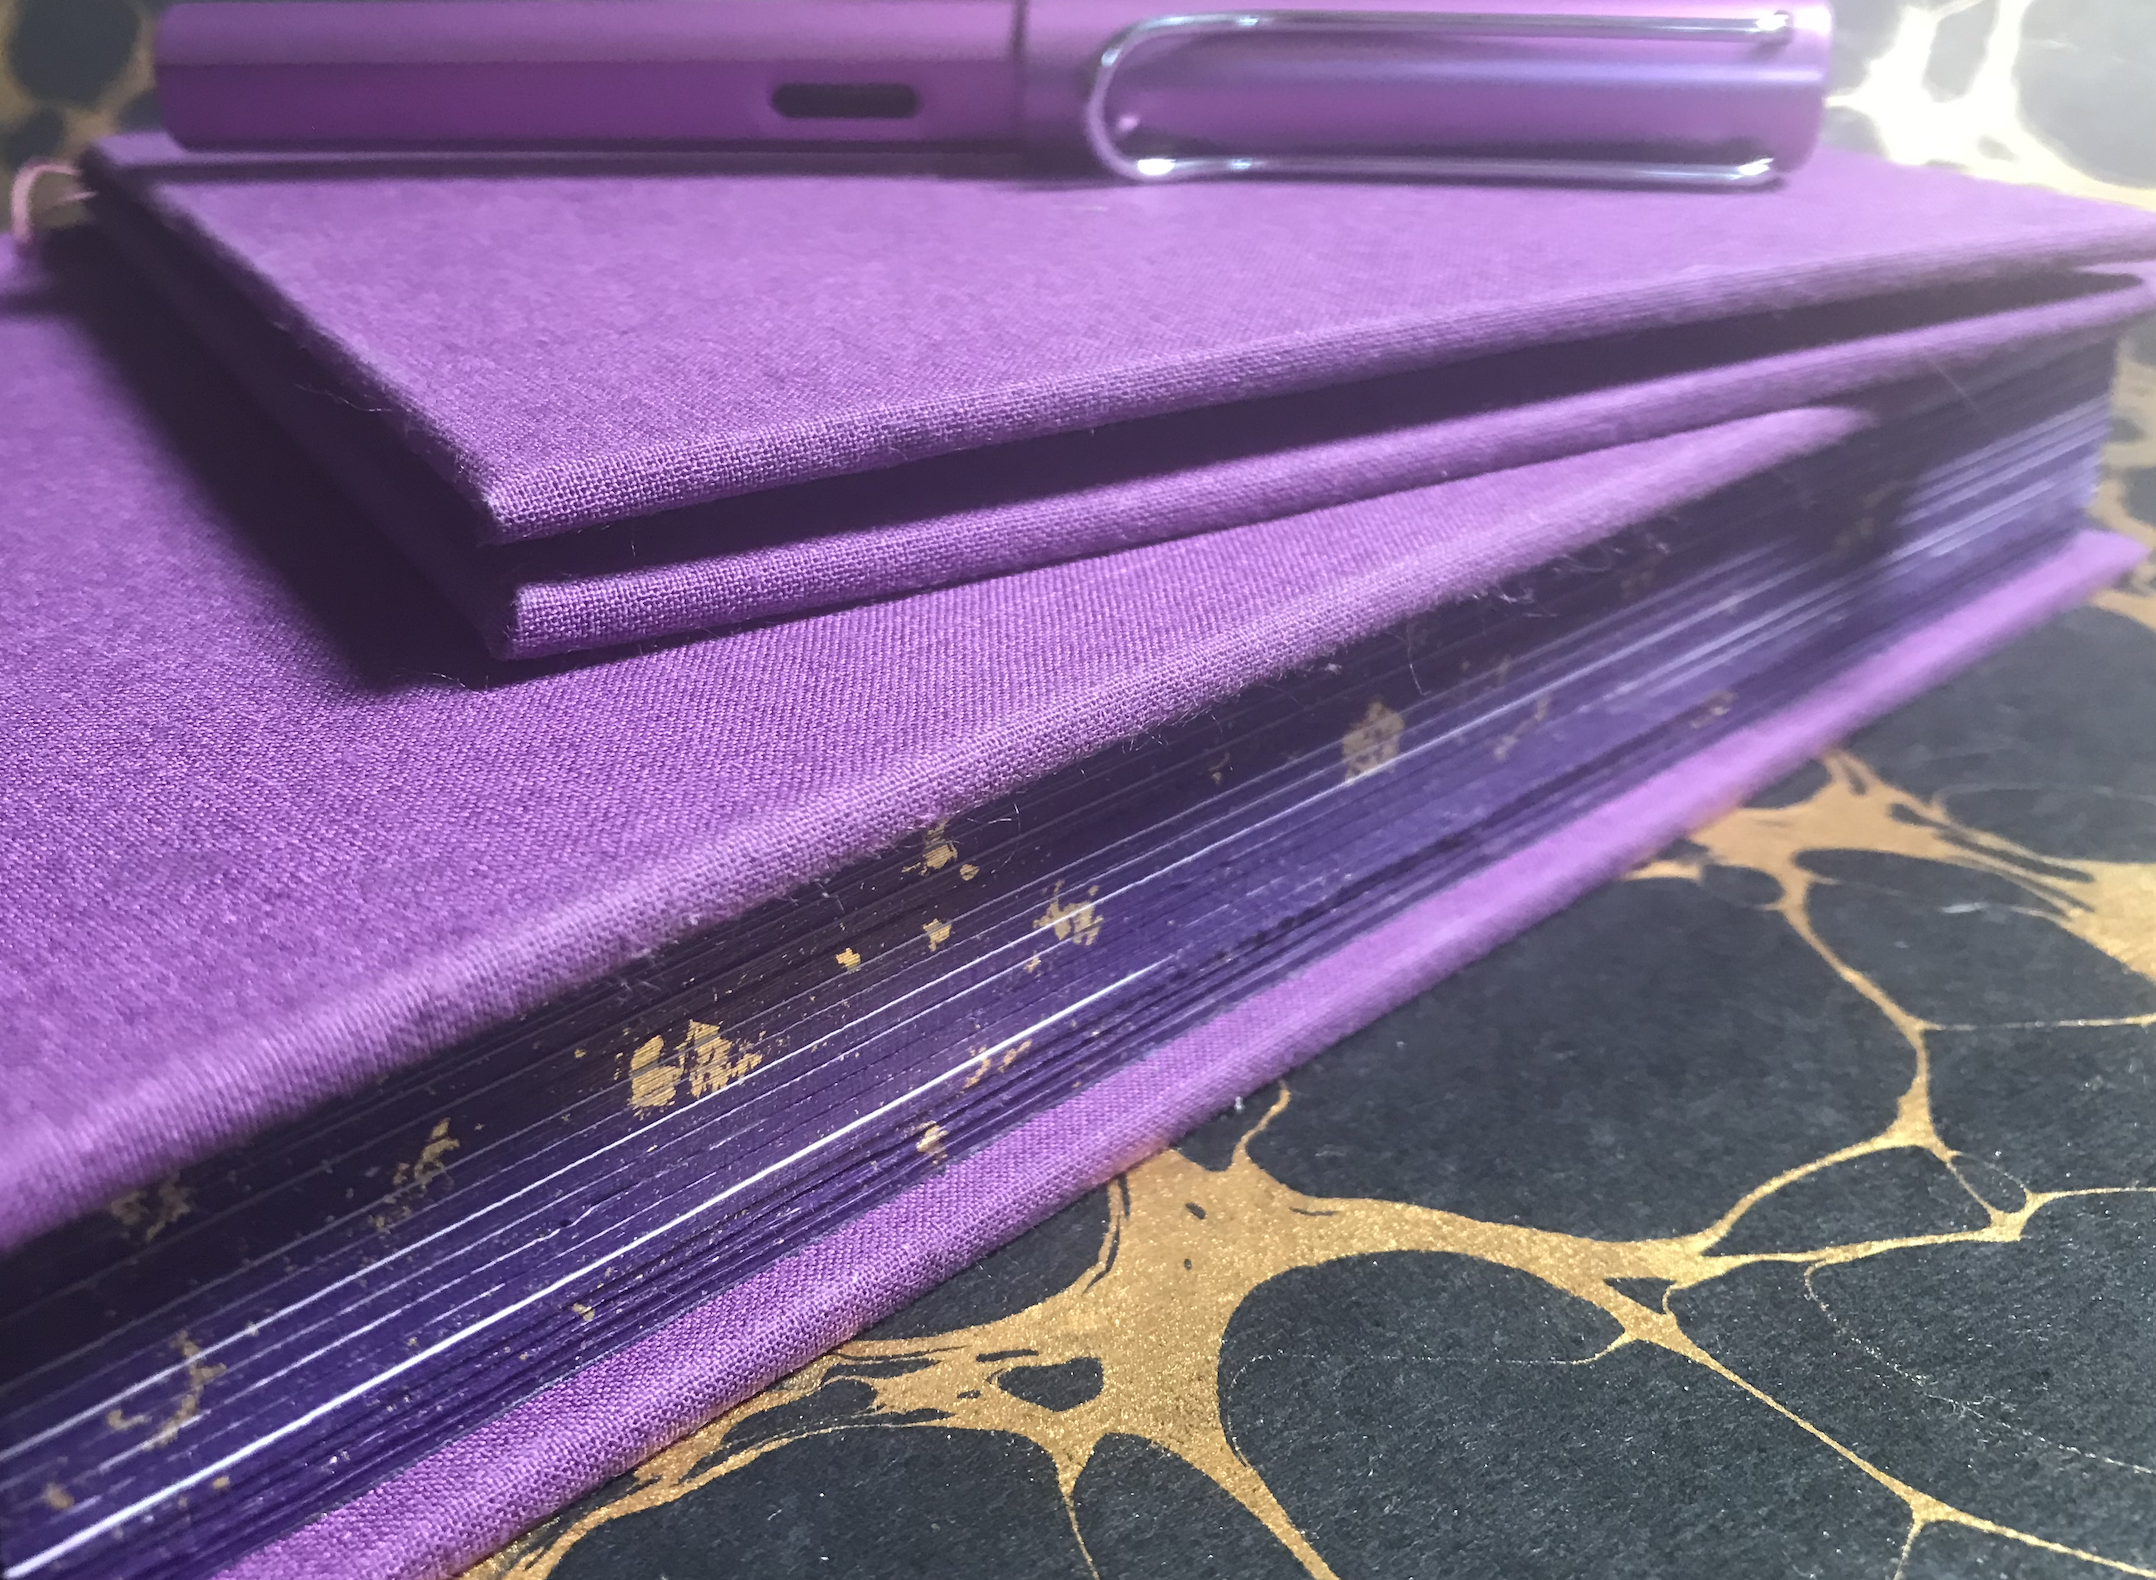
Books II and III: Archive-grade, hand crafted hardbacks with 24k gilding on painted edges
Handmade hardbacks; LAMY Al-Star 2023 Special Edition Lilac fountain pen, and marbled decorative endpaper
My third book is shown above, it's the small one on top of Book II, it was just put together over a couple of hours as a proof of concept, I use it to keep a track of my spend on binding bits, I've named it "Bookbinding Bookkeeping Volume I". When it runs out of space I'll create Volume II.
Book II: book cloth covered A5 hardback, marbled endpapers and contrasting fly leaves
Something really nice to behold, am shocked I could make something so tactile!
The fourth one is my first leather bound book, it's made with "scraps" of leather cut offs from an eBay merchant called Chesterfield Sofa Company, I bought five kilograms of bits for £7.99 and the leather contents on Book IV cost a staggering £0.08 in total. Yes, you read that right, scrap, waste leather that cost less than ten pence, but it looks, feels and smells wonderful!
I bought a nice fountain pen to accompany Book II, a Lamy Al-Star 2023 Special edition in lilac, so I decided Book IV should have a pen holder down the side. I've got handfuls of cheap throwaway pens, but I thought if I'm to have nice books to write in, I should write in them with something nice! I would like an S.T. Dupont pen but how bloody much? I guess I'm gonna have to start turning pens at some point, but that's got to come after I have a go at marbling some paper first...
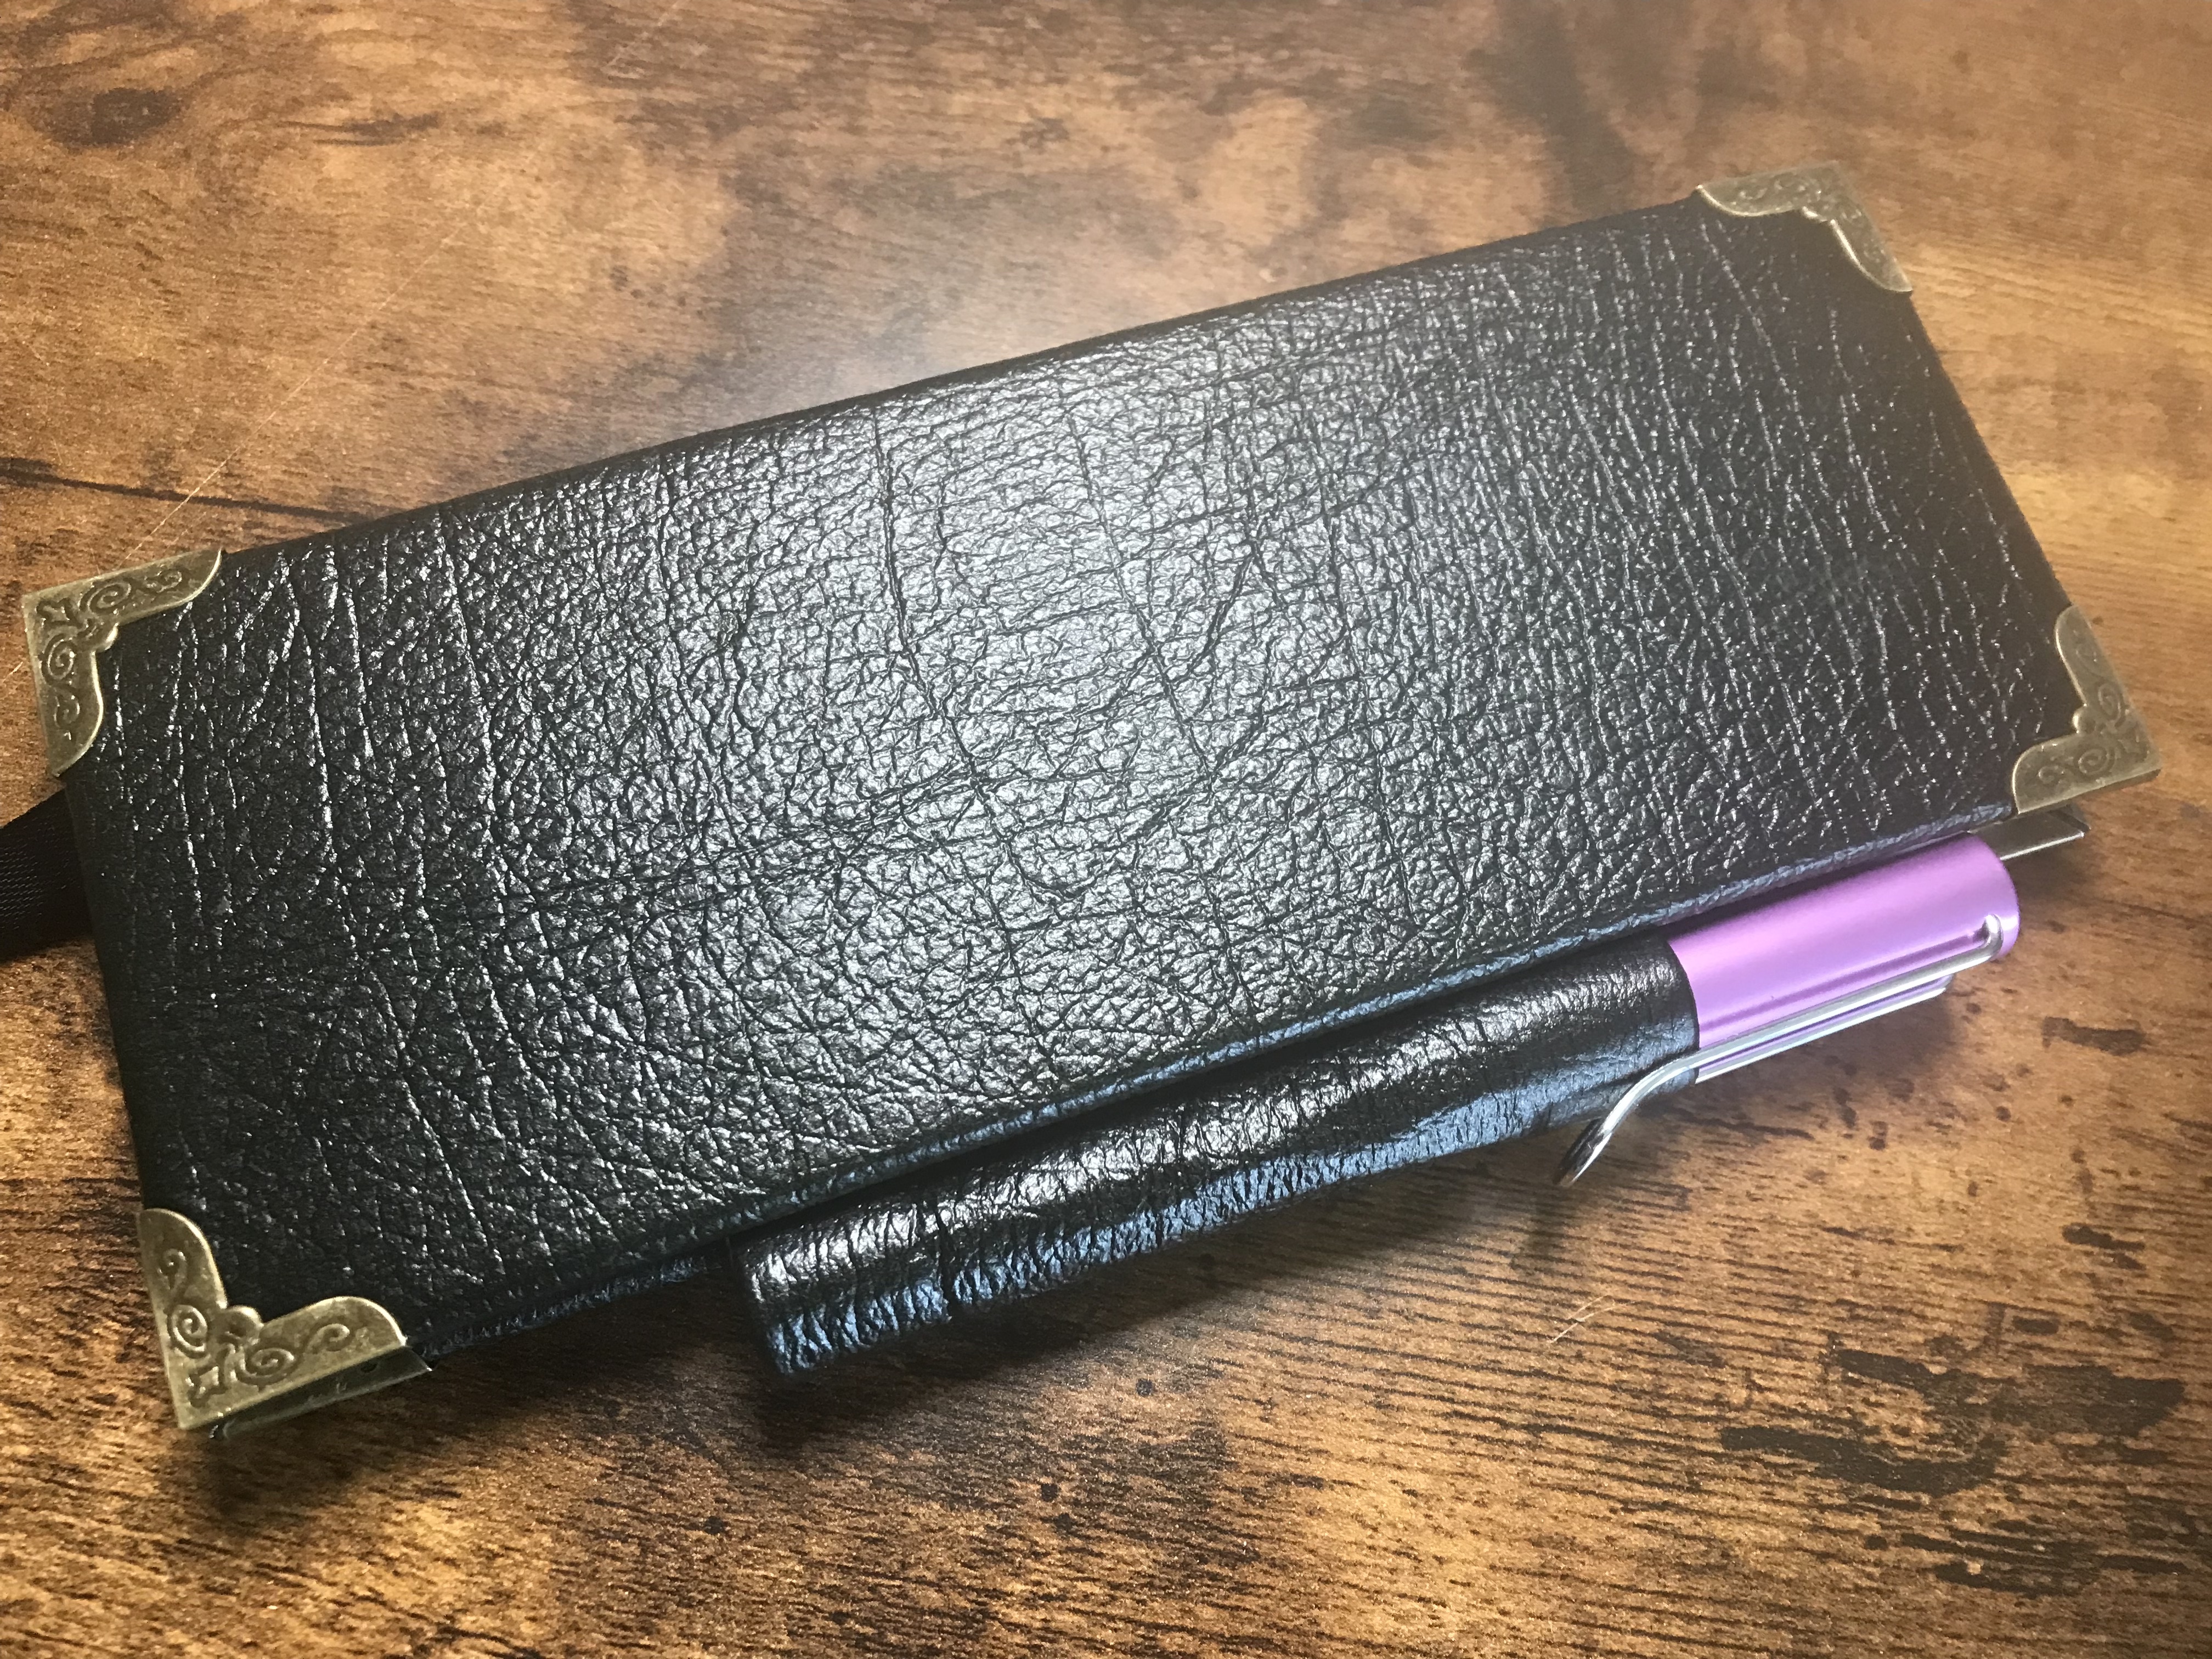
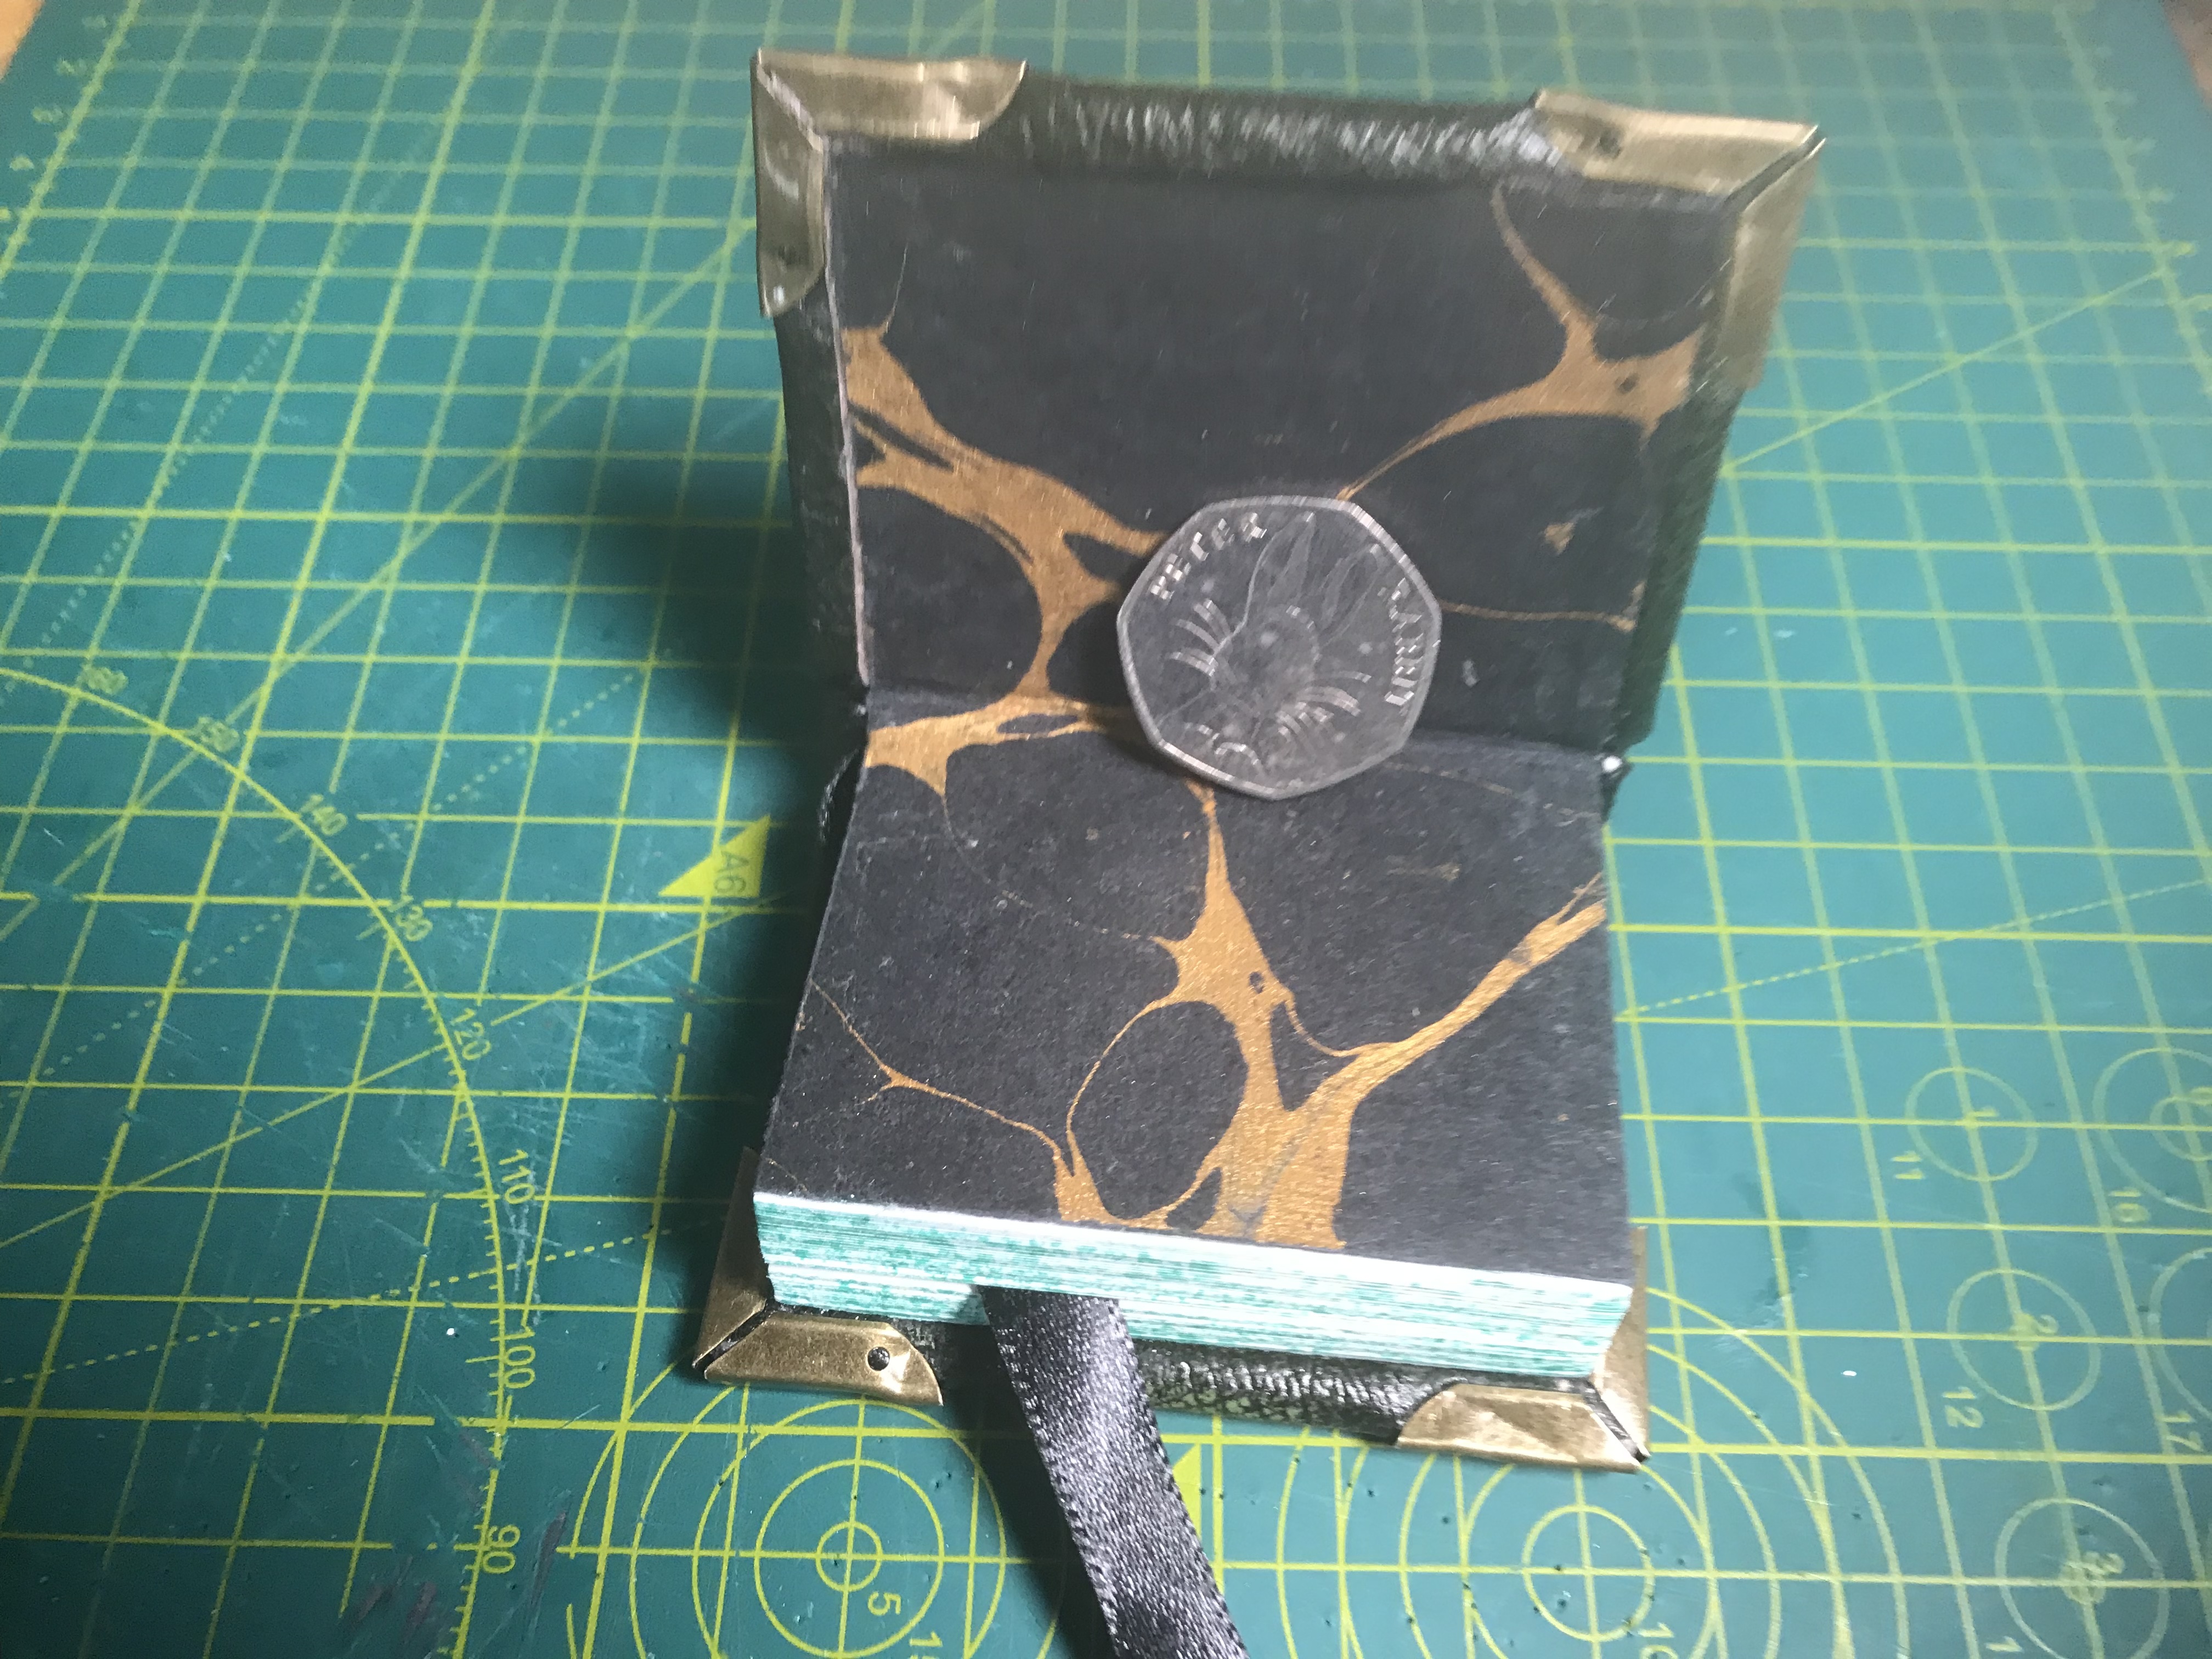
Book IV: Leather bound, hand stitched, hardback notebook with golden marbled endpapers
Chesterfield Sofa scrap leather cover, spine and pen holder, adorned with brass corner furniture
I call it the Gentleman's Jacket Pocket 'Worthy of Note' Note Book,
You see the lovely looking brass corners on that? Do not be impressed by them, you wanna know the reason why I put them on there? I screwed up cutting the leather on one of the corners and the board behind it was exposed, so I ordered some cheap brass bits on Amazon to cover them up, shhhhh, don't tell anyone that flashy looking stuff is there to cover up my screw up! It cost me £5.99 for 48 of them, so that's £0.125 each, I attached them to all corners, so for a quid I managed to hide my balls-up and give it a little touch of class at the same time.
Book V was made over the course of two nights when I couldn't sleep, it's not my best work and it's evident I wasn't giving it 100% attention as some of the stitching punch holes are off the center of the signature, the paste down on the endpapers isn't anywhere near as pixel perfect as I'd have liked, but it's got a really lovely vibe to it thanks to the tasteful cover paper and luscious deep green edge painting, it even used brass furniture as intended, and not to mask my goofy corner cutting...
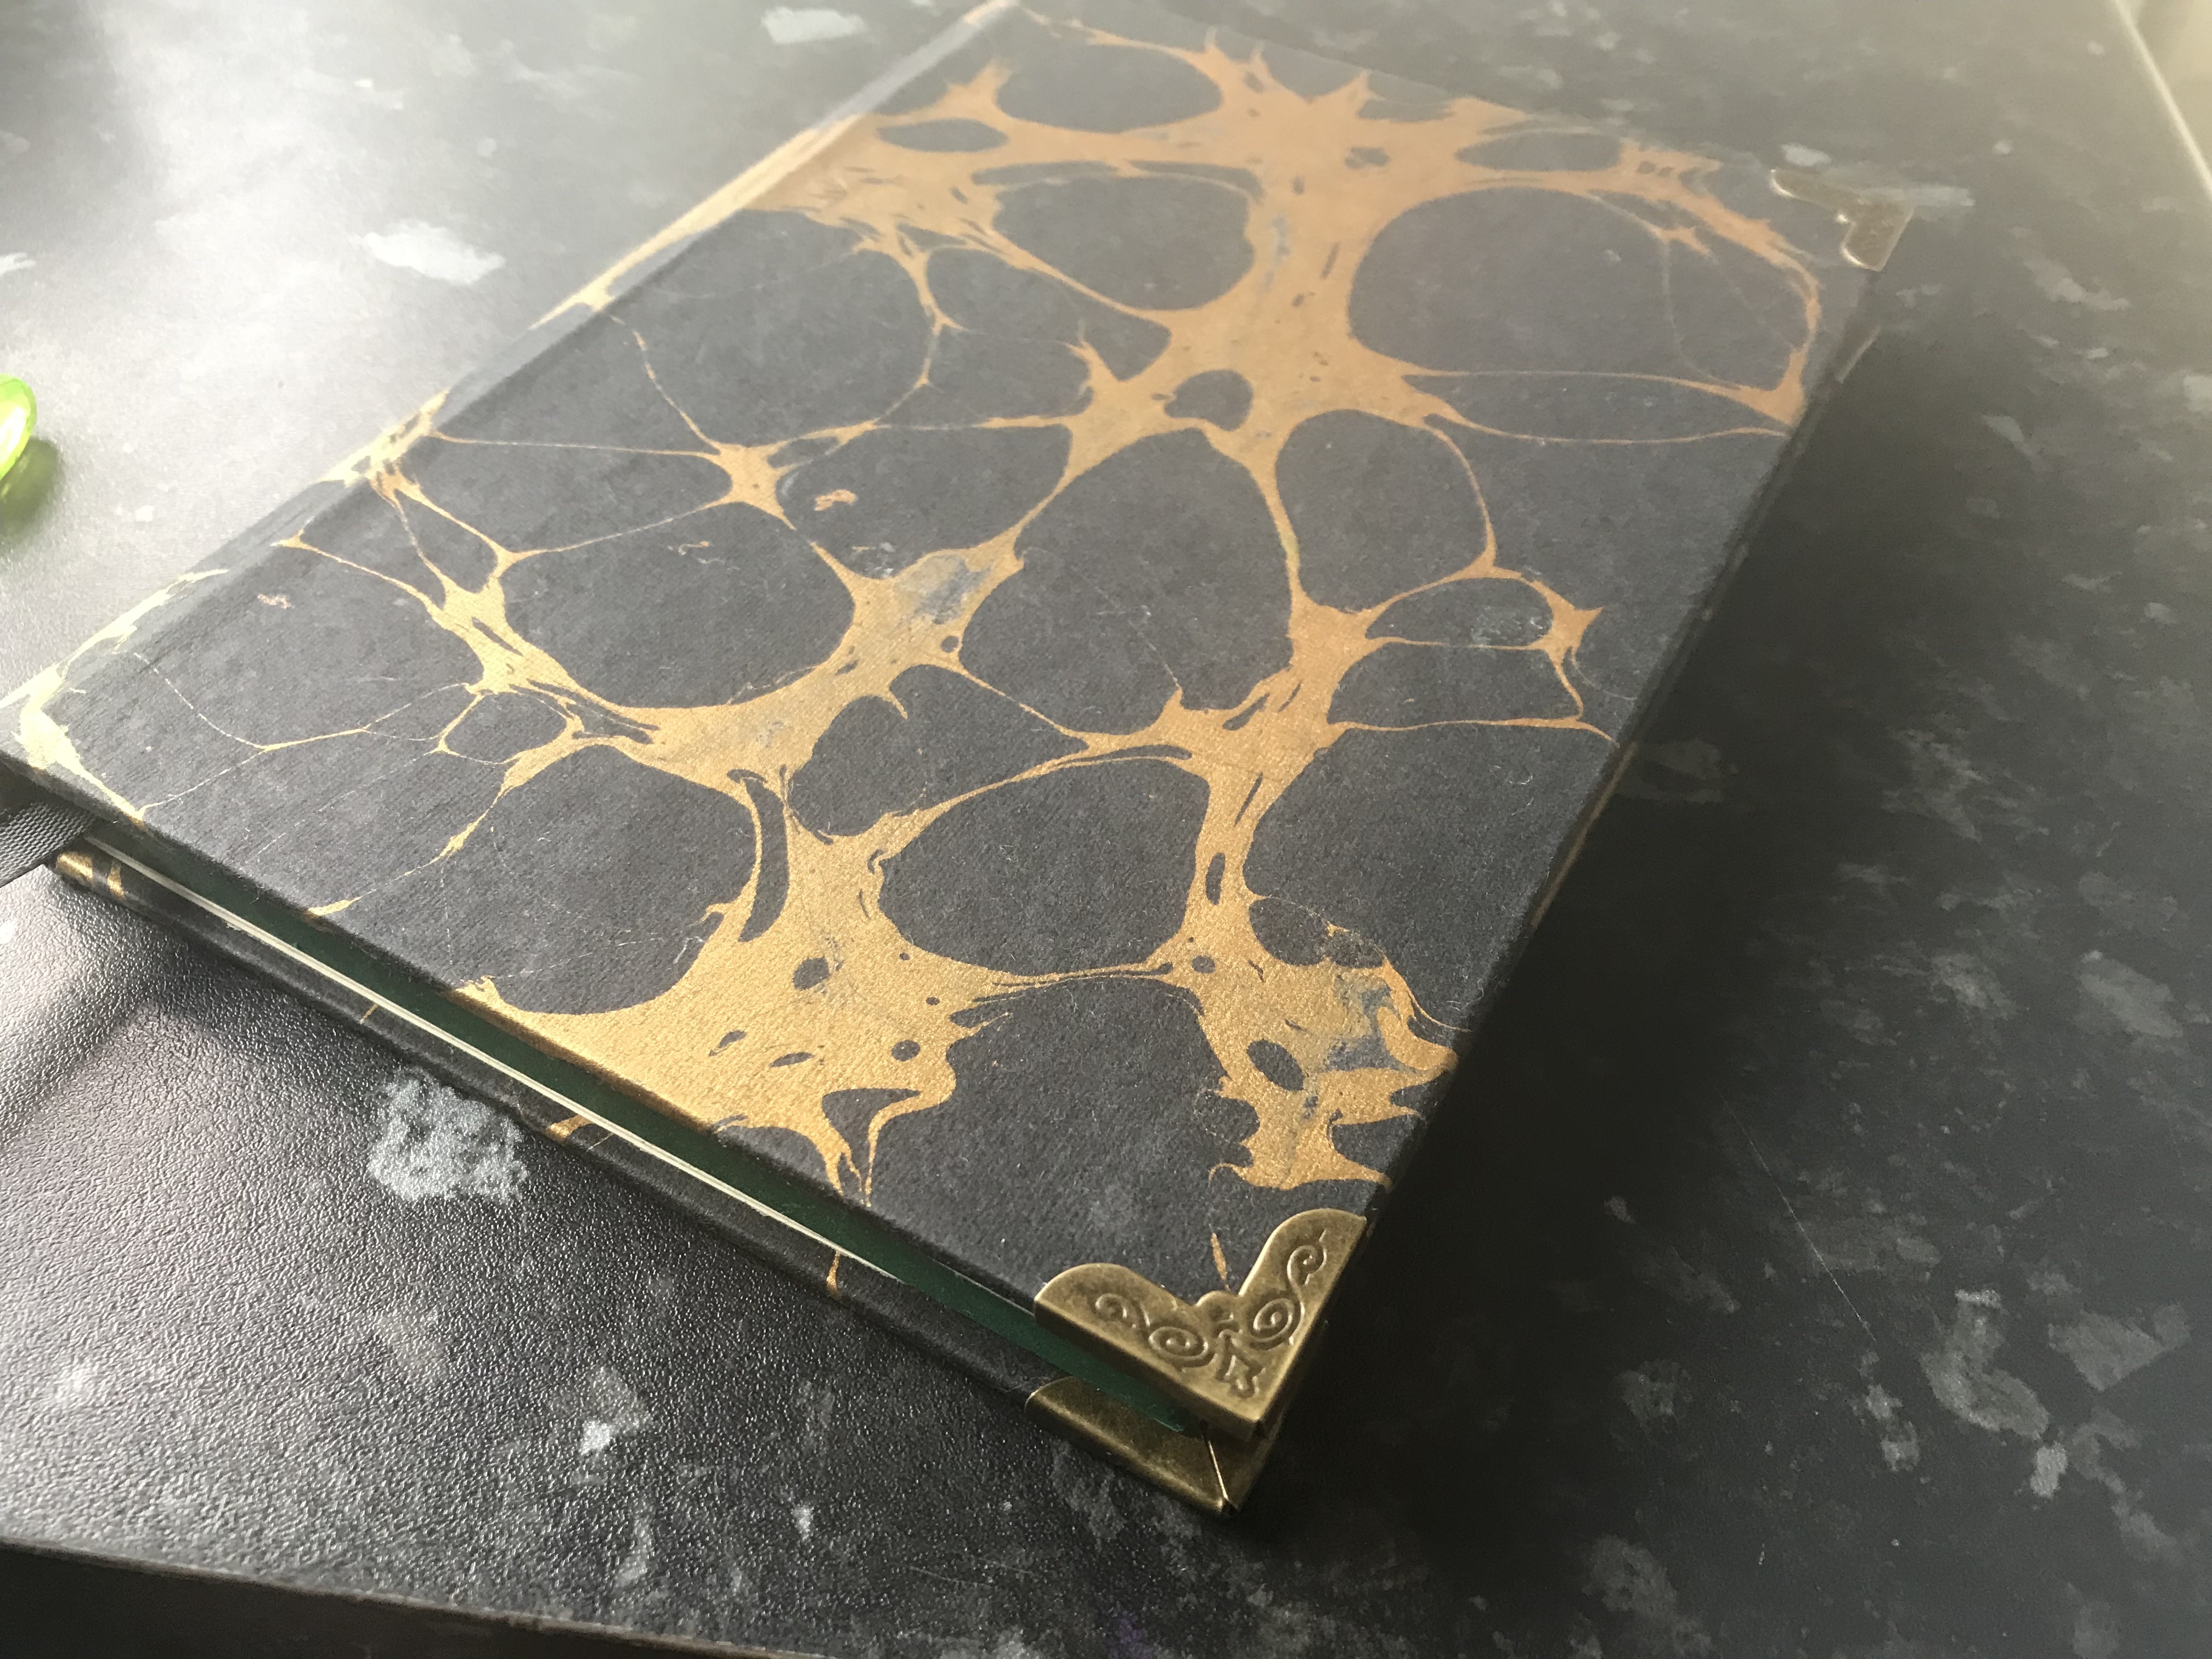
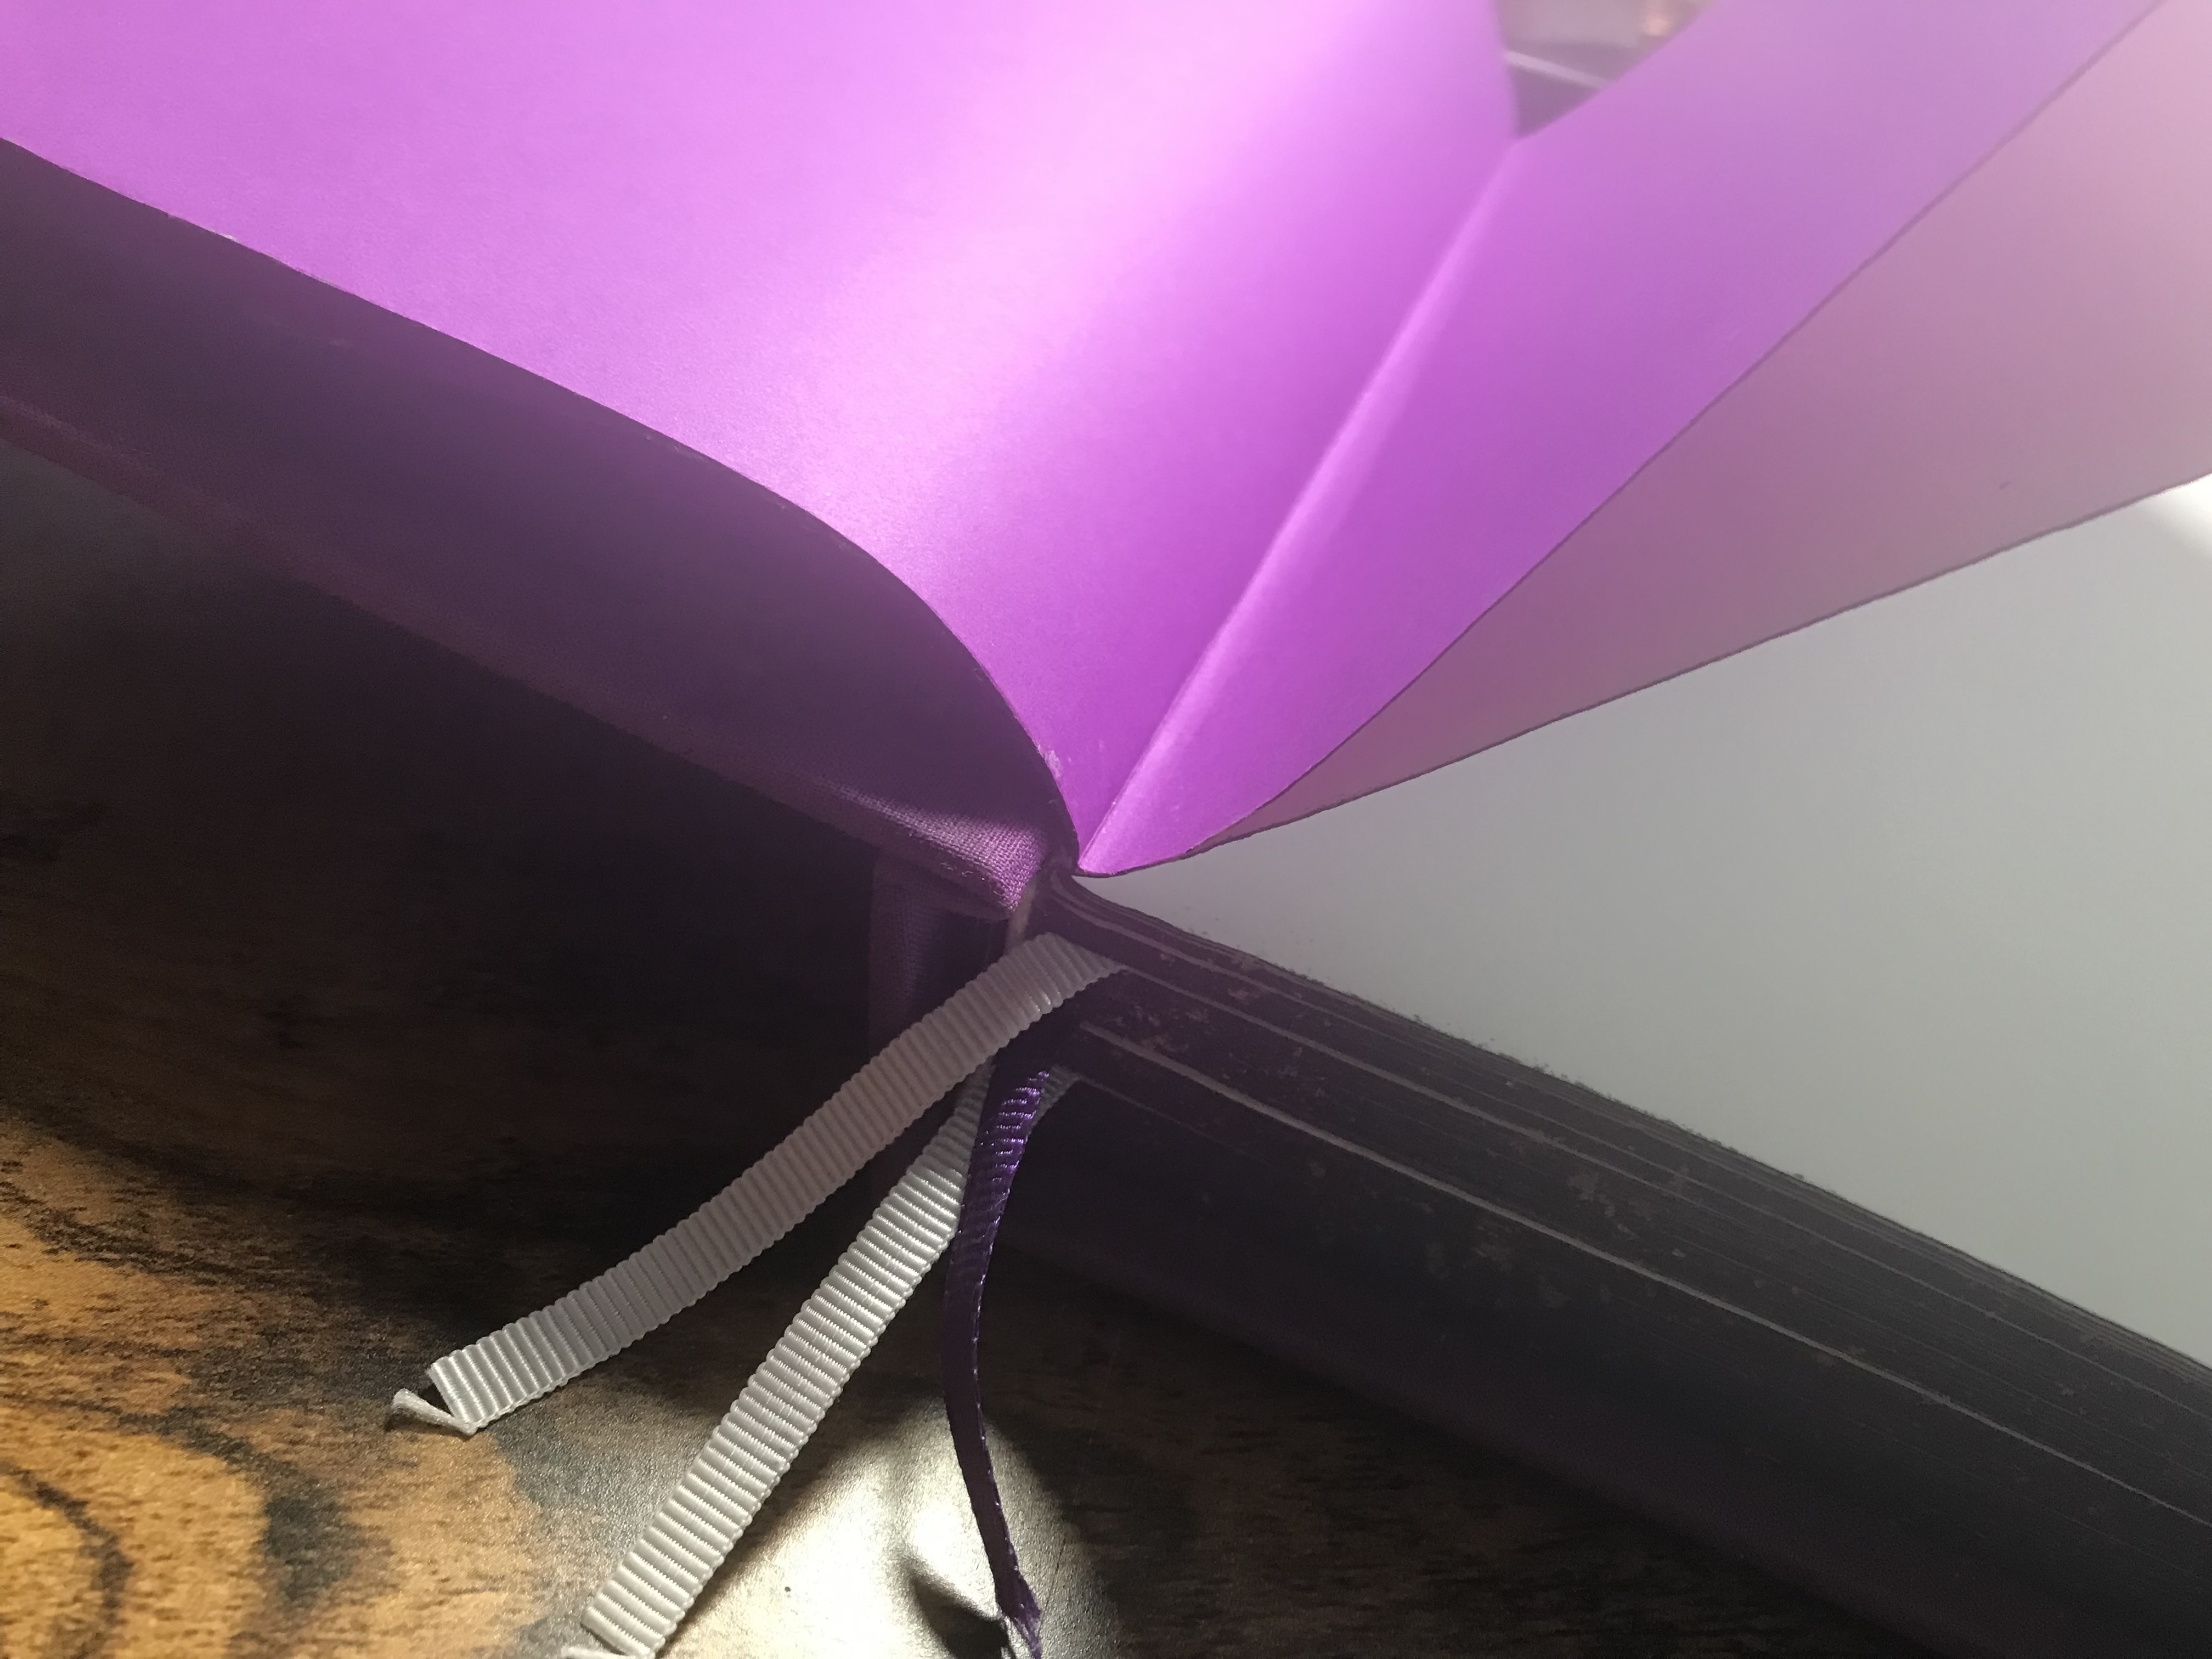
Book V: Black, Gold marbled cover and dark green watercolour painted edges
Using some of the leftover black and gold marbled paper as a cover
I'm loving that dark green on the edges, it's watercolour based and whilst it didn't stick any pages together it did bleed through deeper than just the edges; it's a right pain to mix to a consitent shade, it rubs off on my fingers when I flick through the pages; not good if that means pages get smudged, so really I'm not at all happy with it physically, but love the look of it.
Whilst many bookbinders will say watercolour is the way to go, personally I'm not going to use it again, and will revert to acrylic paint like the one I used on Book II's edges. I can sprinkle talcum powder on the pages before painting, like DAS Bookbinding on YouTube suggests, and it doesn't take too long to go through each page and make sure there are none that have been painted together, I consider turning through each page an essential part of the quality control process for future books, I go through each book with a fine tooth comb and am hyper critcial over the smallest imperfections.
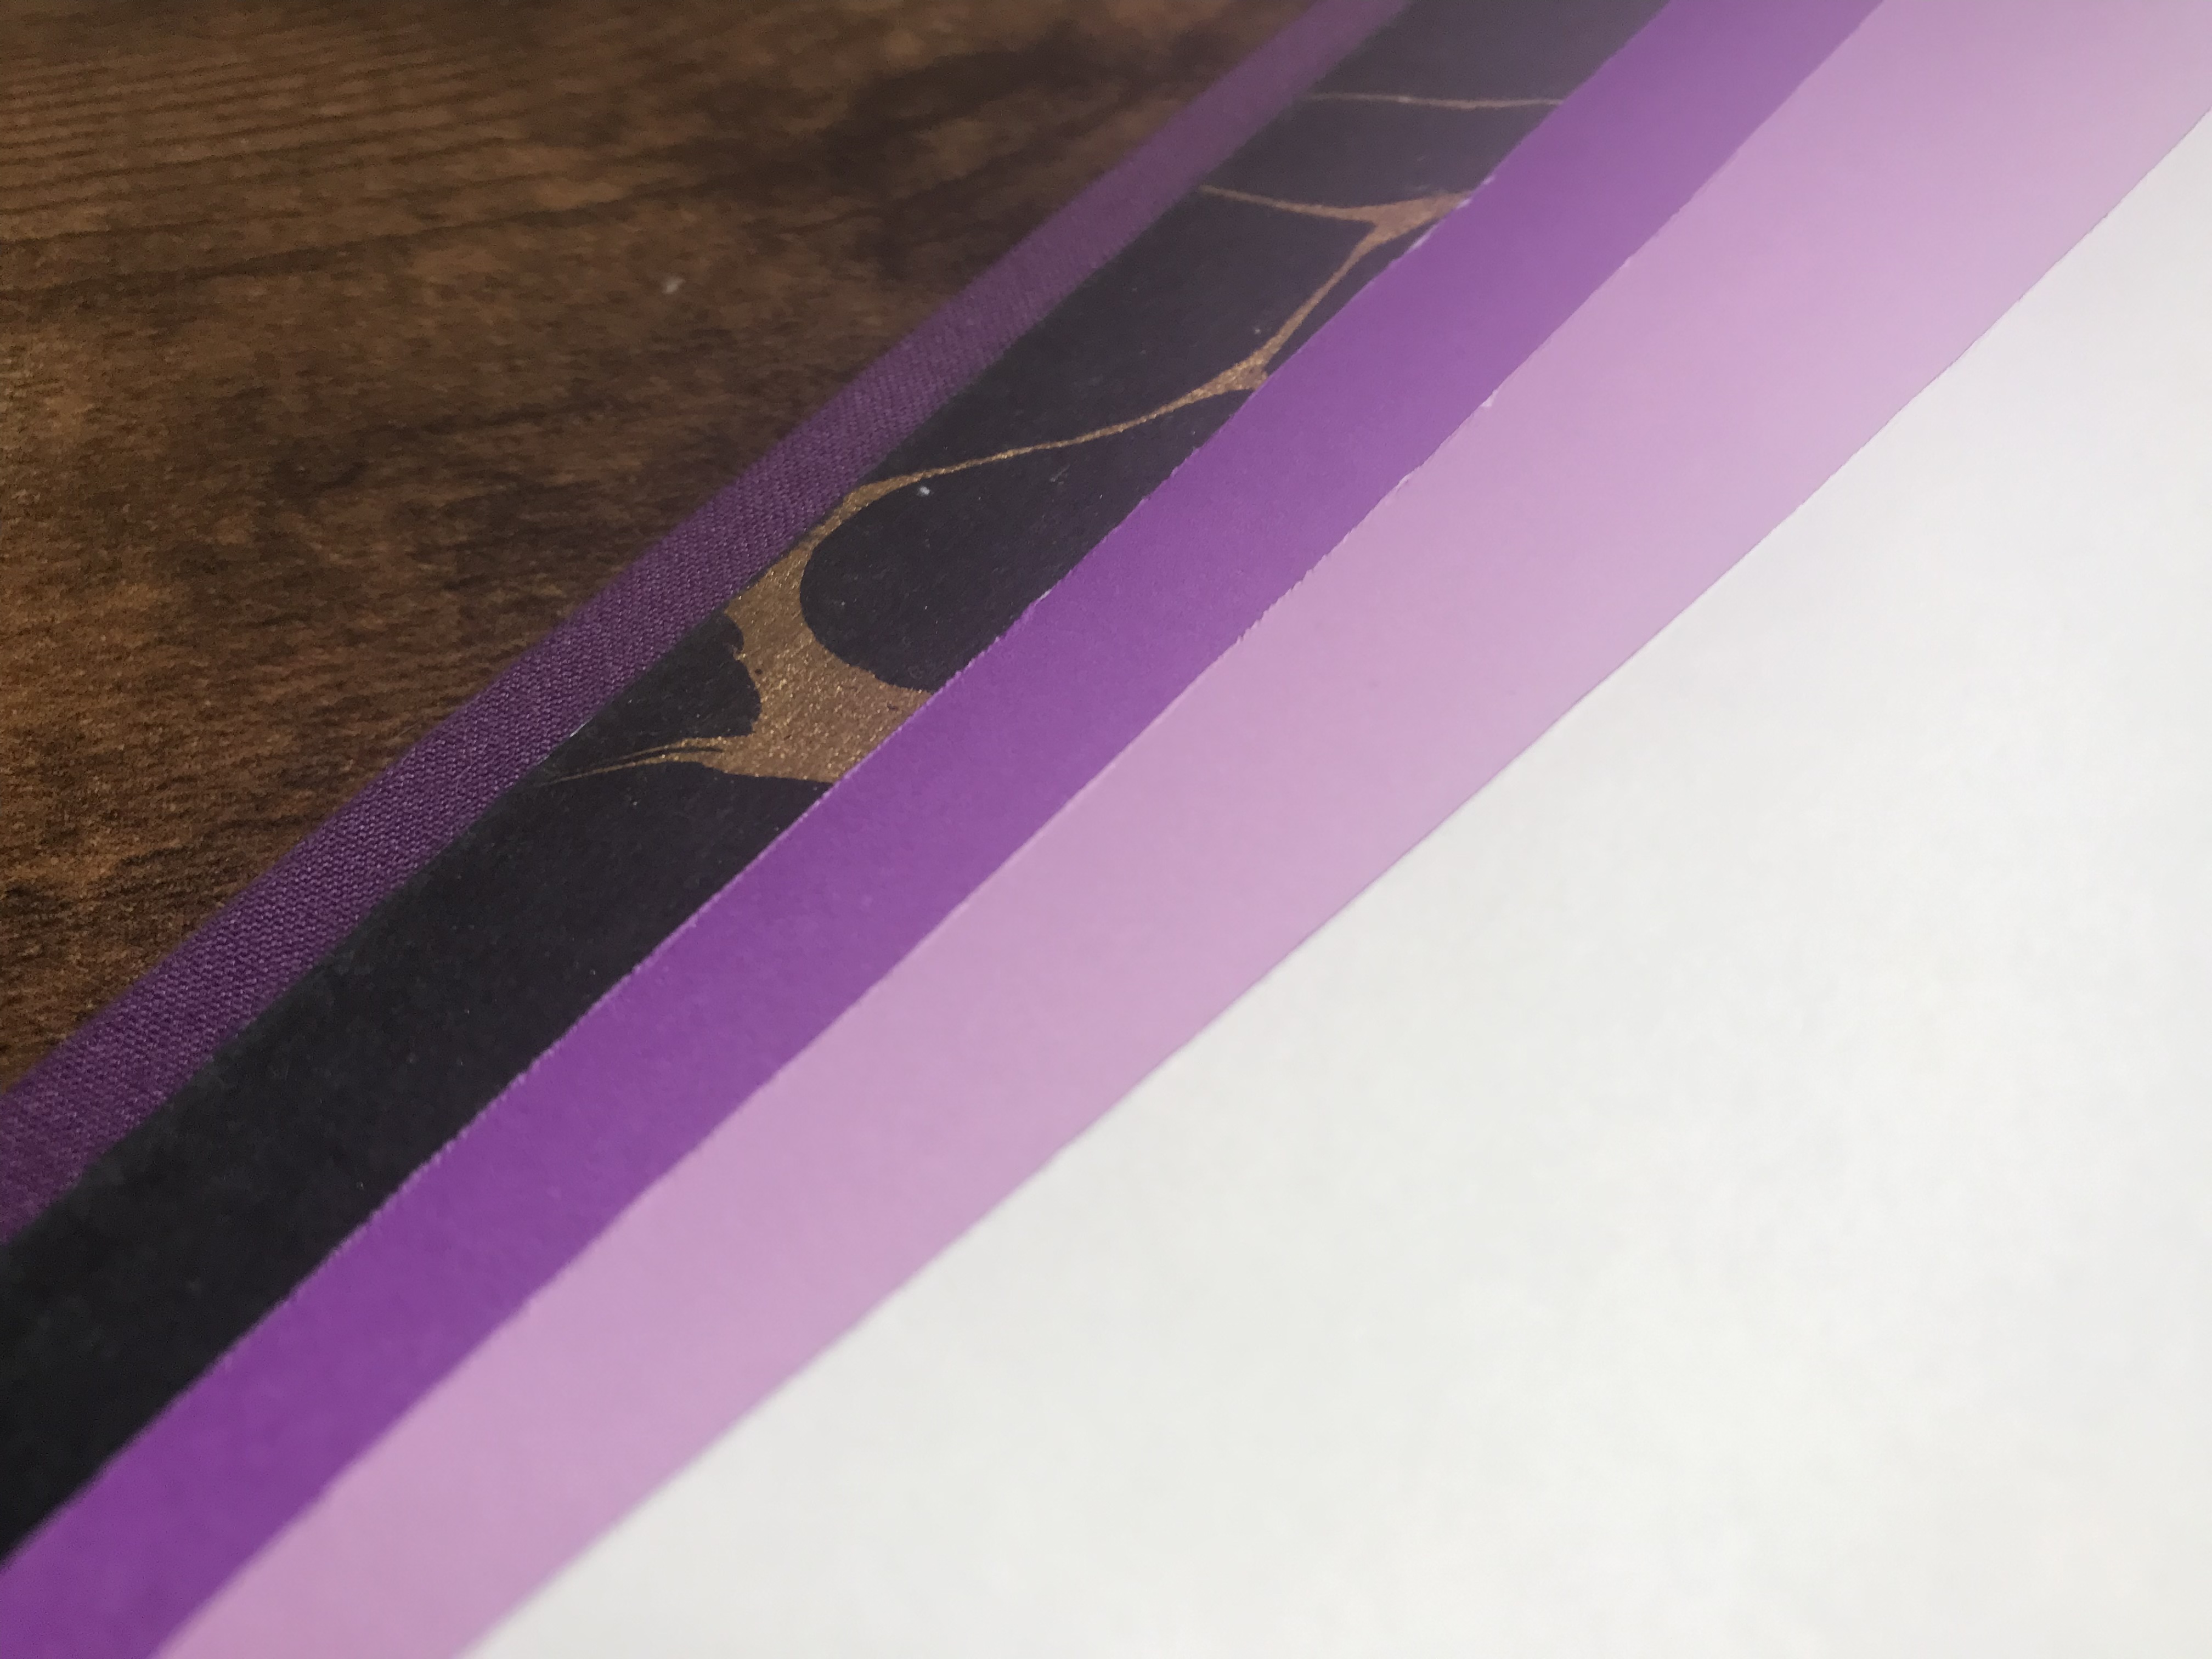
Book VI / Parvum Librum, Latin for "A Small Book" was made with just 4 sheets of A4, an otherwise scrap bit of 3,000 micron card, and a bit of leather from my bag of Chesterfield Sofa cut-offs. It cost less than three quid to make, but it feels like a lovely luxurious item. It looks and feels old on the outside, I even scuffed up the edges to help give a more antiquated effect, then made the textblock more modern feeling and give it extra contrast with my first attempt at splattering paint specks.
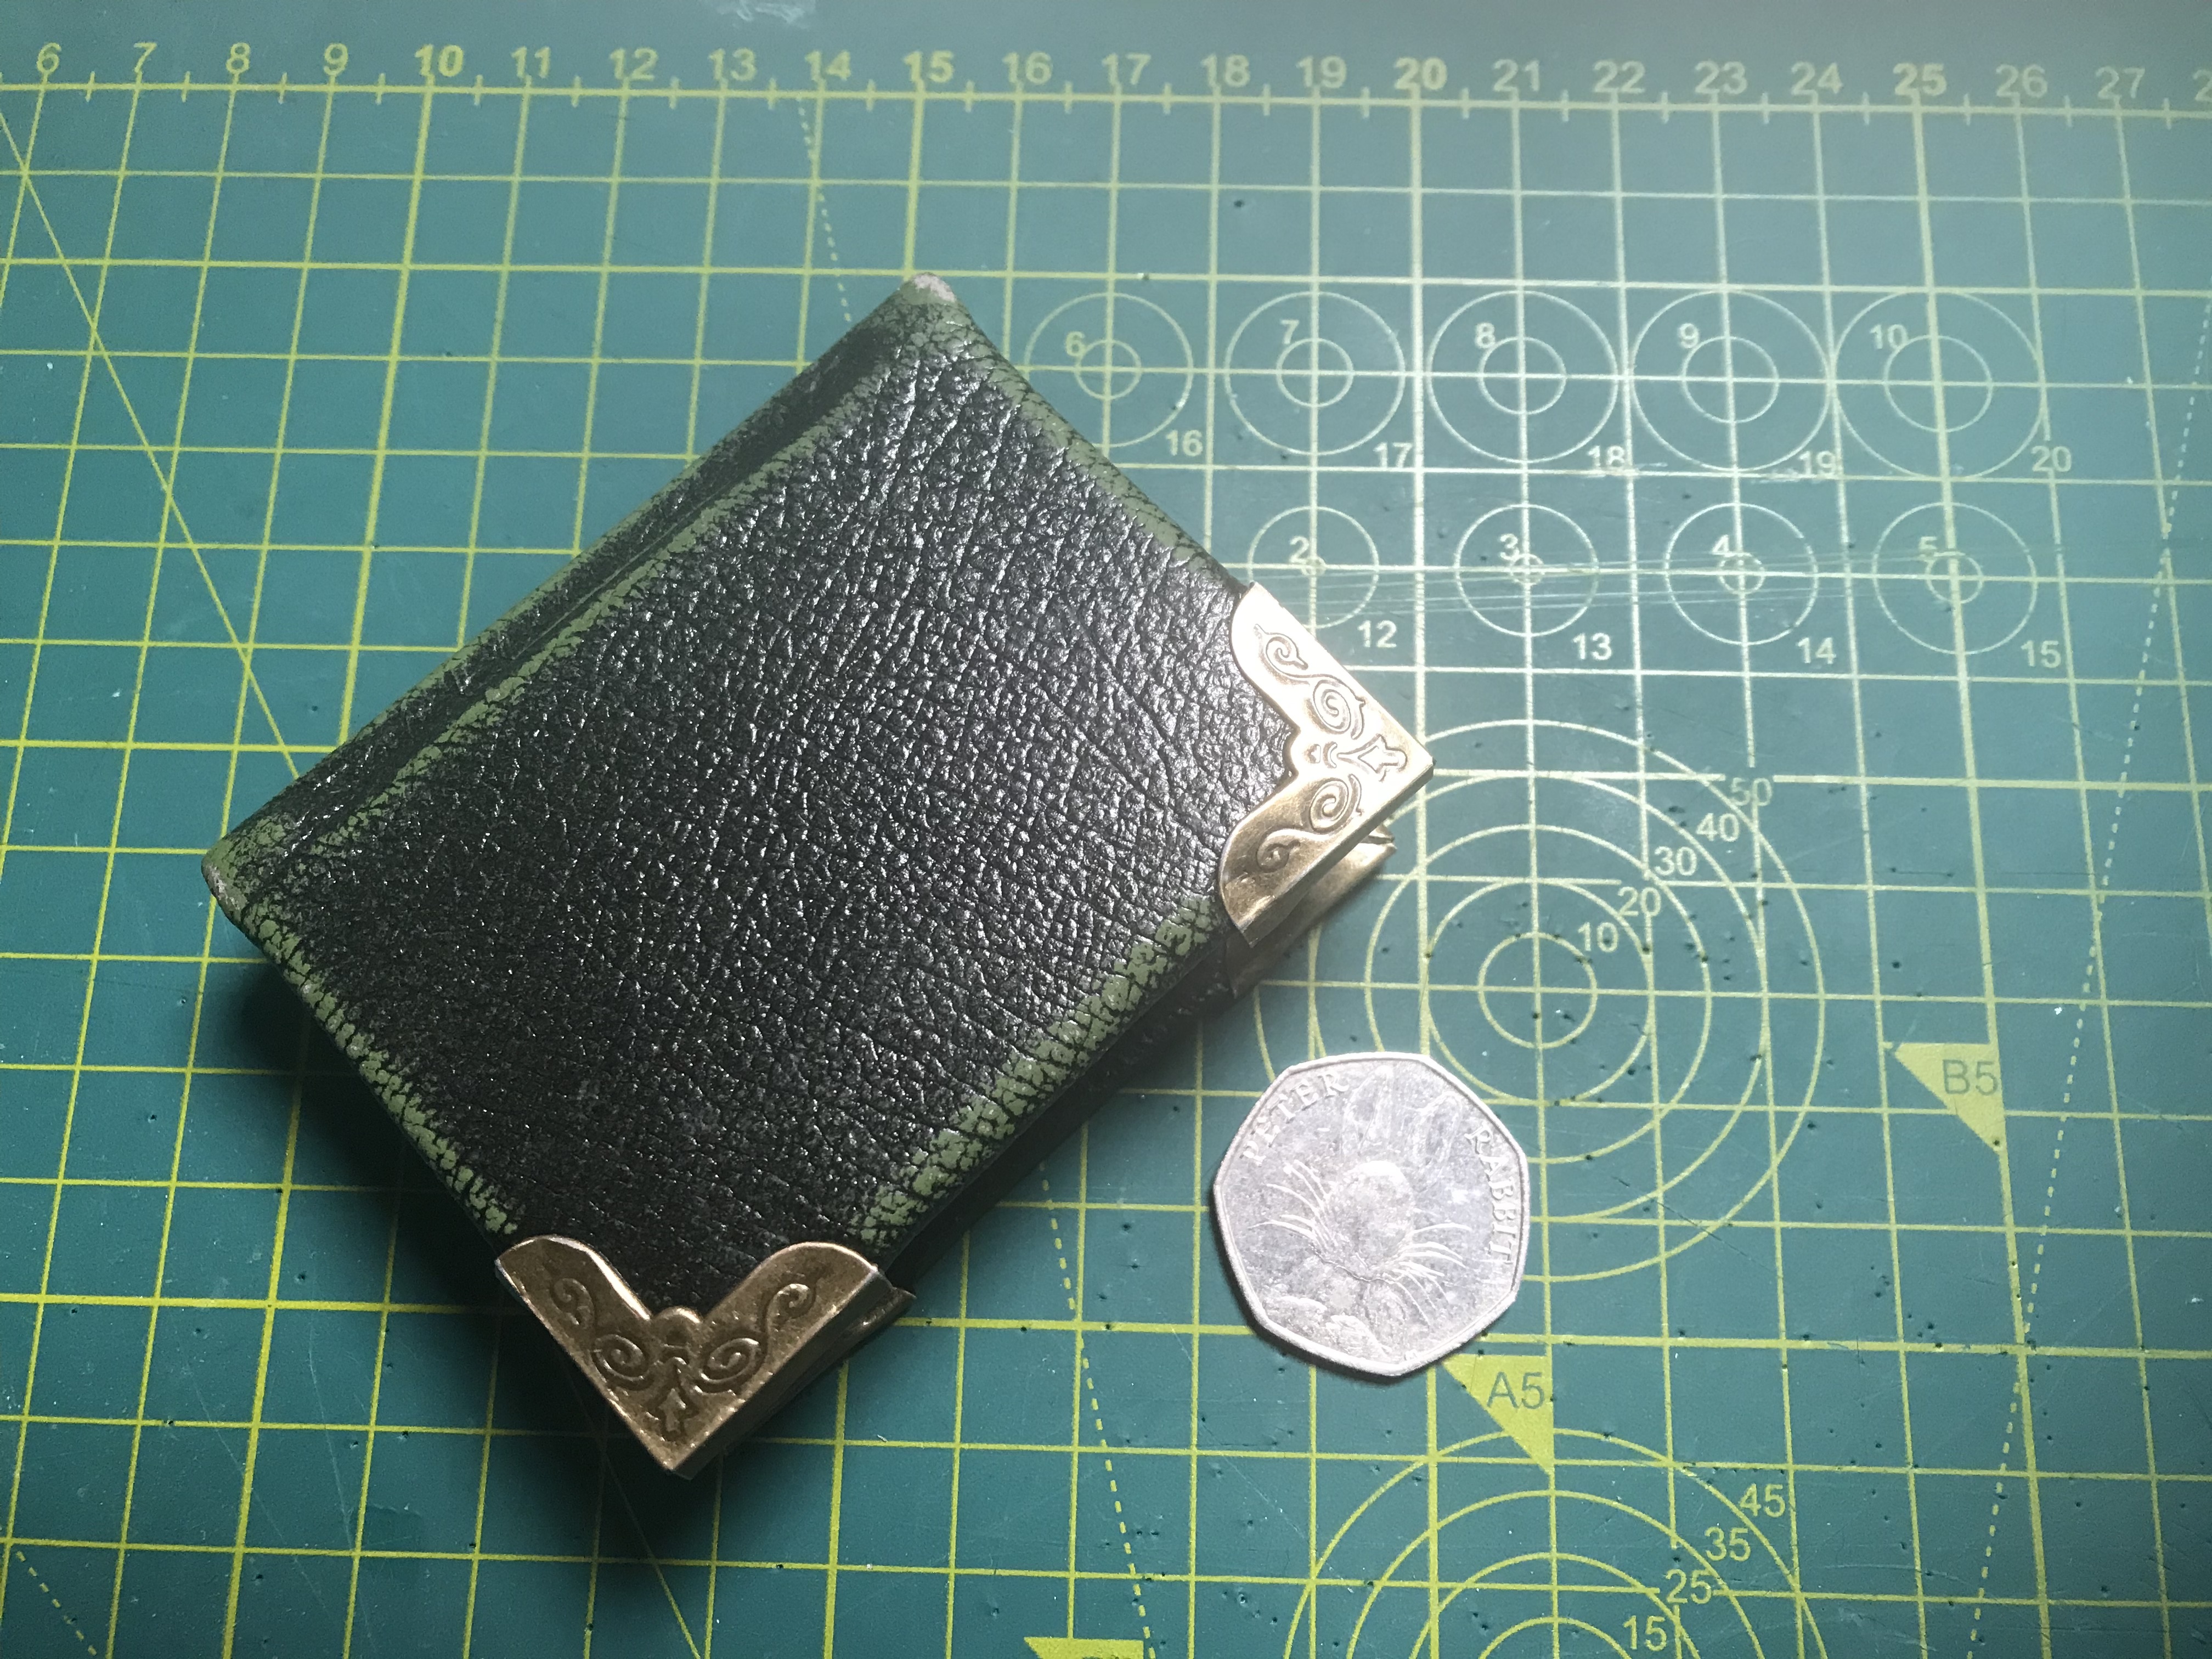
Book VI / Parvum Librum aka "A Small Book" - seriously cute but a pain to stitch and write in
Made from 4 130 gsm sheets of A4 paper, a Chesterfield Sofa cut off, spare bits and leftovers
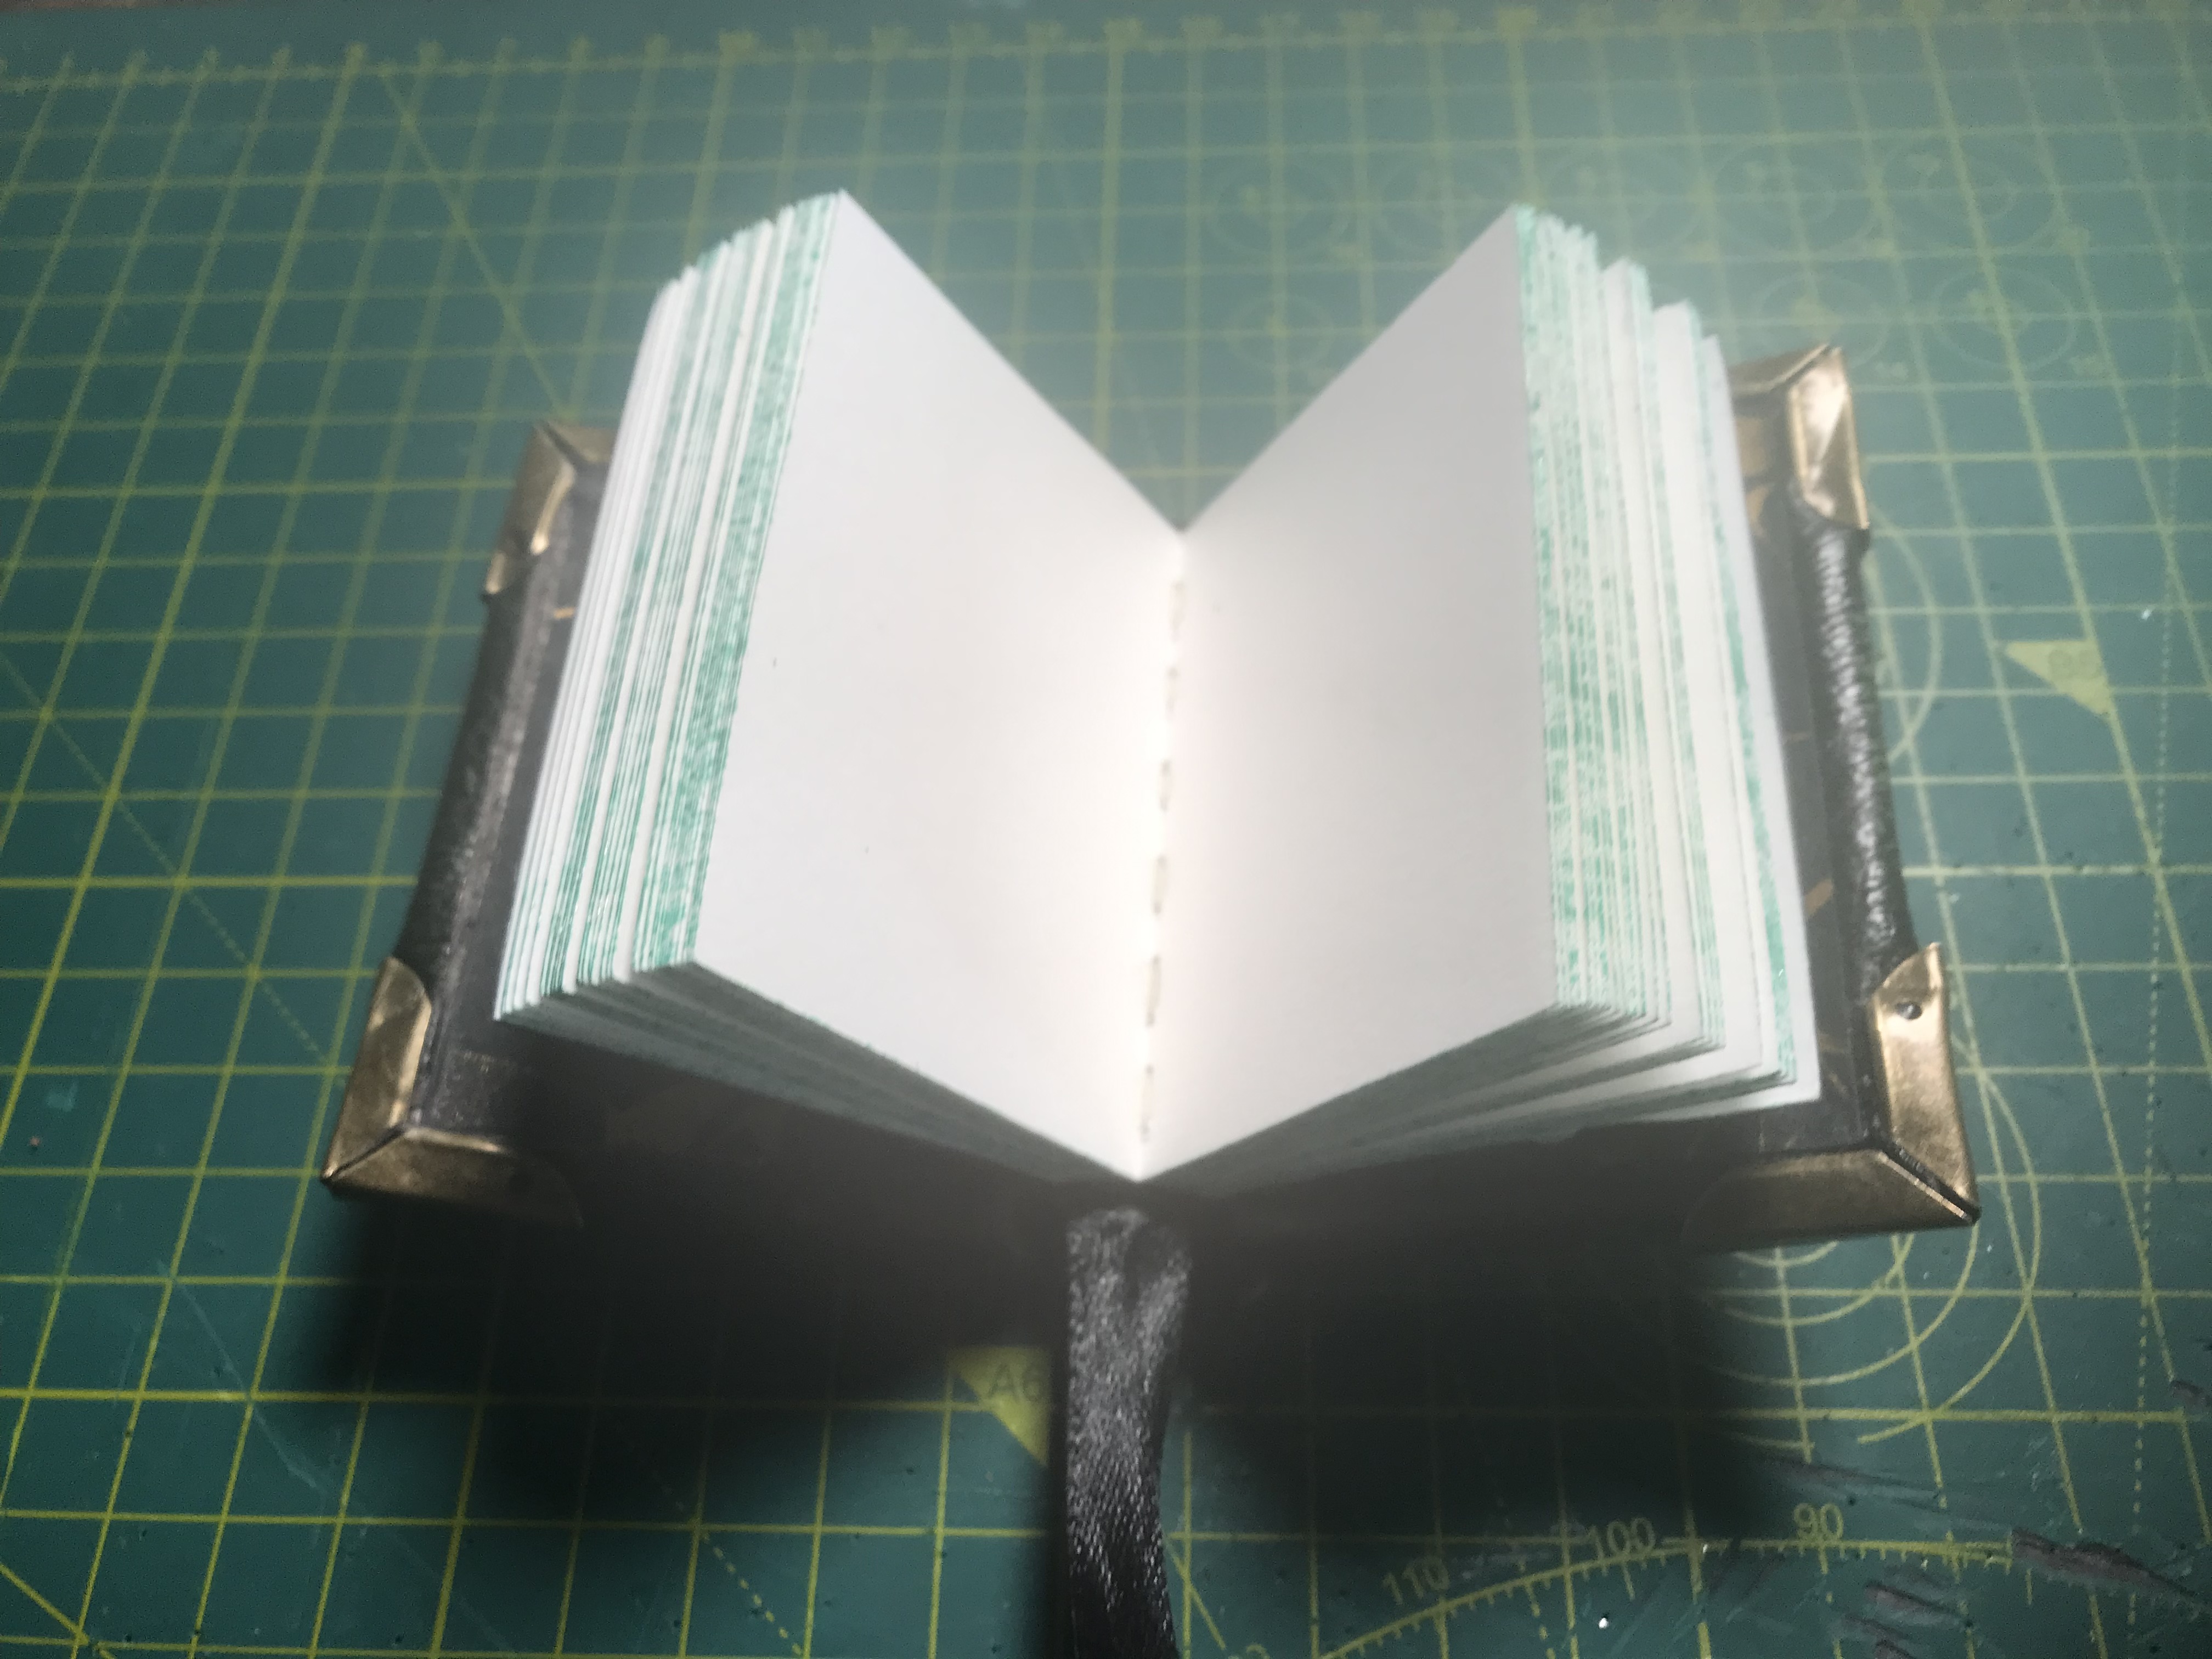
It's roughly A8 sized and has 124 pages with marbled endpapers that are fully glued to the text block to create a made page. The outder dimensions are 77 x 62 x 22 mm, and the dimensions of the text block are 67 x 50 x 16 mm, it's a featherweight 66.2 grams, and there's an insane 12 stitch punch holes in each signature, German Kettles at the head and foot with French linked stitches between. It took several hours as the stitching is the most intricate thing these clumsy hands have ever done! YouTubers never show the bits where they're using an awl to undo the last few stitches because something just didn't feel right...
My Vision for Liber VII:
I've fallen alseep for several consecutive nights now with my mind's eye painting pictures of how I want this book to look and feel. I love the priocess of imagineering something into existence.
- Colours: black, real 24k gold, copper and dark greens: it's mature and subtly exclaims sumptuous, luxurious, quality, think "Gentleman's Club" for the sophisticated vibe I'm aiming for
- Format: A5 Hardback - A5-ish, boards will be slightly bigger, the text book trimmed slightly smaller
- Cover: "Buxton Black" Vegetable tanned, full grain, goat skin leather
- Must be longlasting and durable - archival grade acid free paper should last for 1,000 years ( Source: Preservation Equipment Ltd )
- Has to be strong and solid, be somewhat weighty and feel like a trusted lifelong companion
- Must be beautiful to behold in all senses ( except taste, cos it'd be weird to lick or eat a book, I mean I am weird, just not that f***** weird - yet... )
- Sight: must look stunning from every perspective
- Sound: must have a crispness to the pages that sounds lovely upon turning and flicking through the edges
- Smell: must have a sublte but lushous rich leather olfactory note, I'm not expecting it to age into having that "old book smell" as that comes from acids and lignin in the materials breaking down, and the ingredients are mainly acid-free for longevity
- Touch: must feel luxurious, inside and out, with a number of different complimenting textures
- WOW factor! If it doesn't have it, what's the point? It's not just a book, it's a sensory experience!
- 216 pages - excludes 2 at front and 2 at rear which are used to bind to the covers in "paste-down"
- 55 sheets / leaves A4 ( 55 * 4 pages per leaf = 220 pages )
- 5 folios per signature ( 4 pages per folio * 5 = 20 pages per signature )
- 11 signatures ( 11 signatures * 20 pages = 220 pages in total ) - I'm going for an odd number of signatures so that the middle reference ribbon can be placed in the absolute center of the book in the heart of a signature, that way the green thread can also be seen
- French link stiching over tapes with French bookbinding linen thread
- German kettle stitching at the head and foot
- Should open and close nicely, folding flat when opened and feel well balanced throughout
- Suede on the inner covers ( like endpapers, but suede, and to protect both the textblock and endpapers, absolute overkill I'm sure but it's a concept I want to explore for the tactile sensations of going from leather, to suede, to marbled paper, then fly leaf and finally the text block, with each layer in that book sandwich getting thinner down to the 130gsm acid free core )
- Stunning endpapers ( hand marbled )
- Contrasting head and tail banding ( white, just so it stands out )
- Contrasting reference ribbons ( plural as I plan on using three )
- Fly leaves that compliment the marbled paper and general vibe
- Pixel perfect / proper 90° corners on every dimensional axis, endpapers equidistant from the top; bottom and sides, endpaper corners being aligned with the corner cuts on the leather )
That is truly quite a big ask! Can I pull it off? Dunno till I've tried but I saw a hardback book from Waterstones this week which had a visible fold in the text block, and a tear on the outer cover so whatever I produce will hopefully be better than that! Quality control failed on that book twice, once at the manufacturers where nobody noticed that between the creation of the text block, and the finishing job of adhering that to the cover, something had applied enough pressure on the text block to leave a fold mark on every single page, and it failed again at the dispatching warehouse where human QC didn't spot the torn edges.
Worse case scenario is that it's a bit of a screw up in places, if that happens I'll just gloss over any issues with gold or brass so nobody ever knows. Yes, there's potentially a certain element of Kintsugi going on there, the Japanese art of fixing things up with gold to make them more beautiful.
Tools and bits in my Bindery:
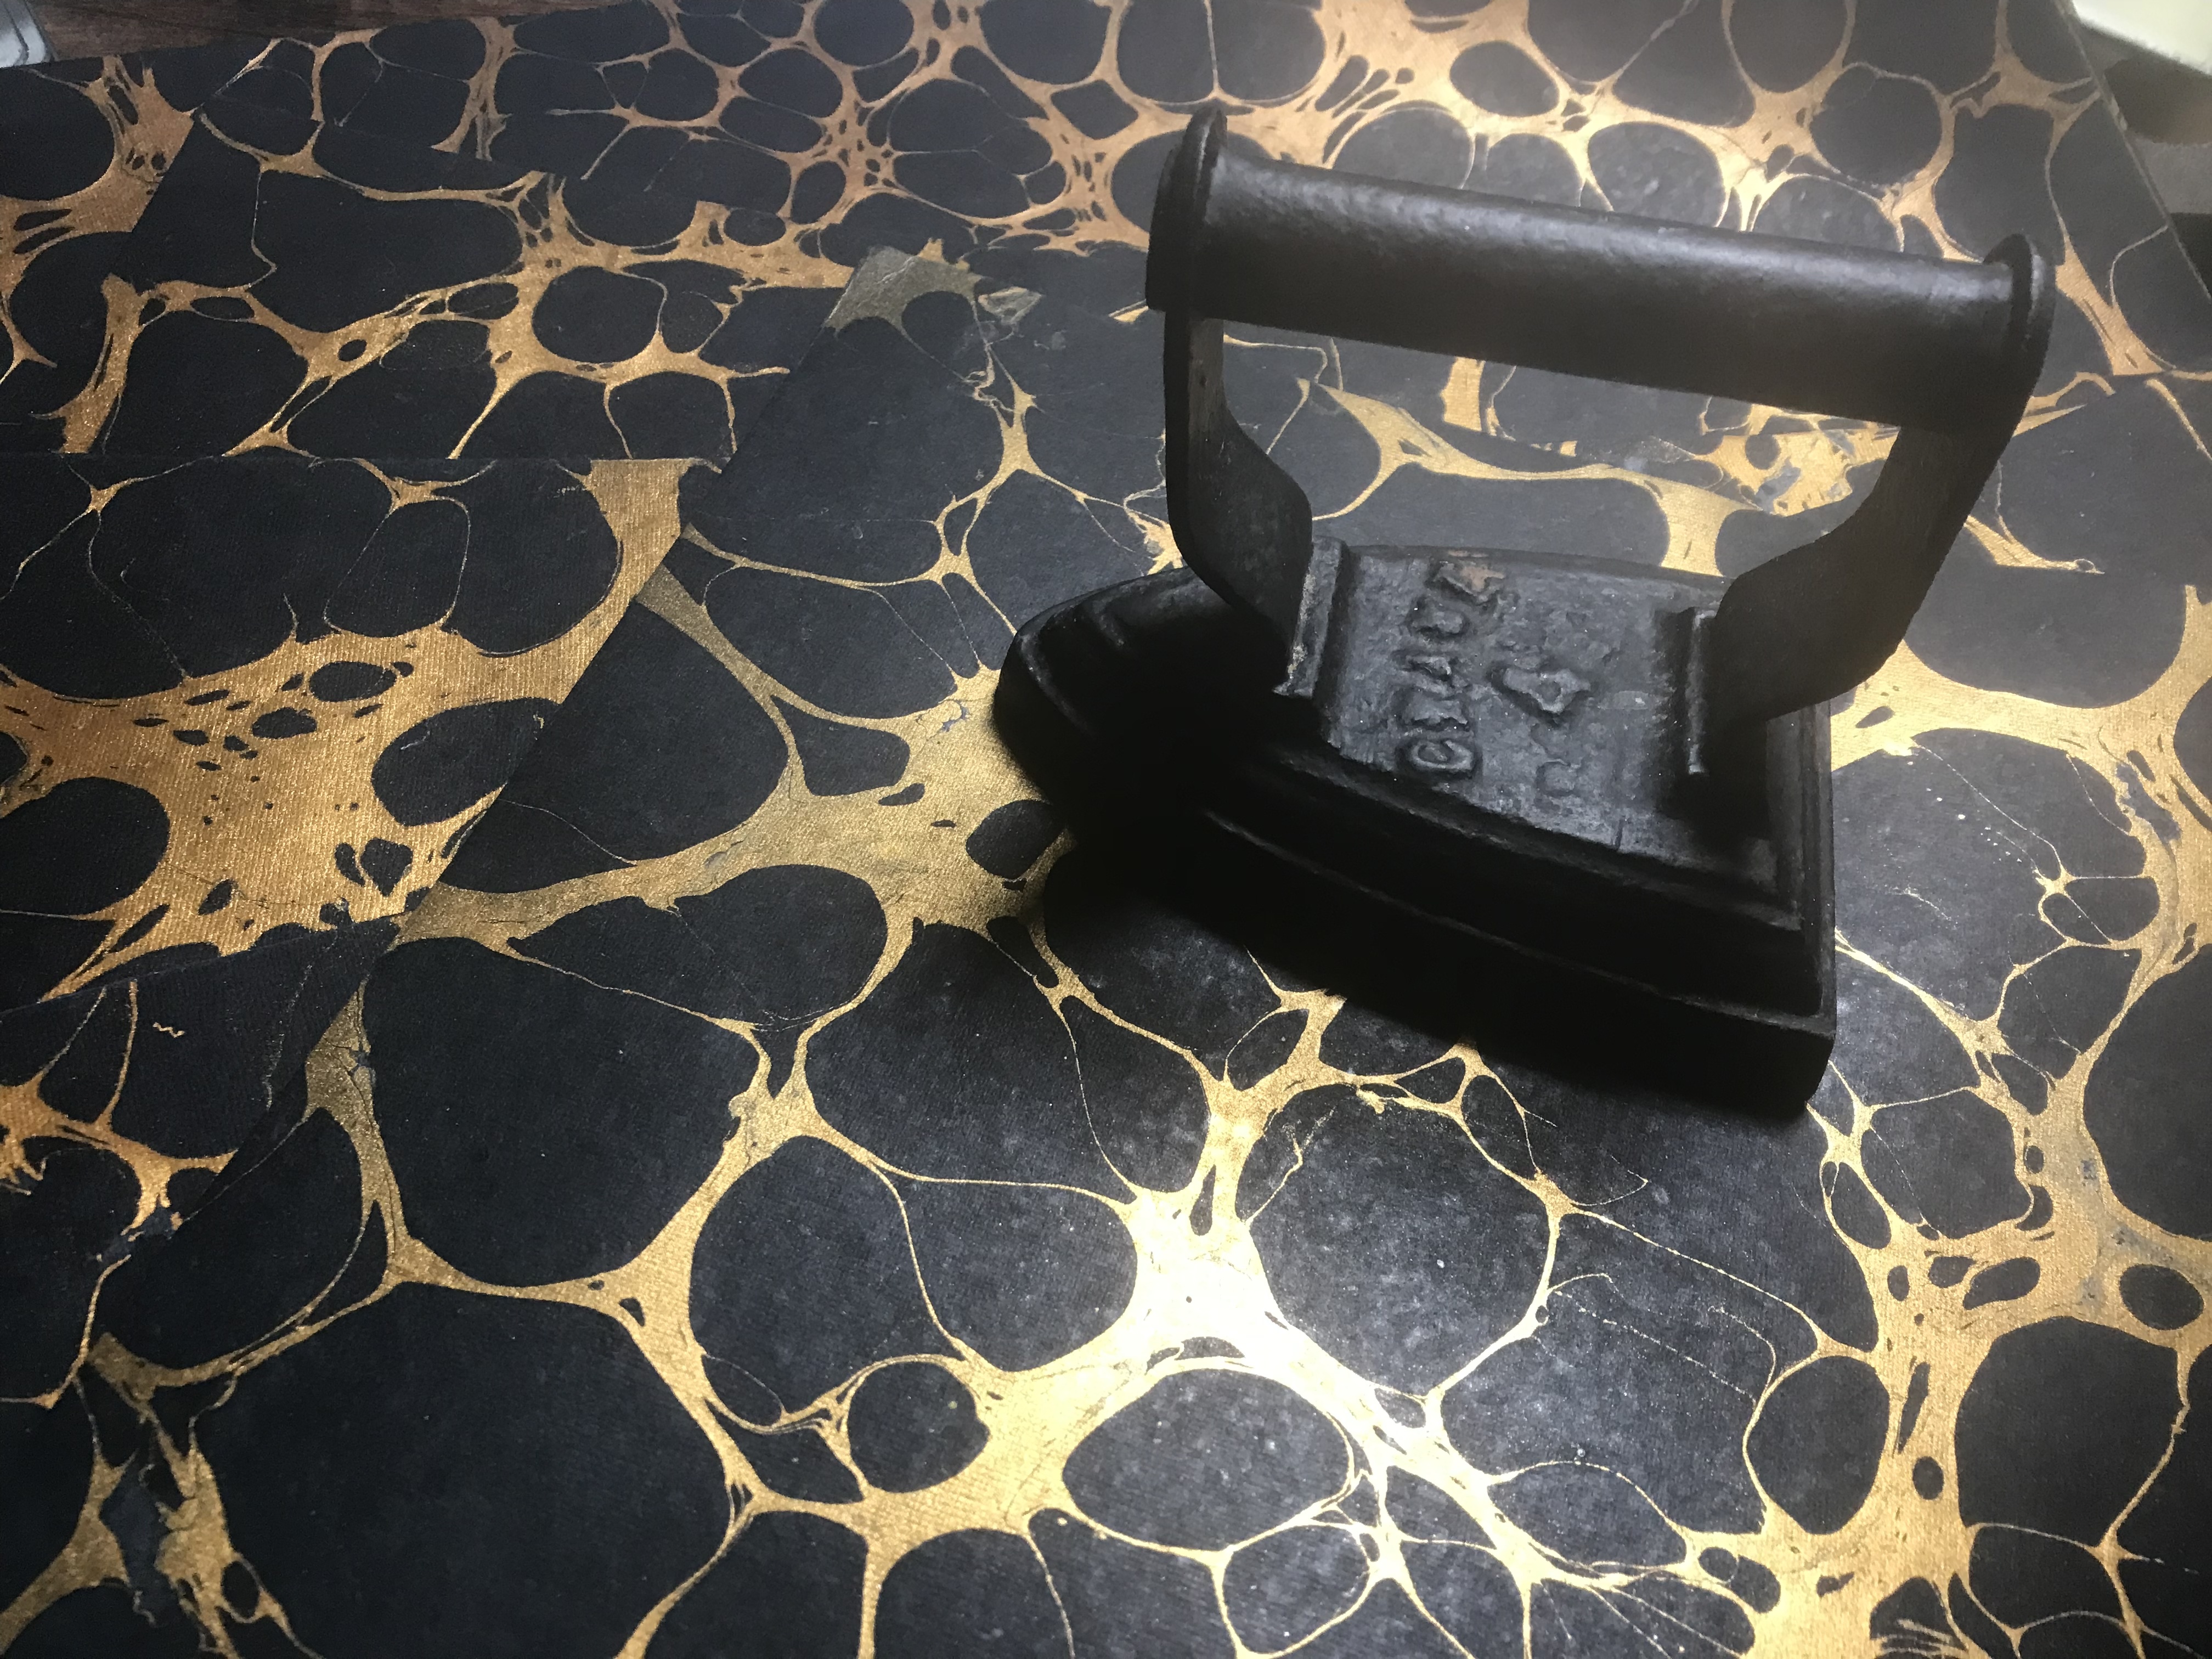
Stash of marbled from a 'paper dealer' and an ancestrally antique cast-iron iron
These decorative papers have a back story about the imperfections and how they ended up on a high street
I'm a little tired of using that style now, I've used it on bookmarks, endpapers and covers, but couldn't resist buying every sheet in stock at a nearby store, and I've even more spctacular marbled paper lined up for the next book:
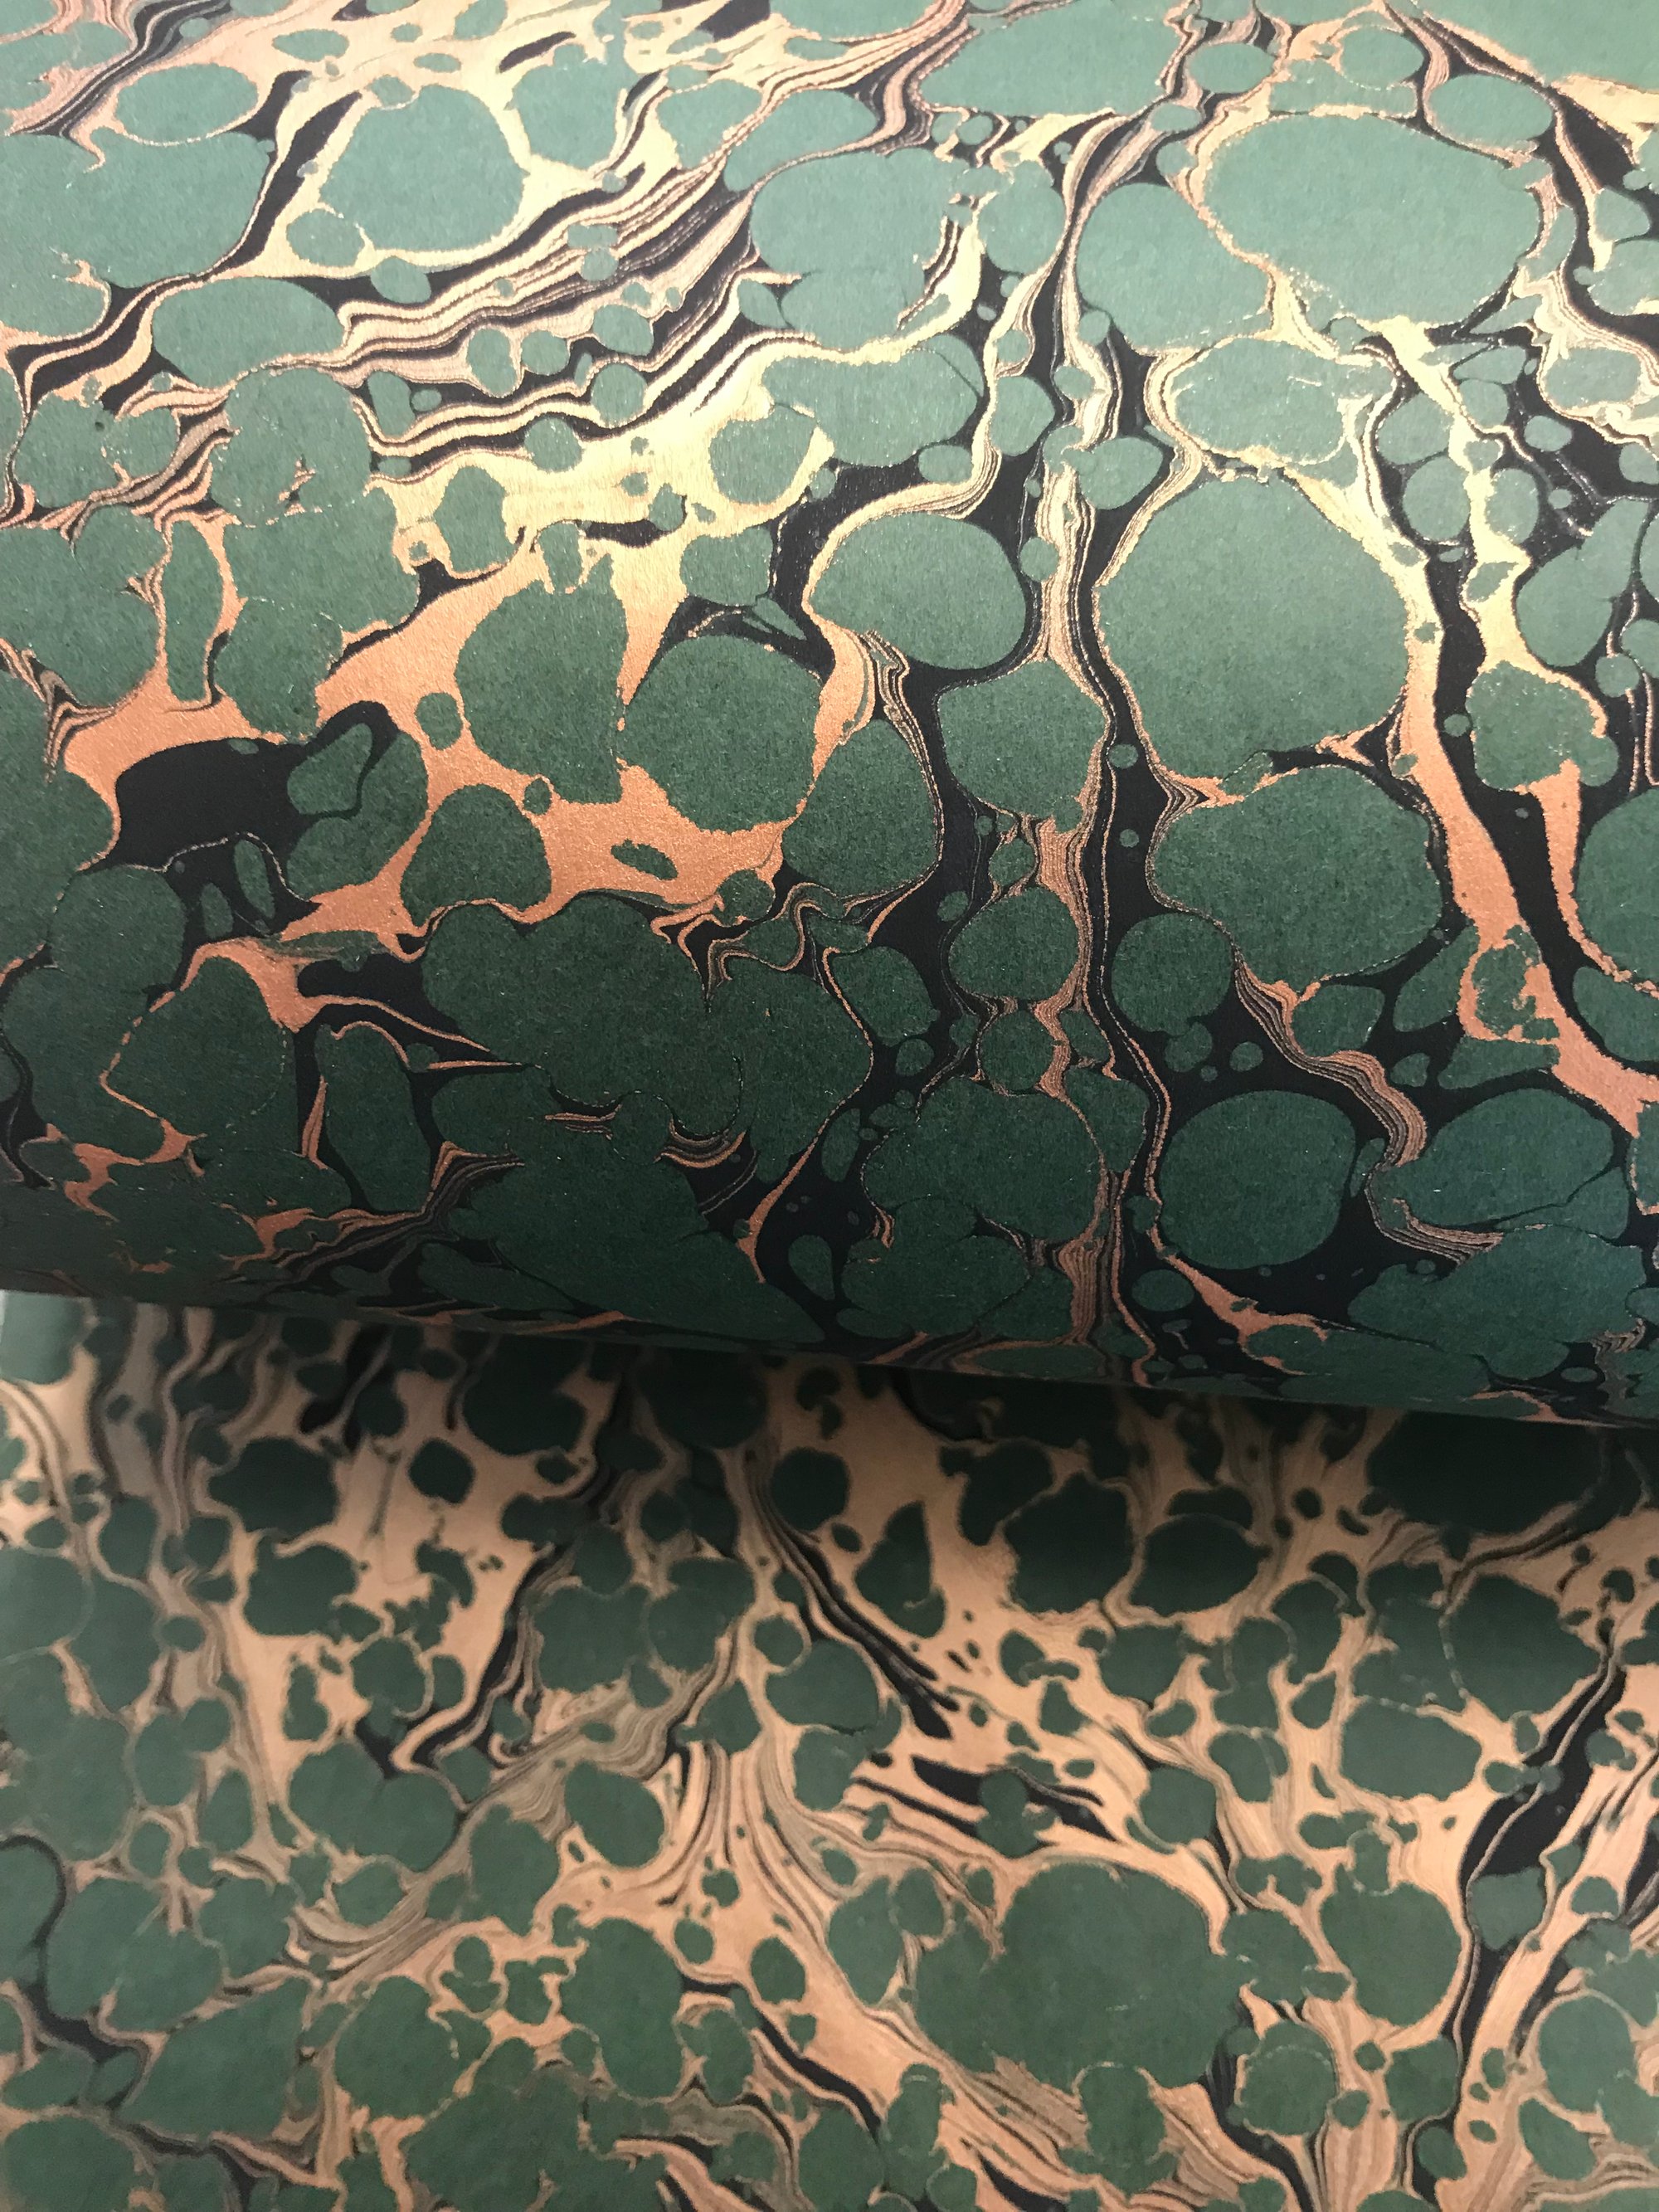
Marbled paper #87 Copper & Black Vein on Green - hand crafted by Jemma Lewis
Endpapers for Liber VII, I love it, it's stunning and this picture does it no justice
My current inventory:
- Self-healing cutting mat
- Precision Knife / scalpels
- Leather pairing / skiving knife
- Fiskars rotary cutter - I can't recommend these cheaper ones, they suck, just get Fiskars to start with
- Thread snips
- Shepherds of London Bookbinder's needles - Standard and Mixed, sizea 15 and 18
- Book Press - 380 x 38 mm for edge trimming and edge painting
- Another Book Press - 275 x 175 mm ( sold as a "flower press", it works, but it's too lightweight and makes me want a Victorian cast iron press that's really heavy! )
- A big hefty stack of books on Acting, 2 x 5 kg and 2 x 3 kg dumbbells plus antique cast-iron iron
- Awl x 3
- 100% natural beeswax
- Bone folders
- Safety ruler ( rubber backed so it doesn't slip around )
- Engineer's square
- 3D printed signature hole punching cradle ( an upgrade from my original cardboard template after Book V's stitching punches were not to my satisfaction, this gets a much more consistent result )
- Homemade corner cutting jig
- Tweezers with PVC tips
- Greese proof paper
- Scrap paper
- 28 different types of thread
- 70 sewing needles
- Brushes for adhesives and paint ( warning: cheap brushes will leave hairs )
- Sieve for gilding speckles
- Agate burnisher
- Chinagraph pencils for marking out leather ( I'm old enough to remember editing audio on 1/4 inch tape with these... )
- Leather
- Suede
- Marbled papers
- A paper stash of varying colours and grammages
- Strontium Aluminate ( glow in the dark paint pigments )
- Silver and gold leaf sheets
- My workspace also doubles up as my Voiceover Studio and has amazing acoustics...
I want to make something unique and spectacular, no point in halfways here. In for a penny, in for a pound, as they say, except it's not just a pound, it's getting somewhat costly...
Materials and Costings:
- Paper for the text block
- Snowdon Bookpaper from Shepherds of London
- 130 gsm
- A4 short grain
- Acid Free
- 200 sheets
- Total: £27.50
- Pro-rata: £7.56 ( £27.50 / 200 sheets * 55 sheets )
- Leather for covers
- From GH Leathers via Amazon
- Goat skin
- Vegetable tanned
- Full Grain
- Buxton Black
- 1.1 mm thick
- Full hide - approx 80 cm x 50 cm
- Total: £30.00
- Pro rata: £6.00 ( estimated usage of 20% of the hide )
- Suede for inside the covers
- From GH Leathers via eBay
- Goat skin
- Natural Grain
- "Donkey" ( I didn't know that was a colour... )
- 0.5 mm thick
- Full hide - approx 60 cm x 50 cm
- Origin: India
- Total: £17.50
- Pro rata: £6.00 ( estimated usage of 30% of the hide )
- French bookbinding linen thread
- Dark Green Fil Au Chinois 894 ( 40/3 )
- Waxed ( will be waxed again with pure beeswax )
- 30 meters
- Total: £3.50
- Pro rata: £0.23 ( £3.50 / 30 meters * estimated usage of 2 meters )
- Adhesives
- Aleene's 15594 4oz Speciality Leather Glue - 4 oz / 118 ml
- Total: £7.99
- Pro rata: £1.01 ( £7.99 / 118 ml * estimated usage of 15 ml )
- EVA Adhesive - Non plasticised Ethylene-Vinylacetate, water soluble - 225 ml
- Total: £5.50
- Pro rata: £0.24 ( £5.50 / 225 ml * estimated usage of 10 ml )
- Starch Paste + 3% PVA - Neutral pH, water soluble - 225 ml
- Total: £4.50
- Pro rata: £0.80 ( £4.50 / 225 ml x estimated usage of 40 ml )
- Aleene's 15594 4oz Speciality Leather Glue - 4 oz / 118 ml
- Mull ( thick, starch rich, muslin type fabric ) - 500 mm x 920 mm ( 4,600 cm squares)
- Total: £3.50
- Pro rata: £0.15 ( £3.50 / 4,600 x 200 cm squares - estimating usage on 200 cm squares ( 20 cm x 10 cm ) )
- Linen sewing tape 10 mm ( to go under stitches on the outside of the text block ) - 1 meter
- Total: £1.20
- Pro rata: £0.36 ( £1.20 / 100 x 30 cm to create 3 x 10 cm strips )
- Acrylic paint - 59 ml
- Total: £1.59
- Pro rate: £0.40 ( £1.59 / 59 ml x estimated usage 15 ml )
- 24k Gold leaf sheets - 10 x 4.33 cm squares
- Total: £5.69 ( I'll use every sheet )
- 6 mm wide ribbons for bookmarks ( black, white and green as I like multiple reference ribbons ) - 1 meter
- Total: £1.95 ( 3 meters at £0.65 per meter )
- Pro rata: £0.65 ( 33 cm per bookmark * 3 )
- Headbands / Headbanding - 1 meter
- Total: £1.30
- Pro rata: £0.03 ( £1.30 / 100 cm x 1 cm x 2 for both header and footer )
- Book boards for the covers
- 5 x A4 sheets
- 3,000 micron
- 3 mm thick
- Acid free
- Total: £6.99
- Pro rata: £2.80 ( £6.99 / 5 sheets x 2 sheets )
- Hand marbled, black and copper on green endpapers - 510 mm x 750 mm
- Total: £15.00
- Pro rata: £10.00 ( estimating usage of about a two-thirds of the sheet )
- Fly leaves - 5 x A4, 160 gsm, 45% cotton, acid-free, "Holly" Daler-Rowney Murano Textured Fine Art Paper from Gadsby's of Leicester
- Total: £5.00
- Pro rata: £2.00 ( £1.00 per sheet x 2 sheets )
Total cost: £143.71 - this is the grand total I spent to buy all the materials needed to make this book.
Pro rata: £43.93 - this is the cost of the materials used in Book 7 / Liber VII.
That doesn't account for postage, which is many cases is a complete skank, plus I spent an extra £3.99 which isn't included above as I decided to not use some bright and pale green A4 paper I'd got from Amazon, it was going to be a fly leaf but the tones were more Ice-Cream Parlour than Gentleman's Parlour and it just didn't work against the marbled paper; acrylic edge paint, the thread or reference ribbon. The Daler-Rowney Murano paper in "Holly" fits the aesthetic perfectly, and was well worth going out in the rain for. I fear I may be becomming a paper nerd...
Method and Steps
It's quicker and easier to just buy a notebook, a hell of a lot cheaper too!
Forwarding: making the text block
- Got all required materials together
- Counted out 55 sheets - checked all sheets for blemishes - found one with an imperfection, switched it out
- Grouped into 11 signatures of 5 sheets each - stacked one horizontally, then one vertically, repeated to form "L" shaped pile
- Folded signatures - 5 sheets at a time
- Bone folded between grease proofed paper - so as not to burnish / polish the paper's edges:
- Each signature as a whole, once up, once down, each side ( 4 passes )
- Each page individually - as above
- Each signature again as a whole - as above ( totals 28 passes per signature / 242 passes in total)
- Stacked and pressed - spines and outer edges opposing for balance
- Marked the top of all the signatures down the spine with a pencil line, so I know which way is face up
- Punched stitching holes in each signature - 8 holes per signature, 88 holes punched, created 440 holes in total
Still not happy with how the holes are balanced down the spine, even when using a cradle - Sewed all the signatures together - size 18 needle
- German Kettle stitches on the head and tail
- French link stitches over the linen sewing tape
Why is it sometimes really easy to sew through the thread by accident when French stitching, yet sometimes when doing it on purpose to attach the needle it's really hard? - Weaver's knots between stretches of thread - had to extend the thread twiice
Learning weaver's knots is easier than dealing with thread that's longer than an armspan
- Pressed the spine of the textblock between boards that were covered in grease proof paper
- Closed up the stitching holes with the point of a bone folder
- Applied EVA to spine - paper only, not over linen tapes - reapplied when tacky to total 2 costs
- Left to dry in the press
- Cut, folded, bone folded, starch-pasted and tipped-in fly leaves at both ends
Fly leaves and endpapers are applied between the first and second, and penultimate and last pages of the textblock as to sandwich them with glue inside the first and last signatures, the front and back pages themselves will be bonded to the cover in paste-down - Same with marbled endpapers
The right side ( recto ) of the endpaper at the front, flows into the left side ( verso ) of the back endpaper, minus what will be trimmed as I'd like to see a continuity of the ink's drift from front to back
First impressions are "this is hungry paper" as it soaked up the first layer of paste so quick, then when applied and bone folded it came loose as there wasn't enough to stick, the second coat made it seem like too much and created small wrinkles which needed extra bone folding and pressing to get rid of as many imperfections as possible - Pressed again
- Starch-pasted endpapers and fly leaves together at the seams to create a "made page"
Similar issues again with the glue, there is a very fine line between too little and too much, too little and things risk delaminating over time, too much and things get wet and wrinkly
Notable screw up: tipped in the top, bottom and sides, should have just done the longest edge - that's what I did on Book II so I don't know why I deviated from something I knew worked, I guess I was worried about the way the endpapers first bonded, so went overboard to try overcompensate for that... - Pressed overnight - used cheapo Amazon press thing with a dozen or so books and 16 kg dumbbells
That press thing is naff, I know it was sold as being a flower press and it'll be fine for flattening a pancake, or pamphlet but when it comes to anything over a centimeter it's going to bend so doesn't apply pressure evenly... - Sharpened leather skiving blade
- Trimmed leading edge - clamped in press, backed with a board
- Sanded leading edge - 400 grit paper till glossy, used a large paint brush to get rid of all the dust
- Painted leading edge - deep green acrylic paint - six coats in total
Forgot to apply talcum powder before and forgot to wrap the boards in grease proof paper
Painted then given a short time to dry - three coats then a light sanding, followed by three further coats
I'd previously painted a swatch to see how many coats it took to get the most consistent lush shade - Gilded leading edge - 4 sheets of gold - when final coat paint still had some moisture
- Burnished leading edge under grease proof paper, then direct
Would have used an agate burnisher but I think one of the cats might have taken it and hidden it thinking it was a toy, reverted to using a teflon bone folder - Made sure all pages can open and aren't painted together with a bone folder
This is the price I'm paying for forgetting to add talcum powder over the edges first, but since I'd started it that way, I continued to make sure everything was consistent, albeit somewhat of a pain... - Trimmed top edge
- Sanded top edge
- Painted top edge
- Gilded top edge - 3 sheets of gold
- Burnished top edge
- Made sure all pages can open and aren't painted together with a bone folder
- Trimmed bottom edge
- Sanded bottom edge
- Painted bottom edge
- Gilded bottom edge - 3 sheets of gold
- Burnished bottom edge
- Made sure all pages can open and aren't painted together with a bone folder
Despite doing this once for each outer edge, the two first, and two last pages, next to the fly leaves have conjoined into one sheet, bonded only by paint on the outer edges - I kinda like the feeling of it, serendipitous I guess... - Applied tiny drops of paint to a couple of small spots on the edges
- Rubbed some beeswax onto the suede side of some leather, bone folded it into a thin even layer, then applied to outer edges and rubbed it in
- Cut out an A4 sheet of suede, brushed leather and suede glue onto the unmarbled side of the front endpapers, affixed suede and ran over it with a bone folder
This is complete overkill but adds wonderful contrast to the green on the spines; olive, copper and black endpapers, and the holly fly leaves, not just a visual contrast but a tactile one too - Placed between boards and pressed with 16 kg dumbbells
- Applied glue to the inside of the first page, affixed suede and bone folded through grease proof
Words can not express just how sumptious this suede with paper backing feels! - Boards and dumbbells pressing
- Cut another A4 sheet of suede, glued, affixed to back endpapers, bone folded
- Boards and dumbbells pressing
- Glued inside of the last page, positioned suede and bone folded
- Boards and dumbbells pressing
- Applied more leather glue down the seams where the initial bond wasn't great
- Boards and dumbbells pressing to allow it to dry
- Trimmed suede edges to bring them inline with the rest of the text block
- Cut and affixed reference ribbons with paste - primer coat and top coat to help laminate it into the spine
Three ribbons, one white sandwiched inside two green
Overlenght - I measured out ribbons to nicely overhang the bottom of the book, the rest was bonded to the spine, going down to half-way mark which means I should be able to swing this by the ribbons and have it stay happily intact, I'm not going to even attempt it... - Cut and affixed white headbands and footbands - primer coat and top coat of paste
- Primed spine with glue, applied mull, applied top coat of paste
- Cut craft paper to match spine, apply with paste
- Left it to dry - there's a few layers there and lots of paste which needs to laminate together and dry out
Finishing: making and affixing the covers to the text block
- Measured textblock height, including headbands
- Measured textblock width
- Measured spine width
- Calculated board and spine sizes
- Cut boards and spine
- Sliced some more off the boards to make them fit better
Didn't feel any need to sand the edges - Measured out leather - marked with chinagraph, cut to size
- Affixed tape to the boards and spine to wrap around the text block to get the distances right
- Aligned boards and spine on leather, marked out with chinagraph
- Applied leather glue to the suede side of the leather
- Affixed boards - sans tape
- Pressed
- Cut the corners - folding them in and checking, several times to get it as tight as possible
I felt no desire to skive / par leather, it's a pain in the ass job, even with a sharp tool and my skill set isn't strong enough to want to tackle this as I fear I'd cut through the leather, however it is fairly thin leather and the ruler width overhang around the edges doesn't intrude or impose on the design so I just left it - Glued down top edge, bone folded and squeezed around the corners
- Glued down bottom edge, bone folded and did the corners
- Glued down left foldover, bone folded, sorted corners
- Glued down right foldover, bone folded, sorted corners
- Bone folded between the boards
- Pressed
- Positioned the text block in the case, about 20 times to test how it was feeling
- Committed to adding paste to the outer front page on the text block
- Pasted down linen sewing tapes
- Pasted down mull wraparound block
- Pasted the full page
- Bone folded into the spine and closed the cover with grease proof paper to absorb any extra paste
- Pressed
- Removed the grease proof and checked everything was okay
- Committed to pasting the outer last page
- Pasted tapes
- Pasted mull
- Pasted page, bone folded into the spine
- Added protective layer of grease proof paper, closed the book and hoped for the best
- Pressed
- Removed the grease proof
- Bone folded again
- Pressed overnight
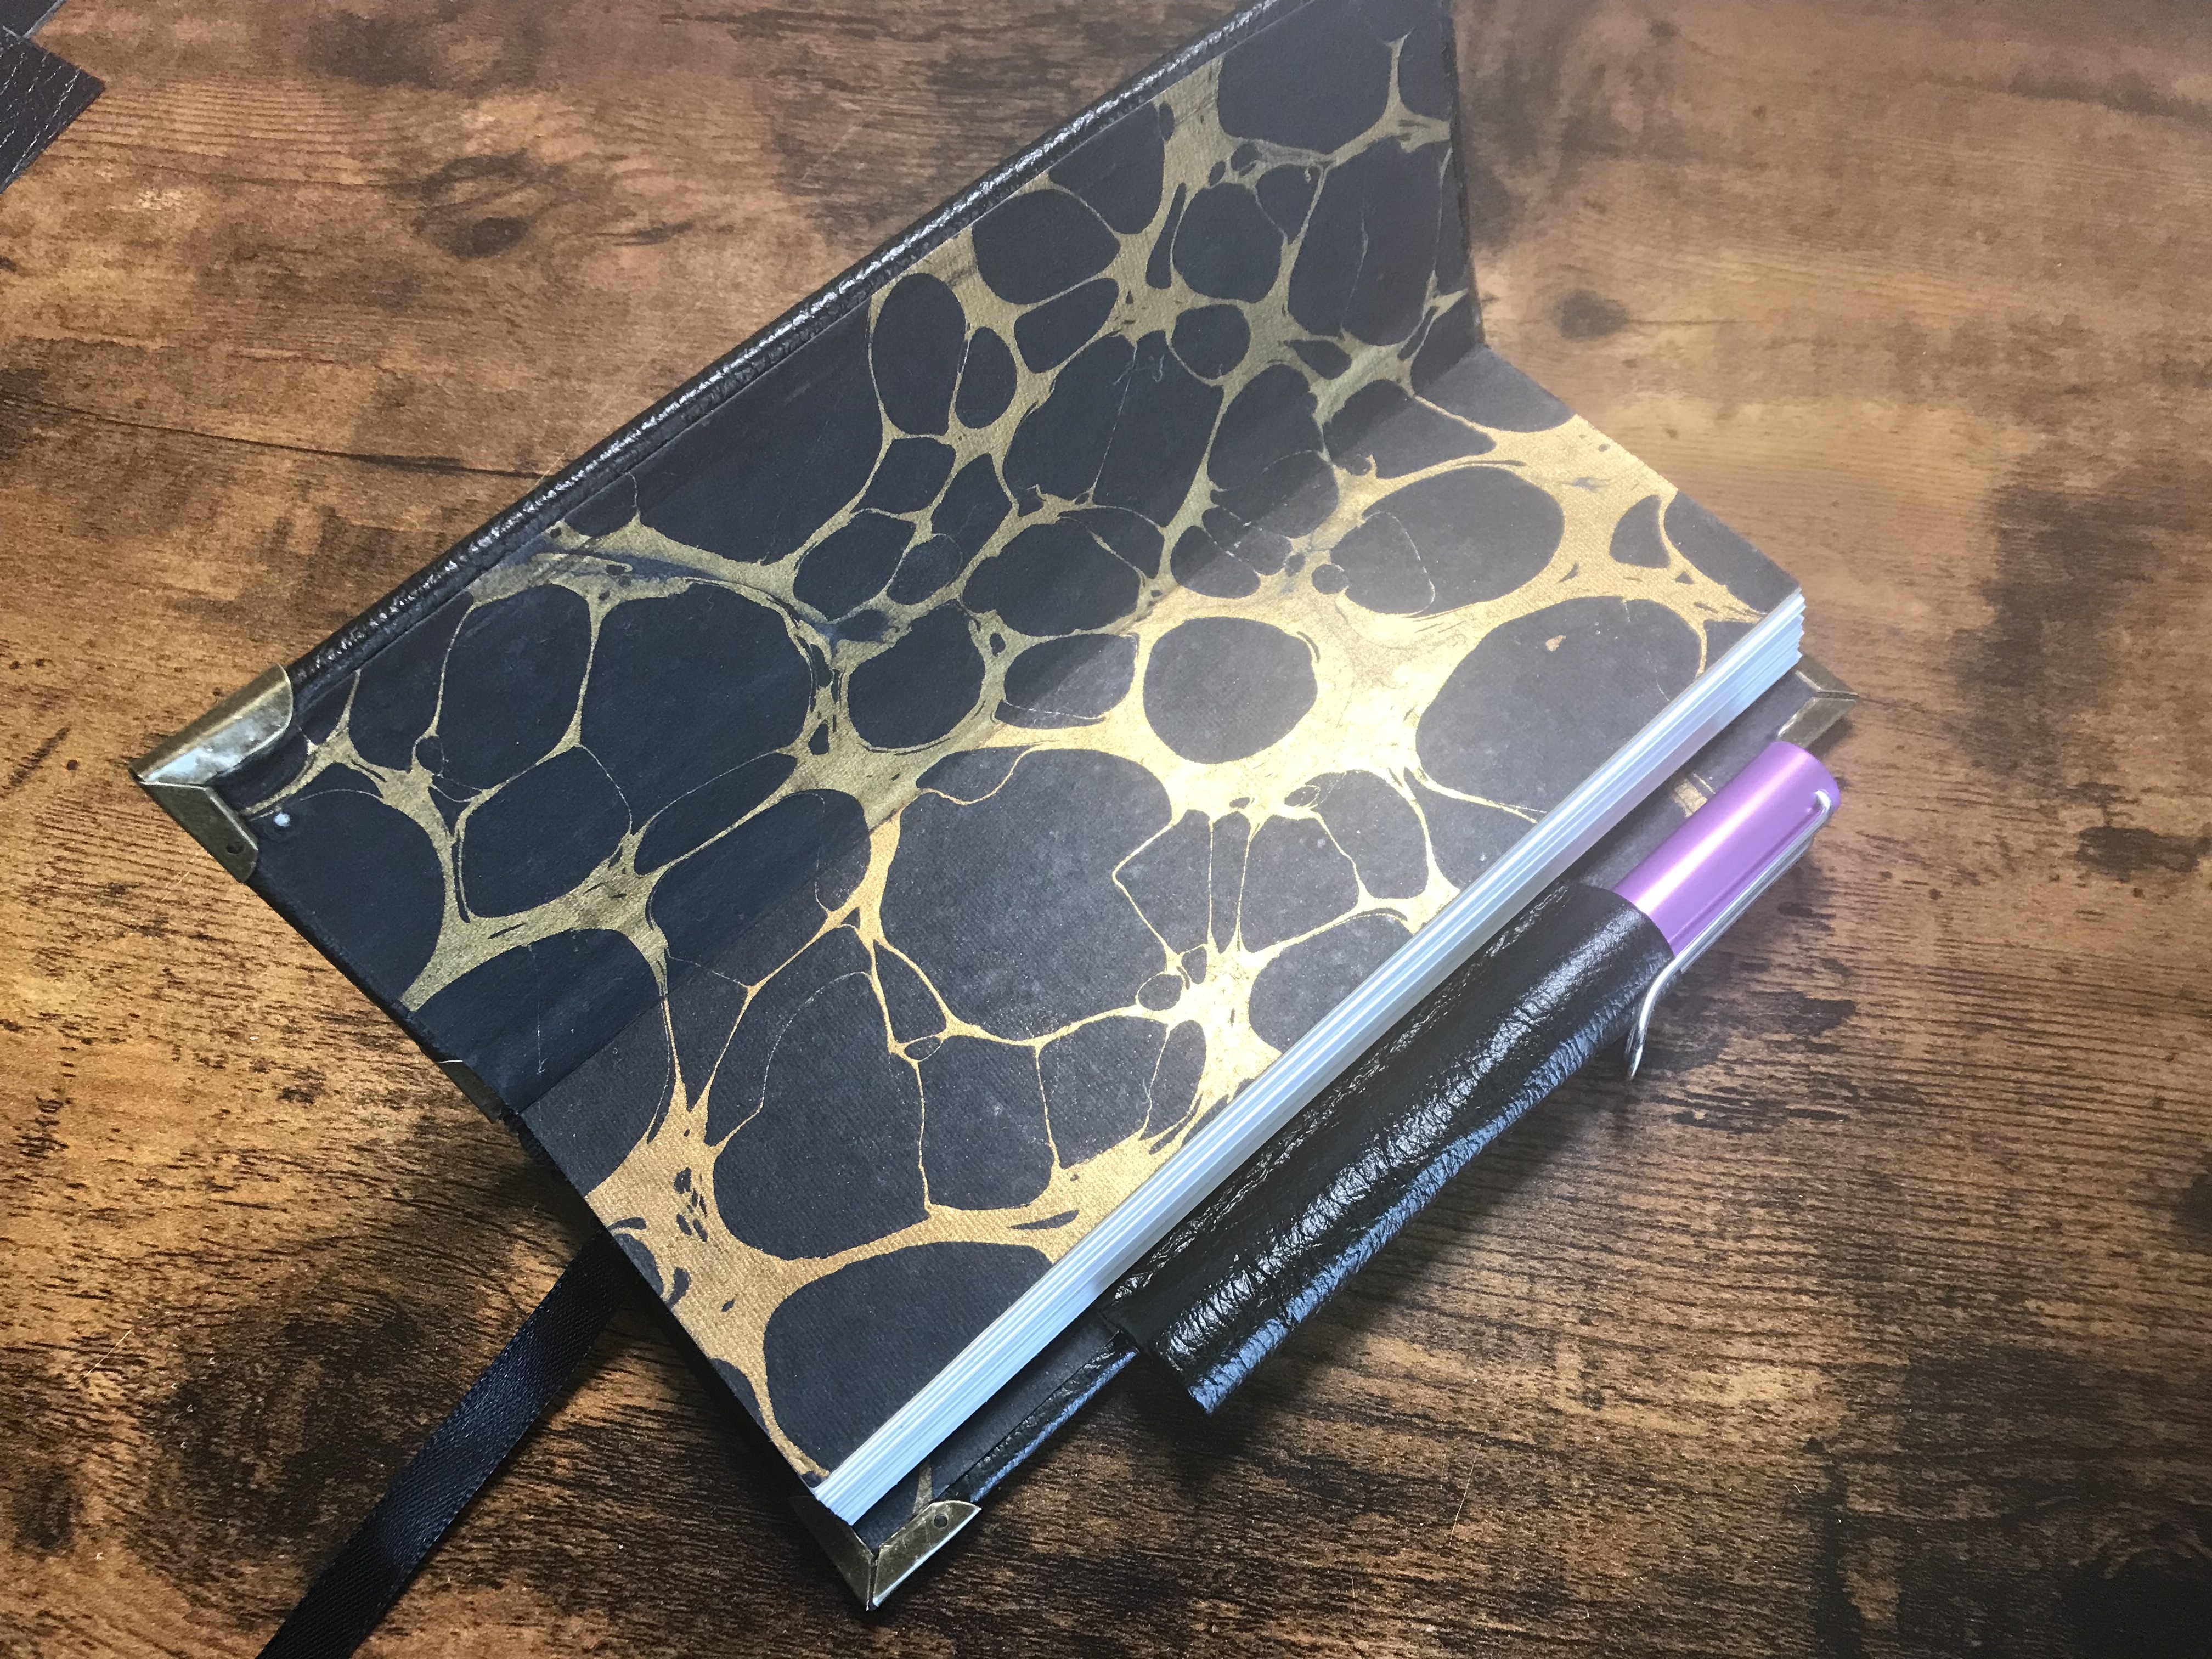
And finally, it's done!
Over a hundred hours from start to finish, most of it in some kind of press.
It has some very minor imperfections, but I'm satisfied things are going in the right direction.
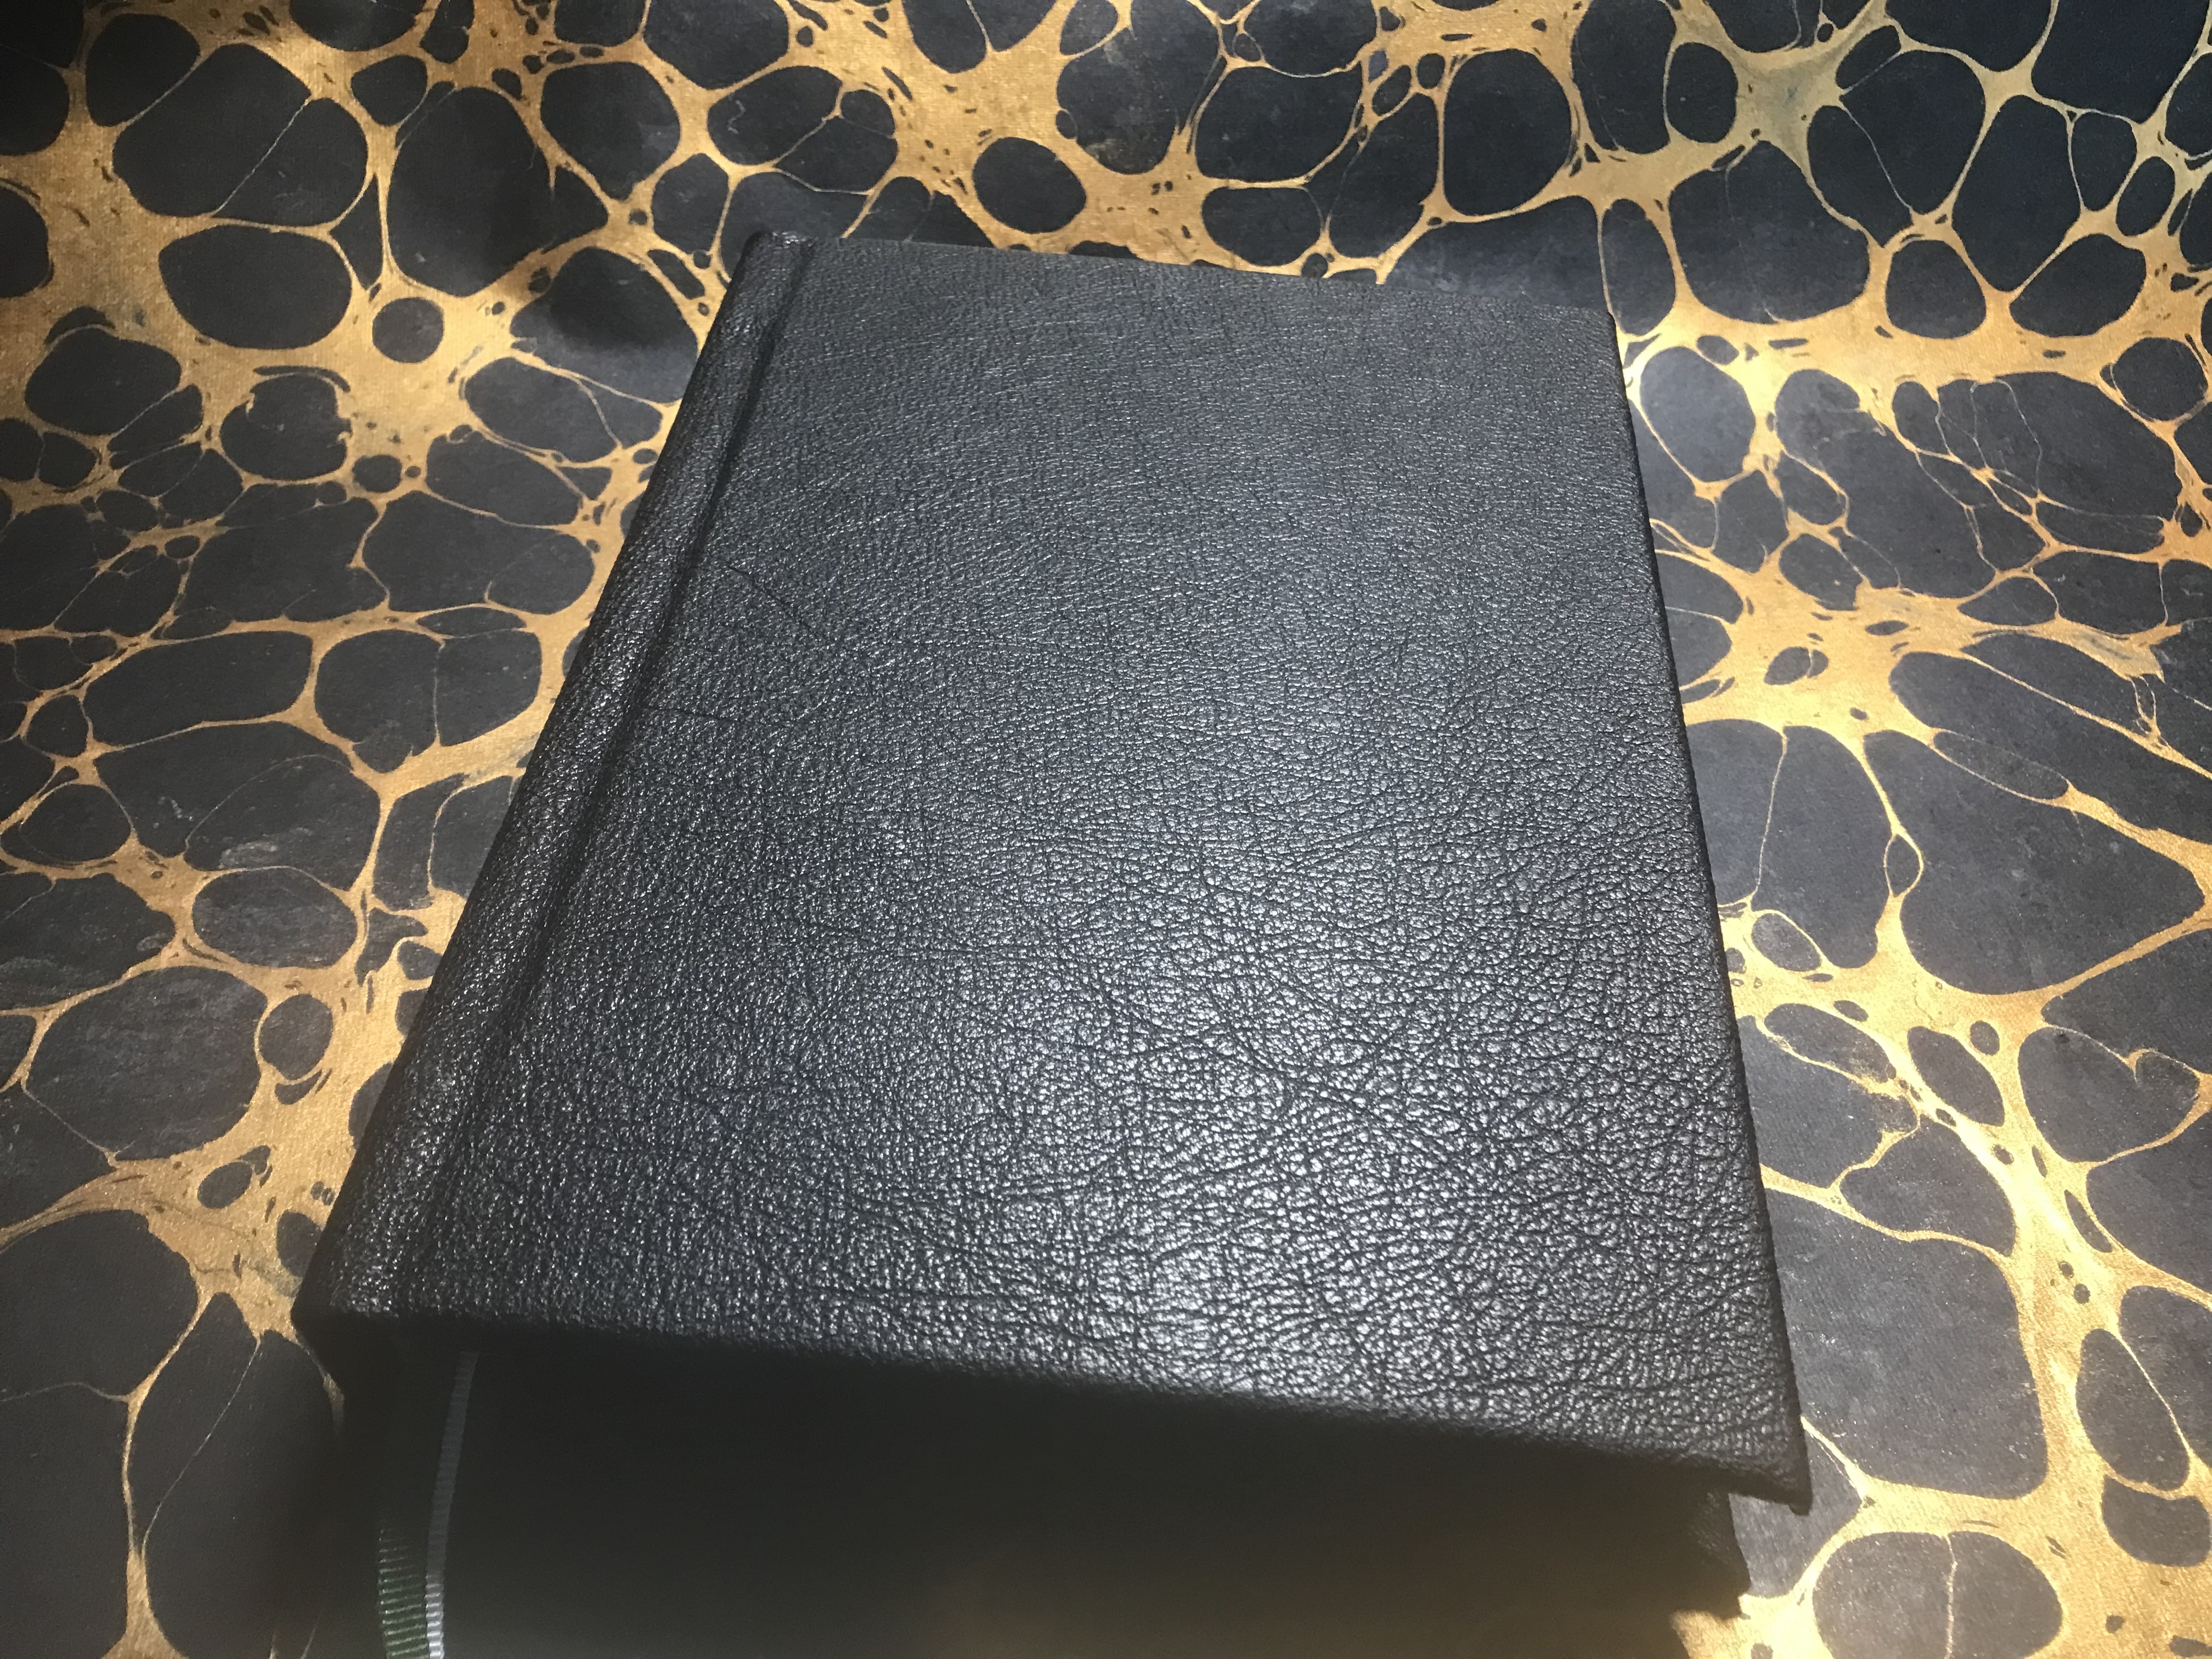
This isn't a book, it's a sensory experience
It tickes everything on the list, except being "pixel perfect" - it's almost imperfection free
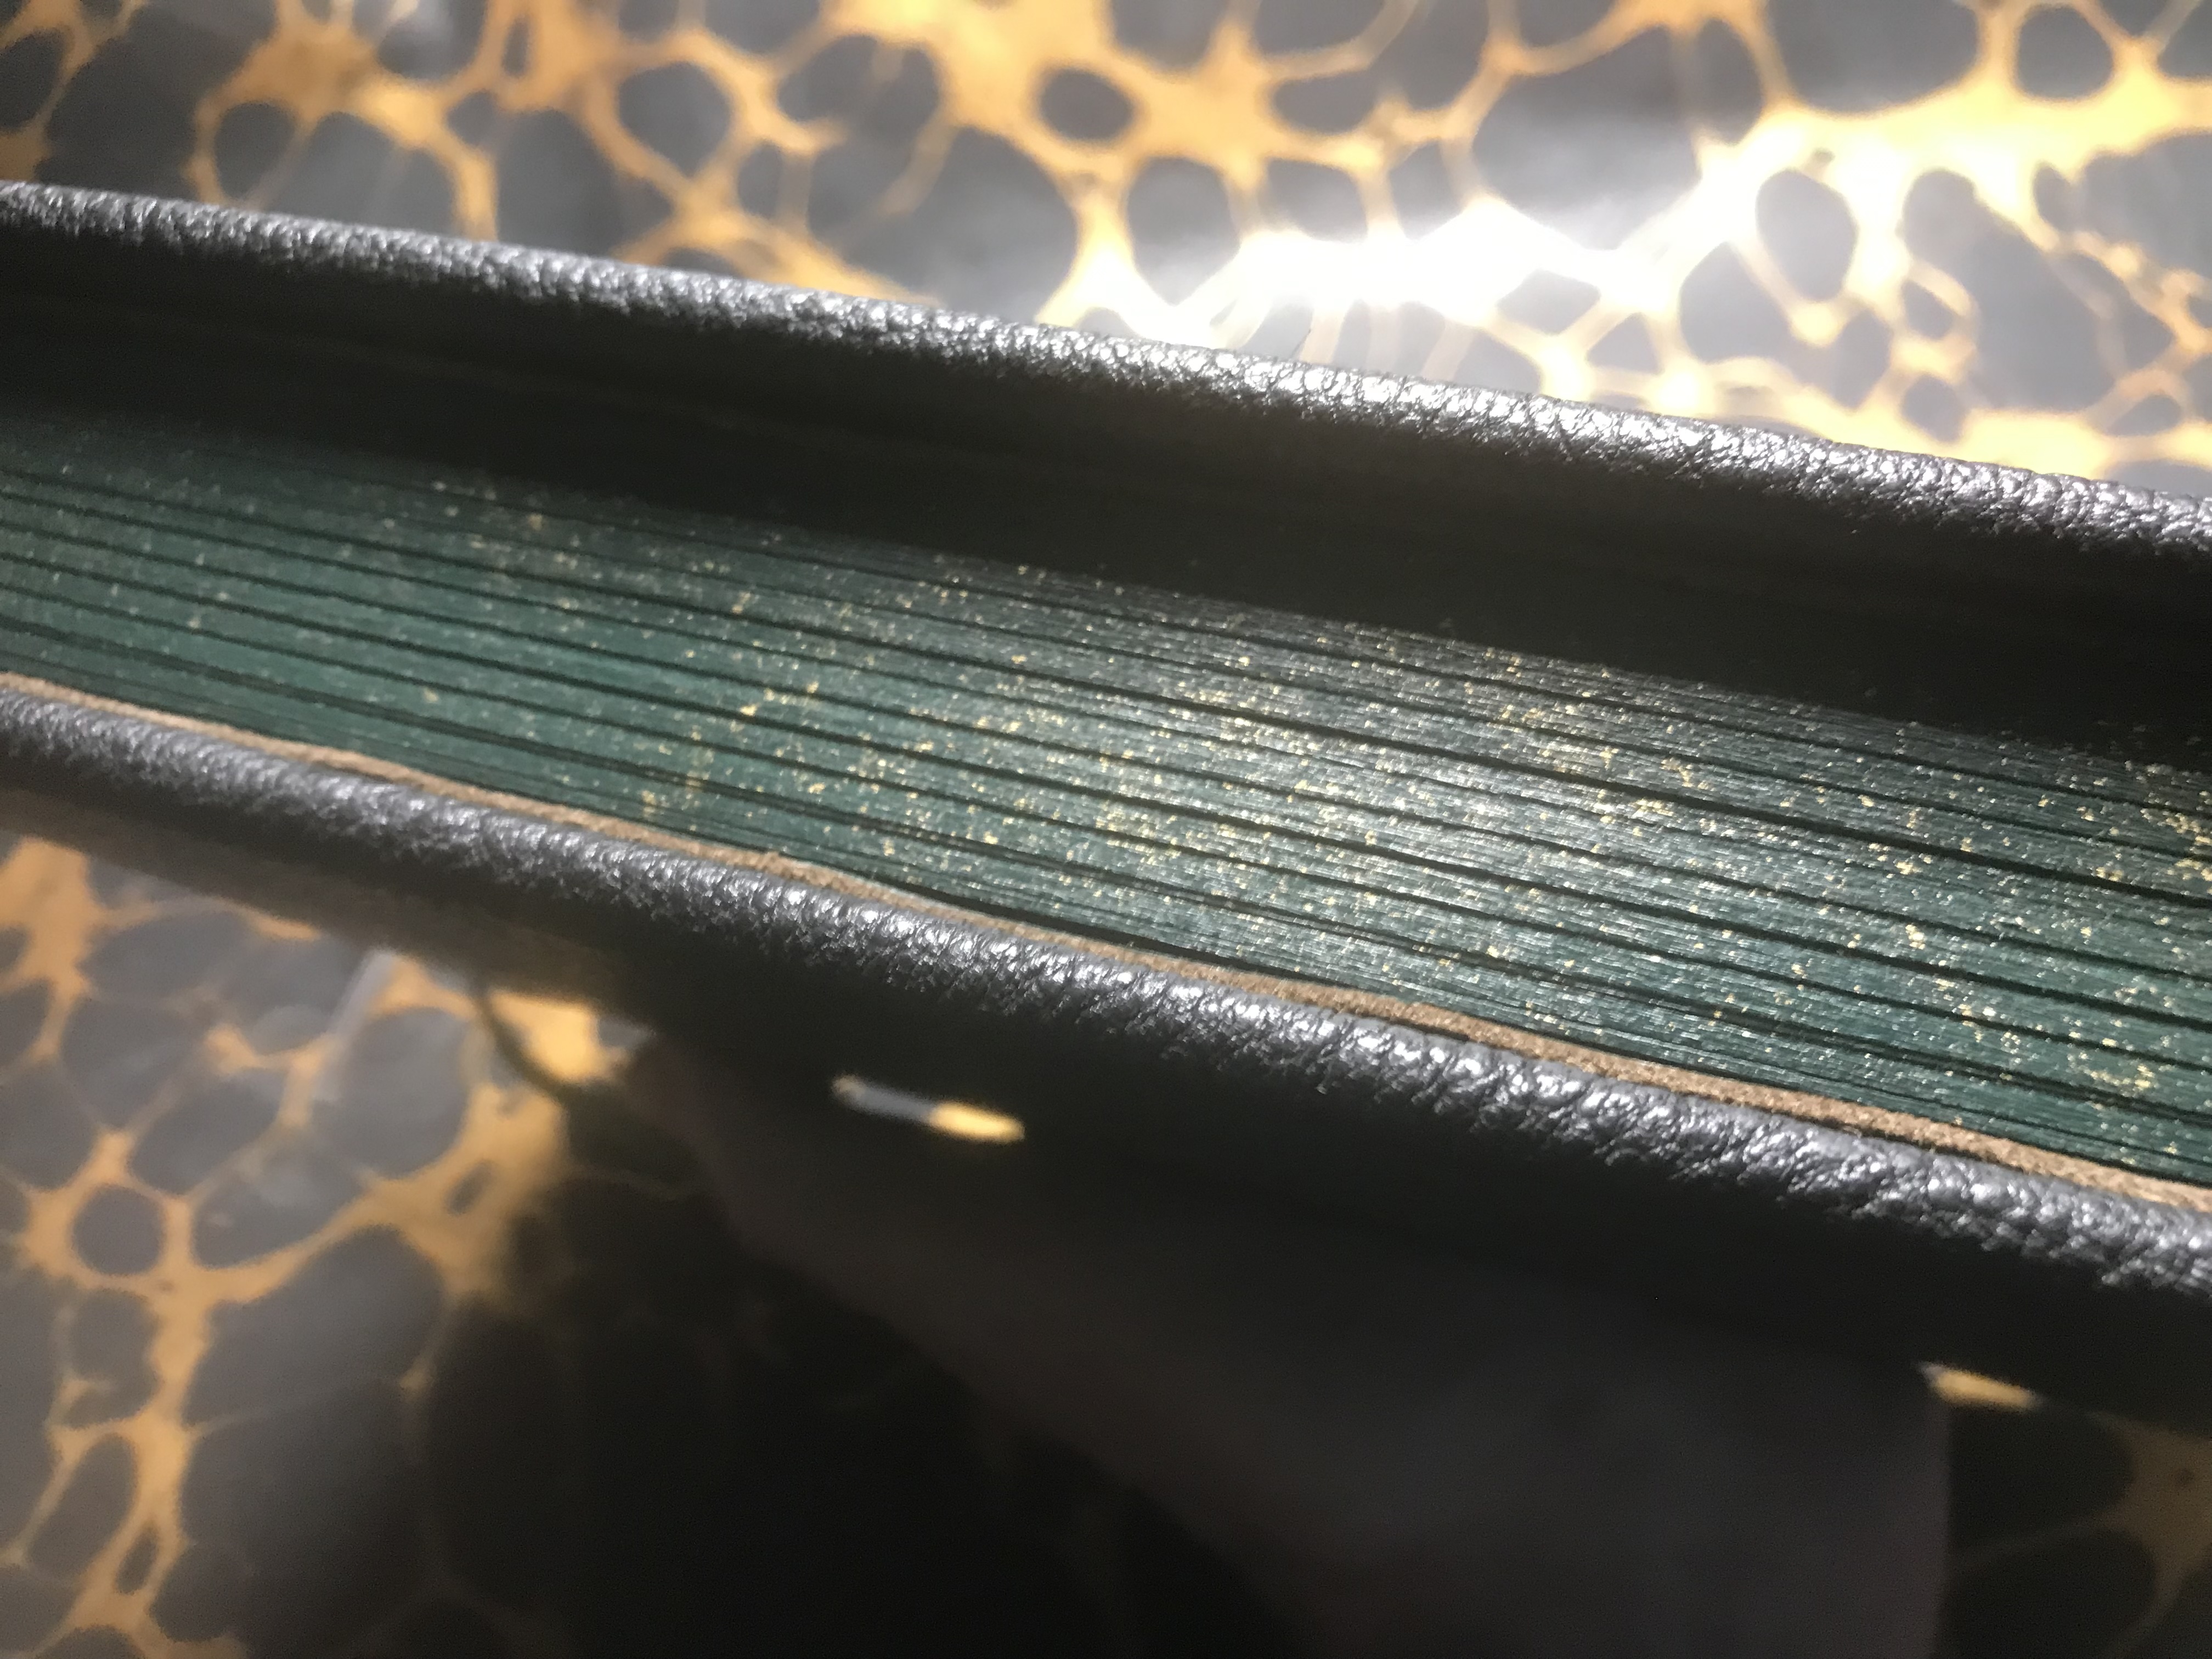
Six coats of paint and 24k Gold Leaf
This is a thing of sumptuous beauty

Three reference ribbons and white headbanding
The white accents here bring a nice contrast to the aesthetic
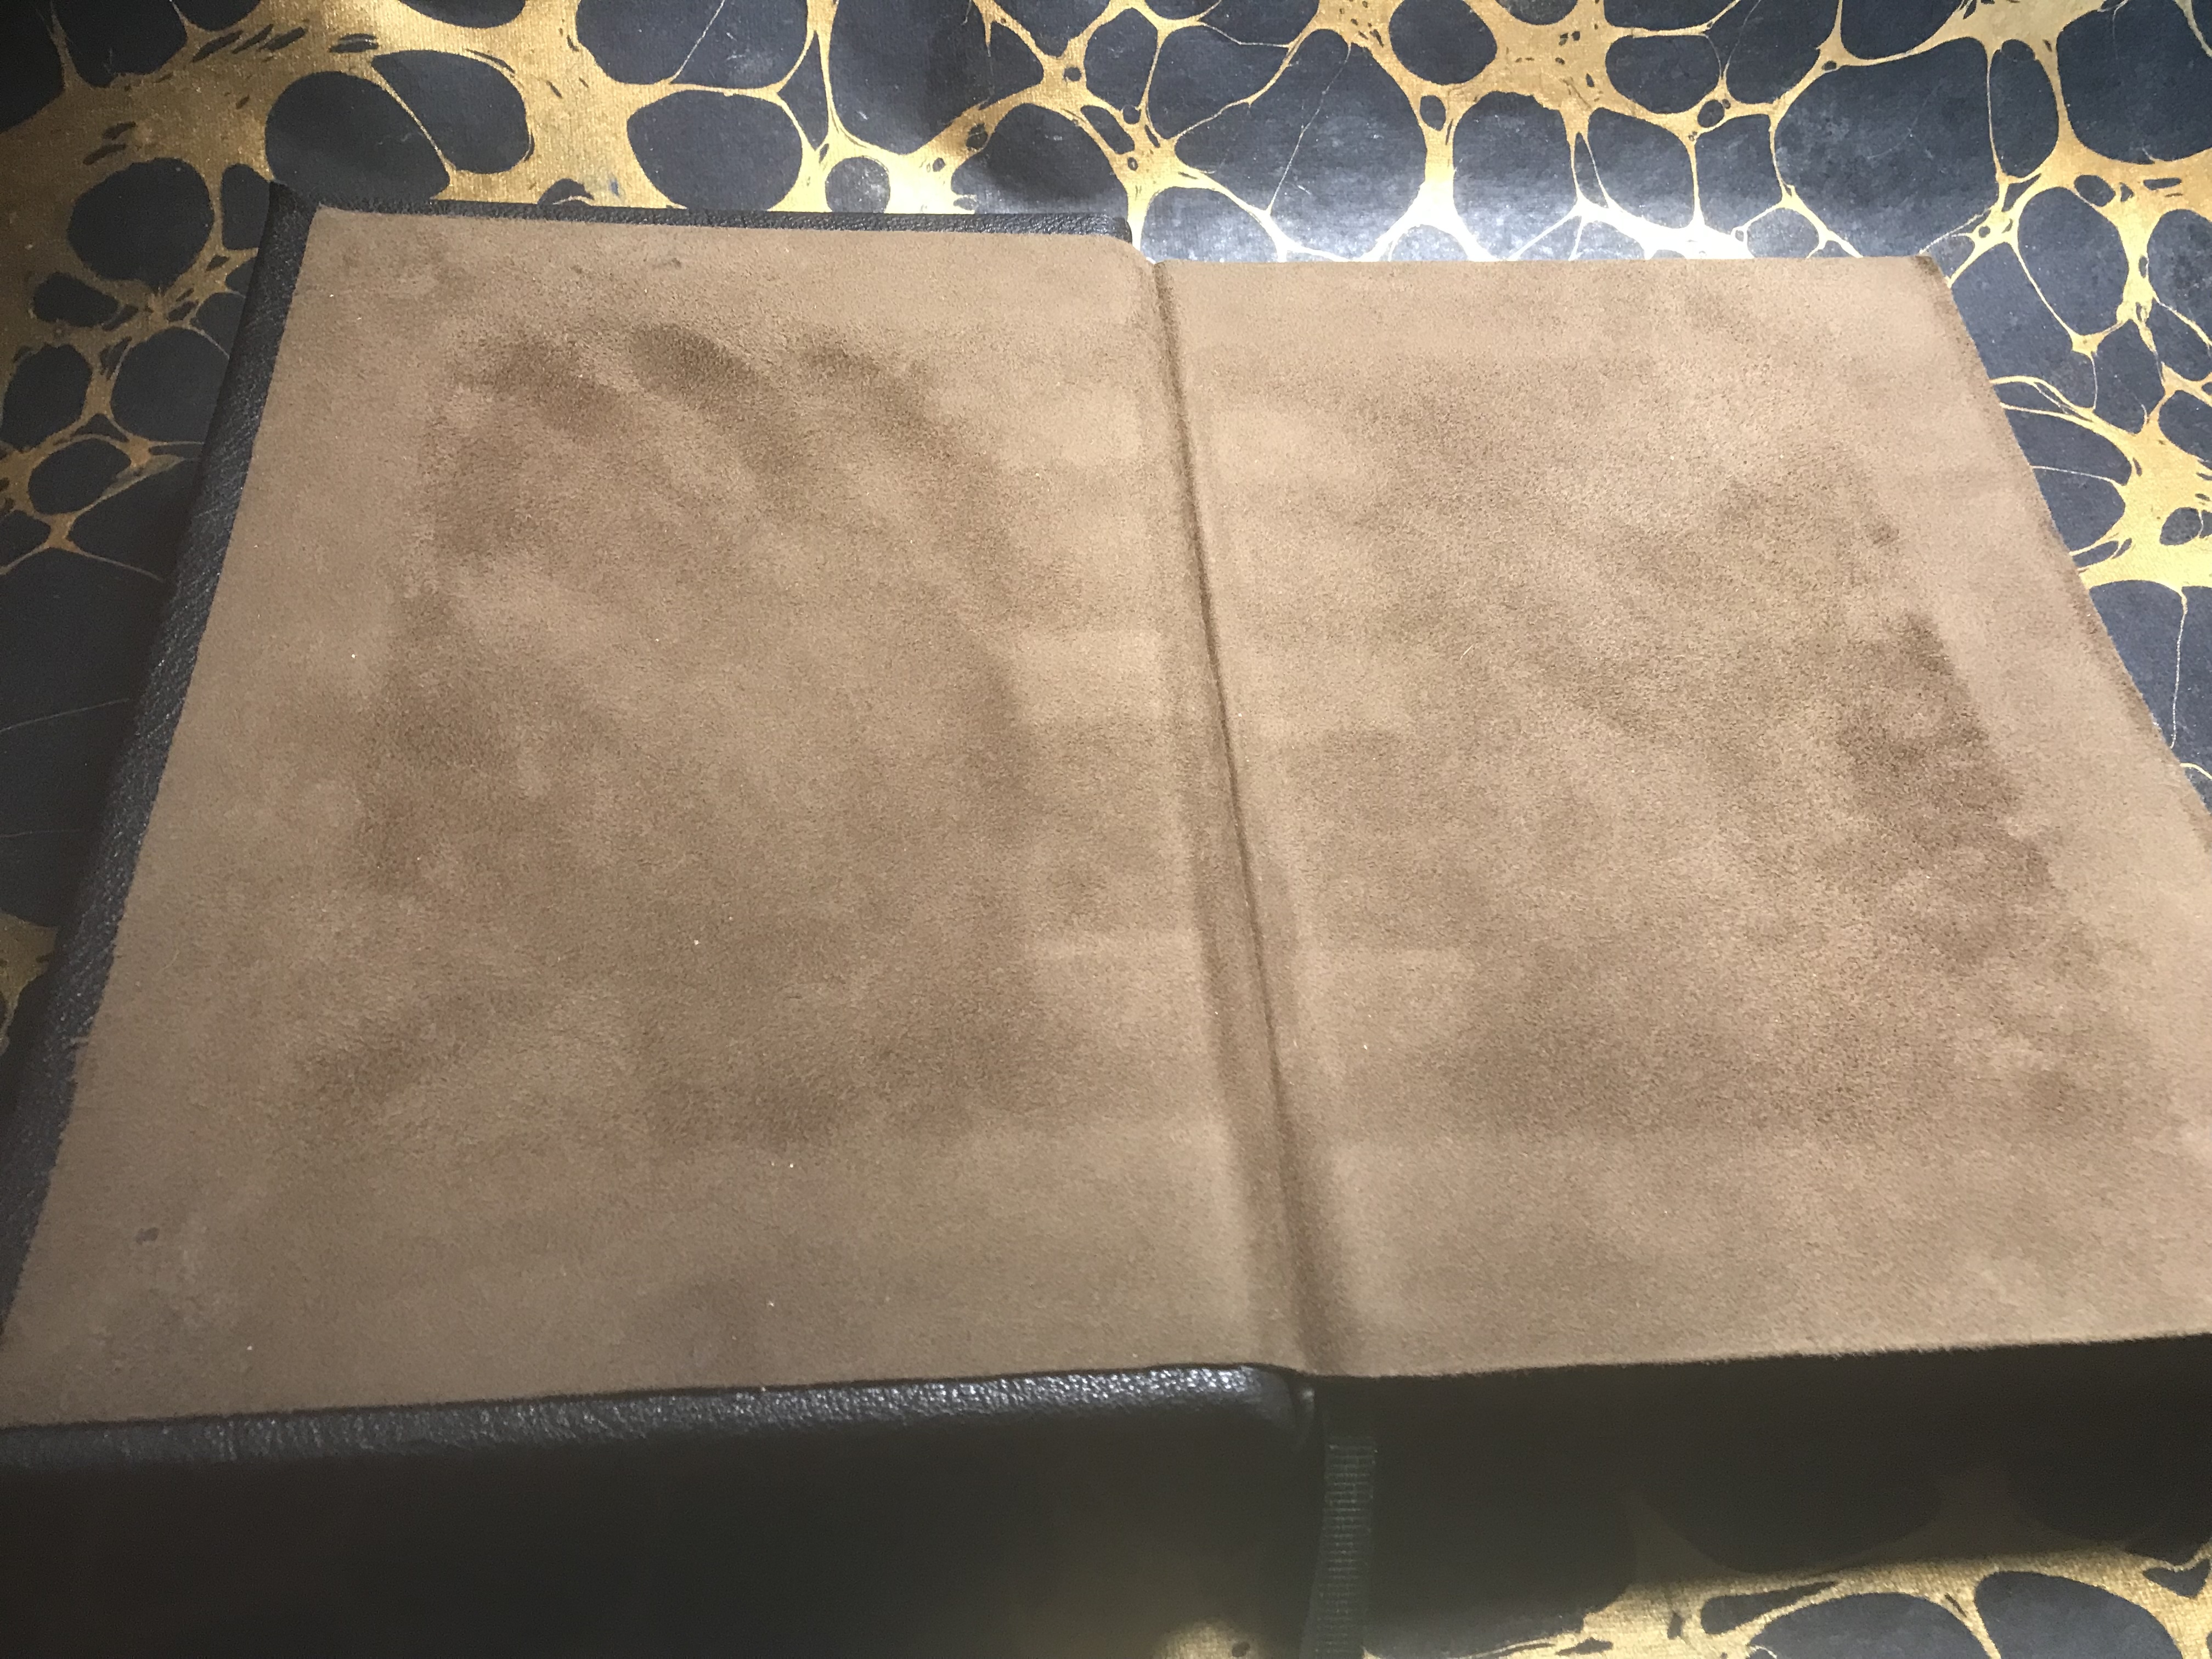
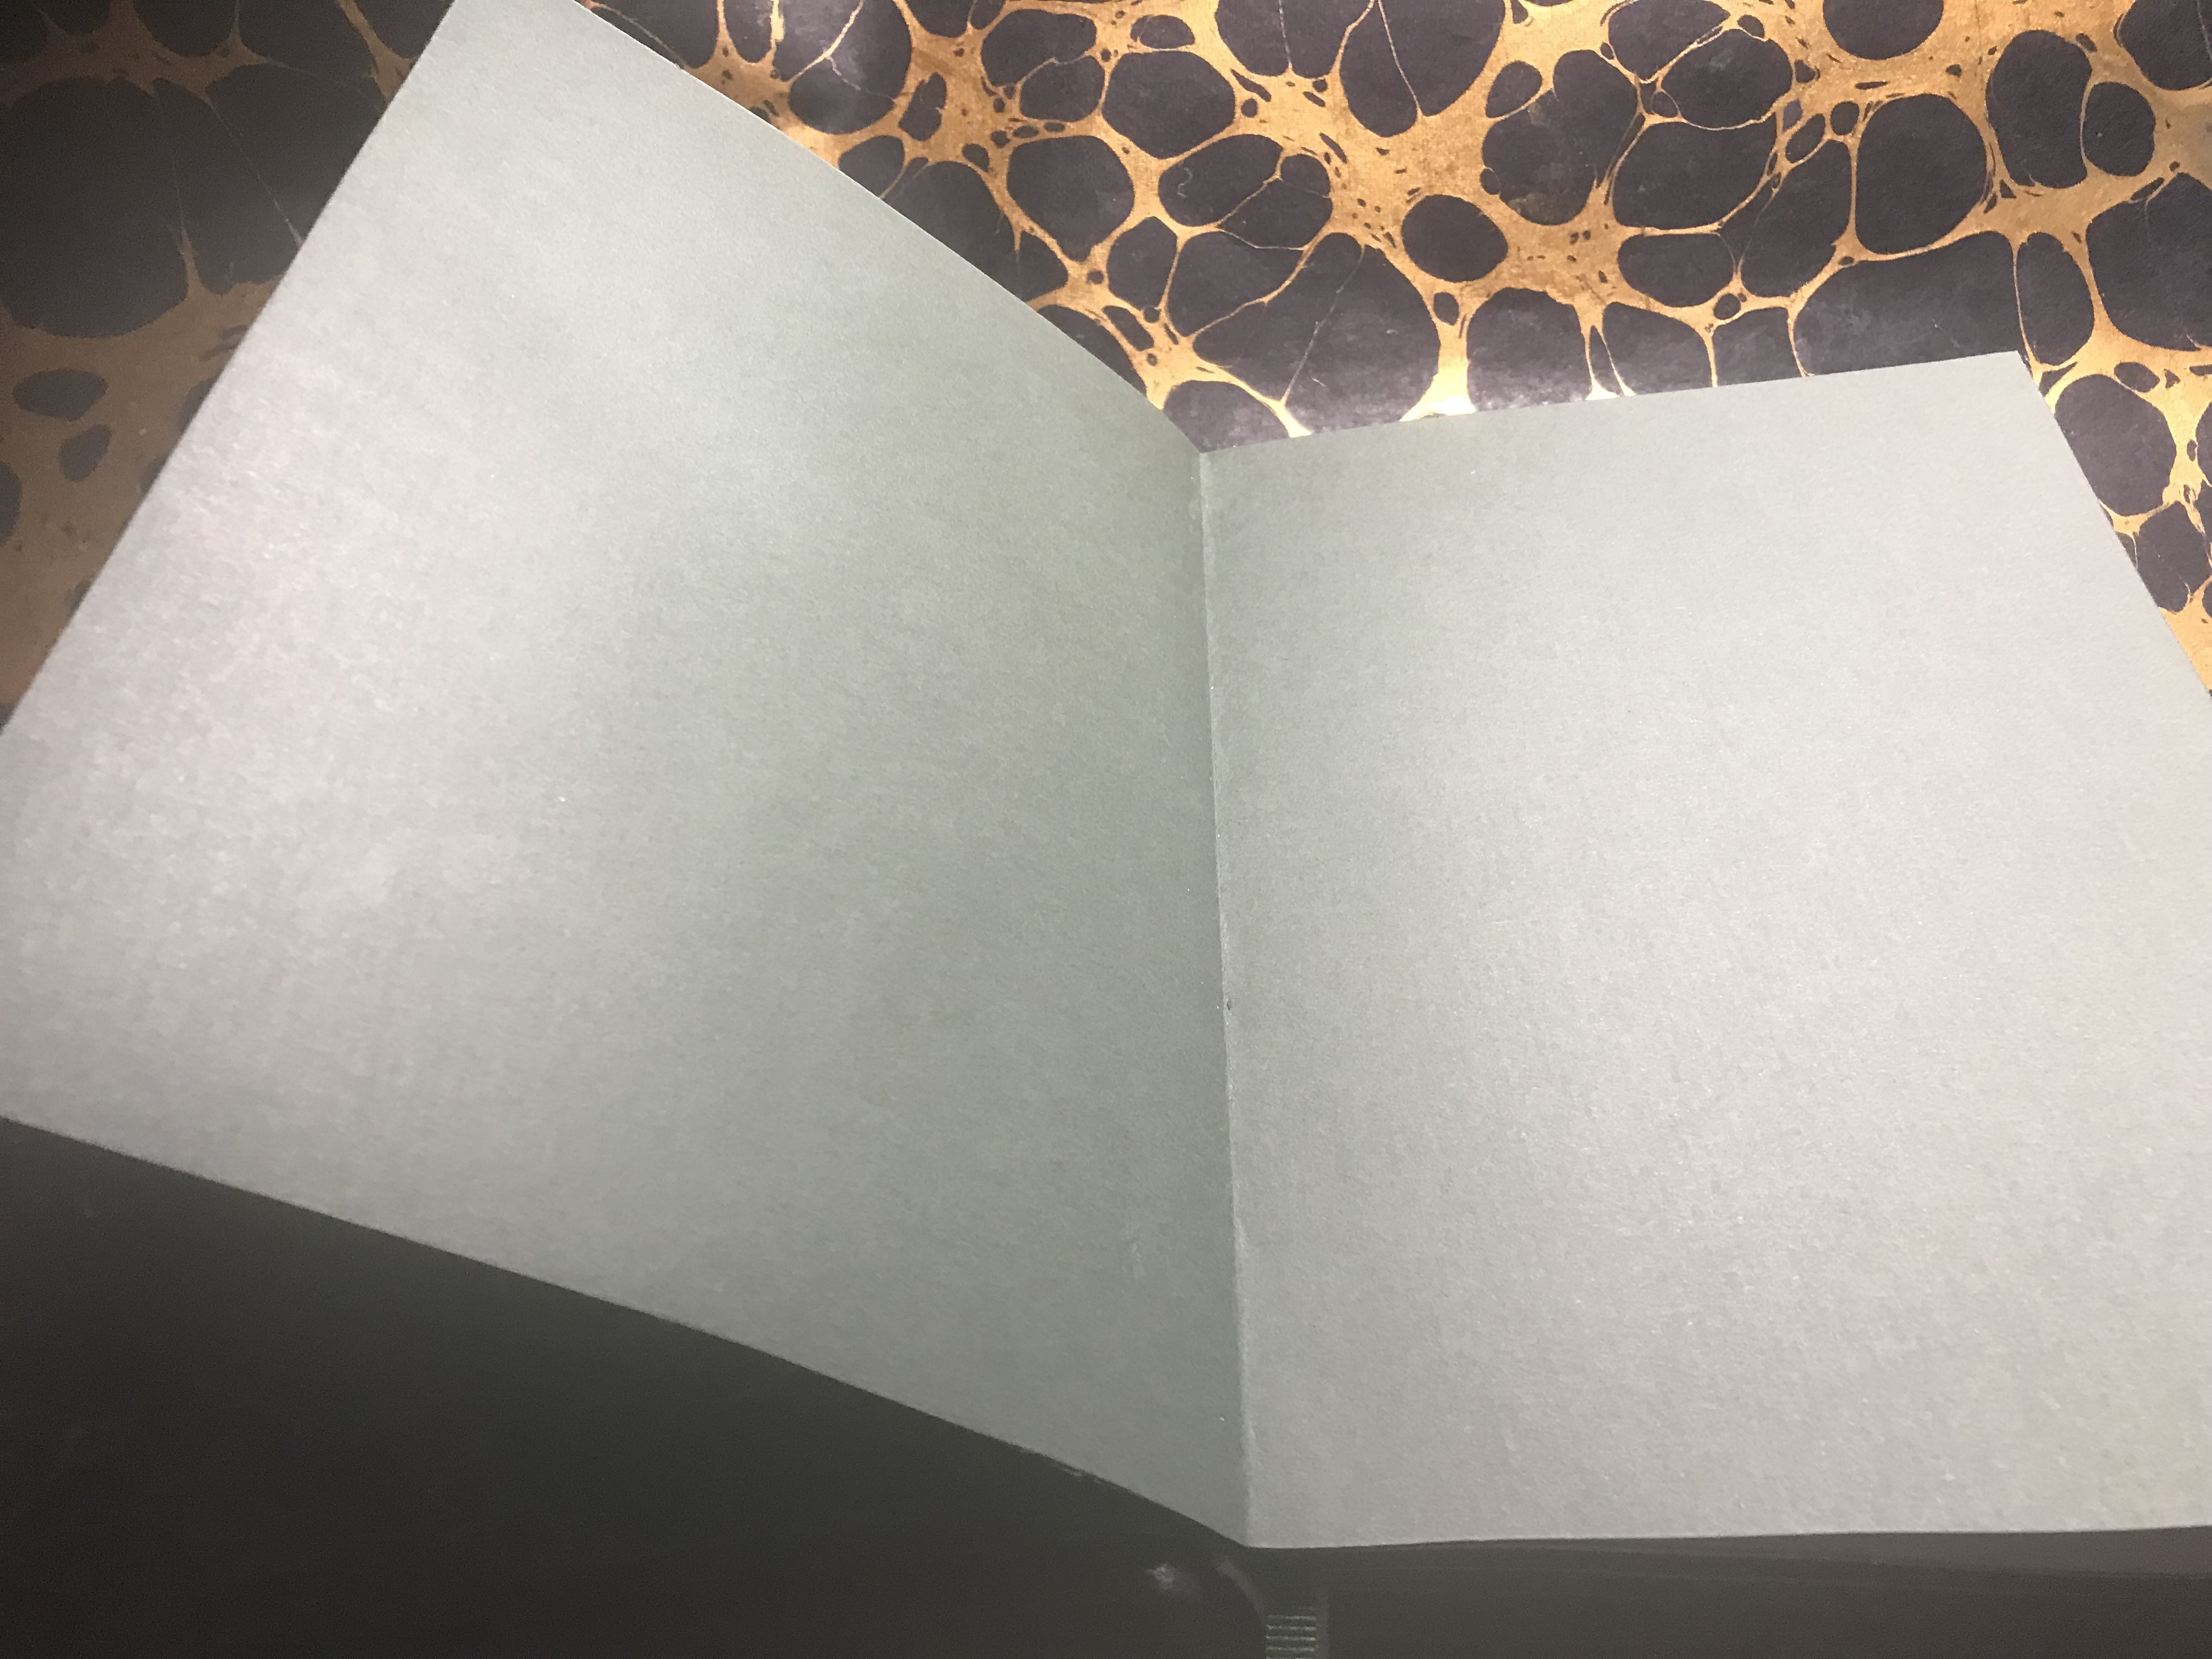
Indian Goat Suede insides - from a full hide - I call it "Scrying Suede" as I see things in it
Smells wonderful, better than the leather, feels amazing and reveals some inner secrets of the bind
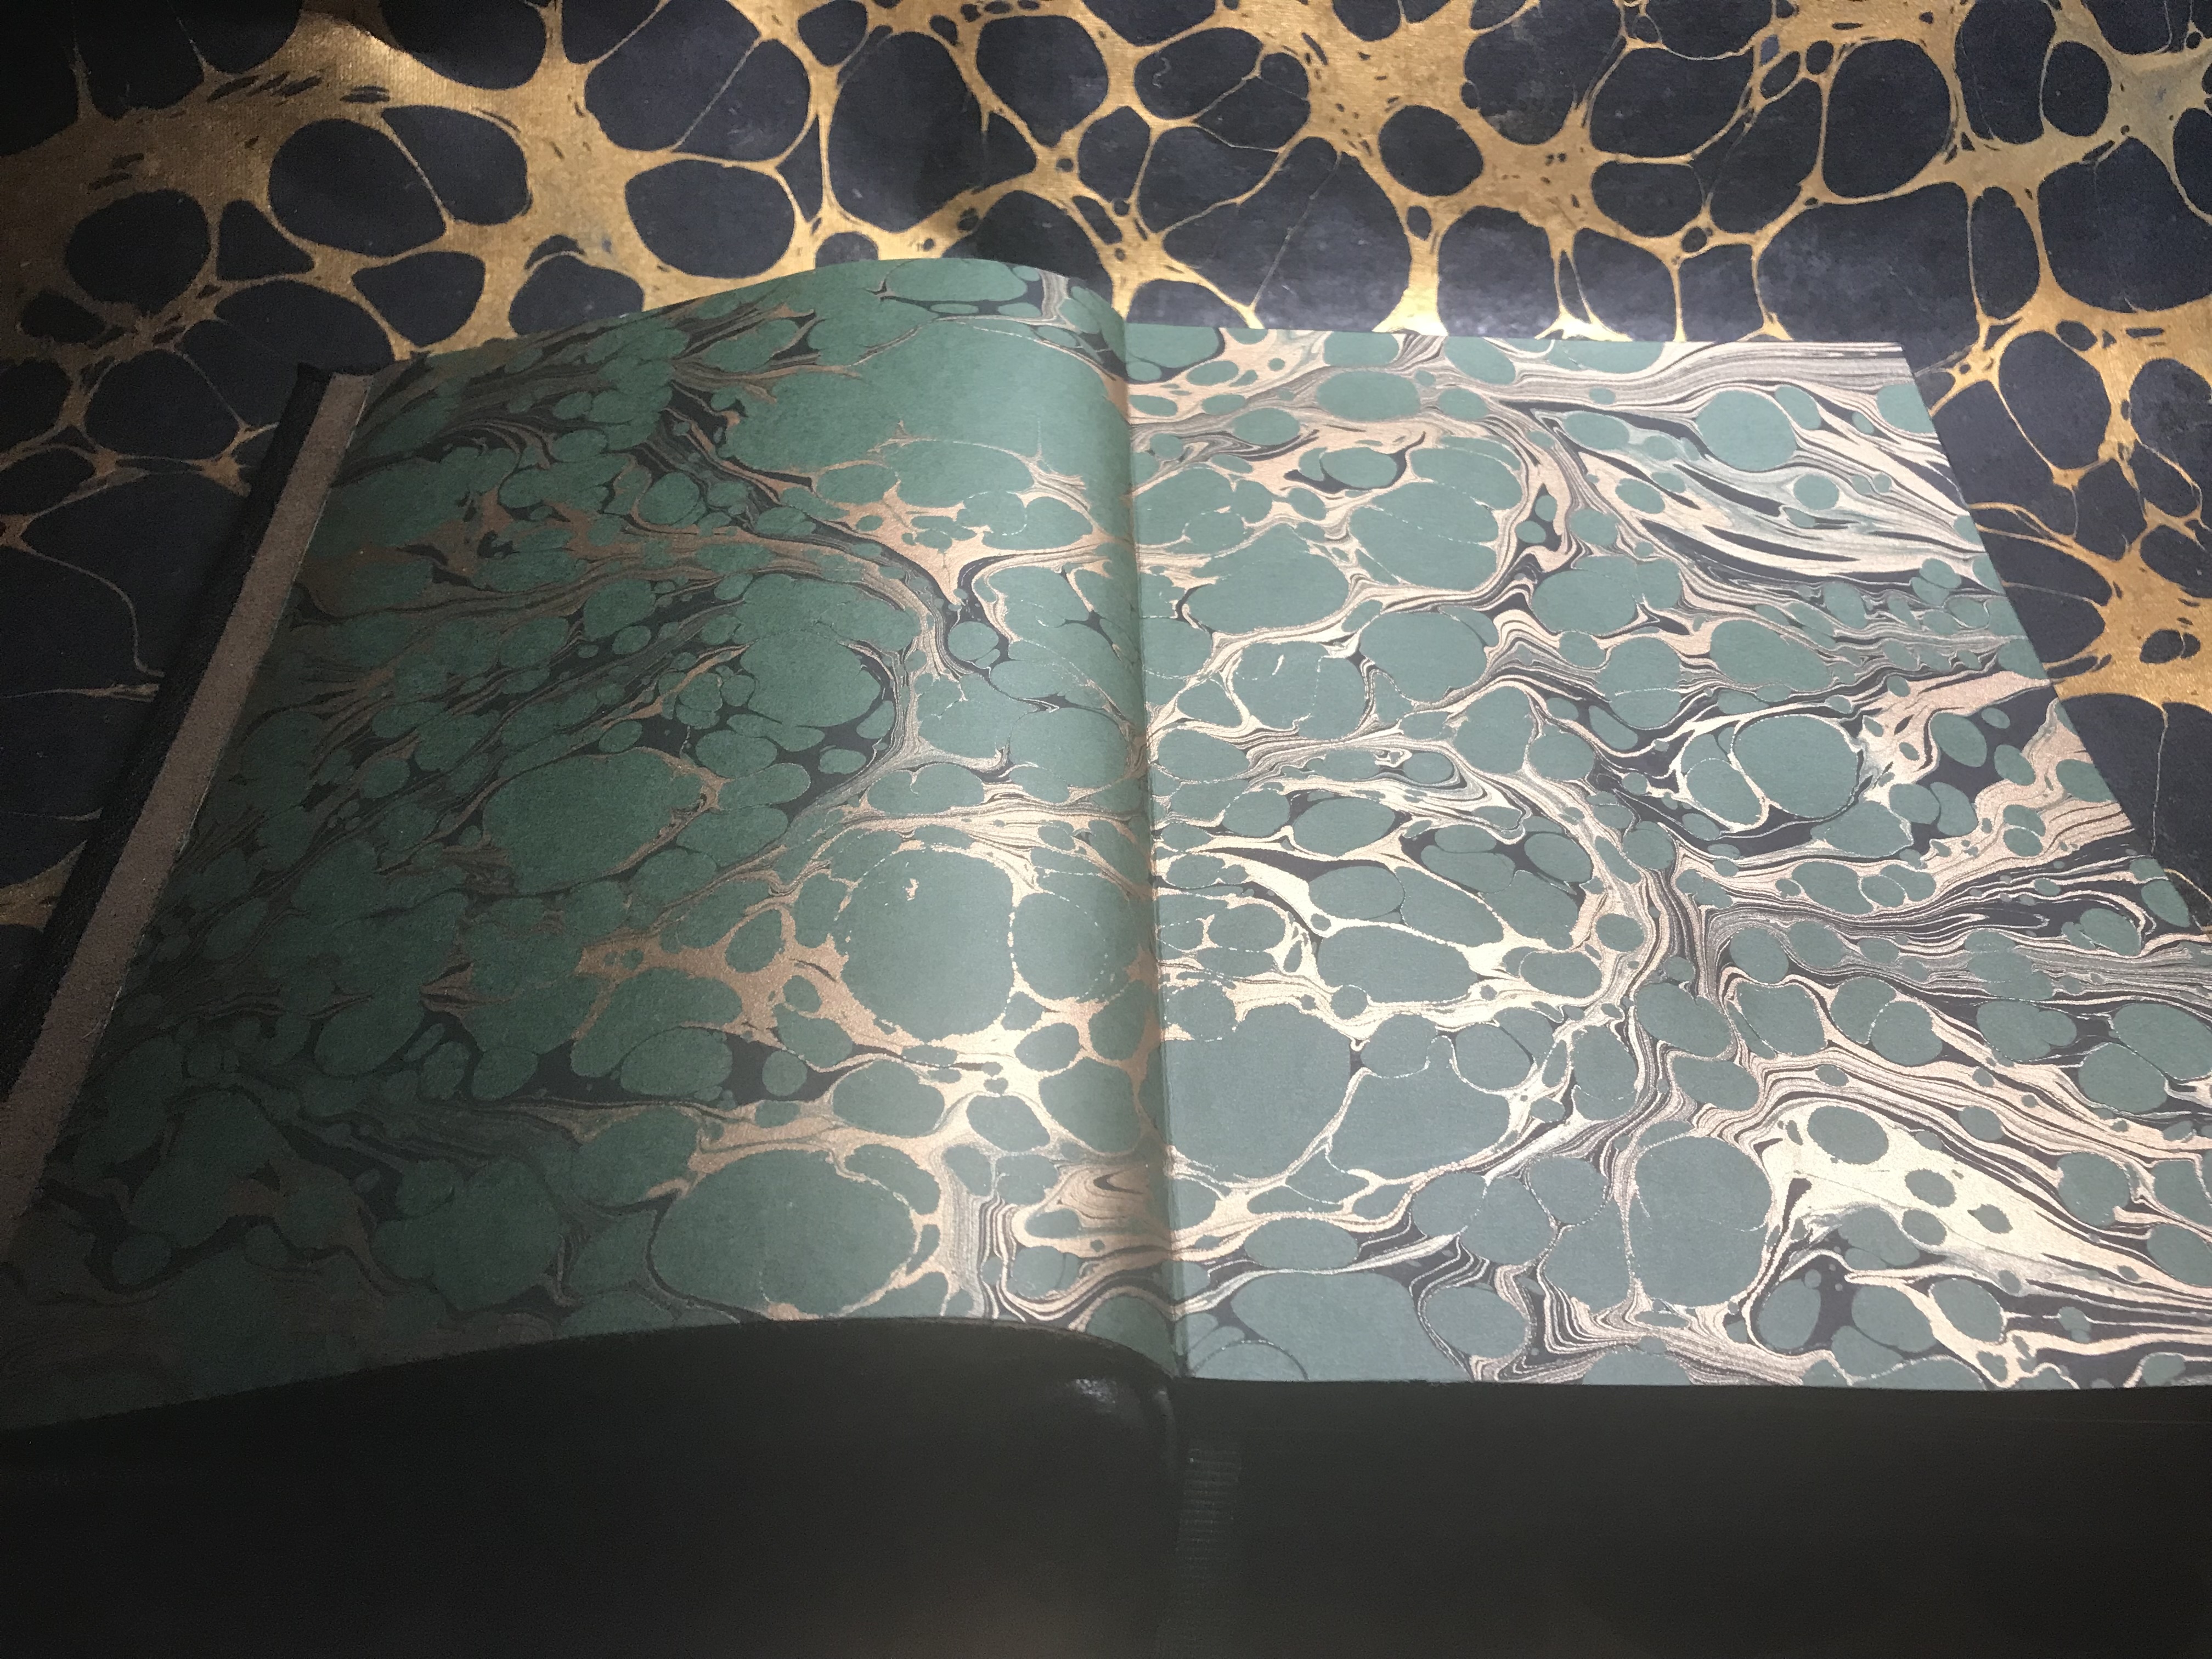
Decorative endpapers - marbled by Jemma Lewis
It was weird cutting this out, I was nervous, slicing up handmade art feels wrong but returns spectacular results

The text block standing out between the endpapers
This is beyond nice looking, it's got something special about it from every perspective
Tonally complimenting fly leaves
Brings another dimension to the experience
This is what I call the "J Geils Band"
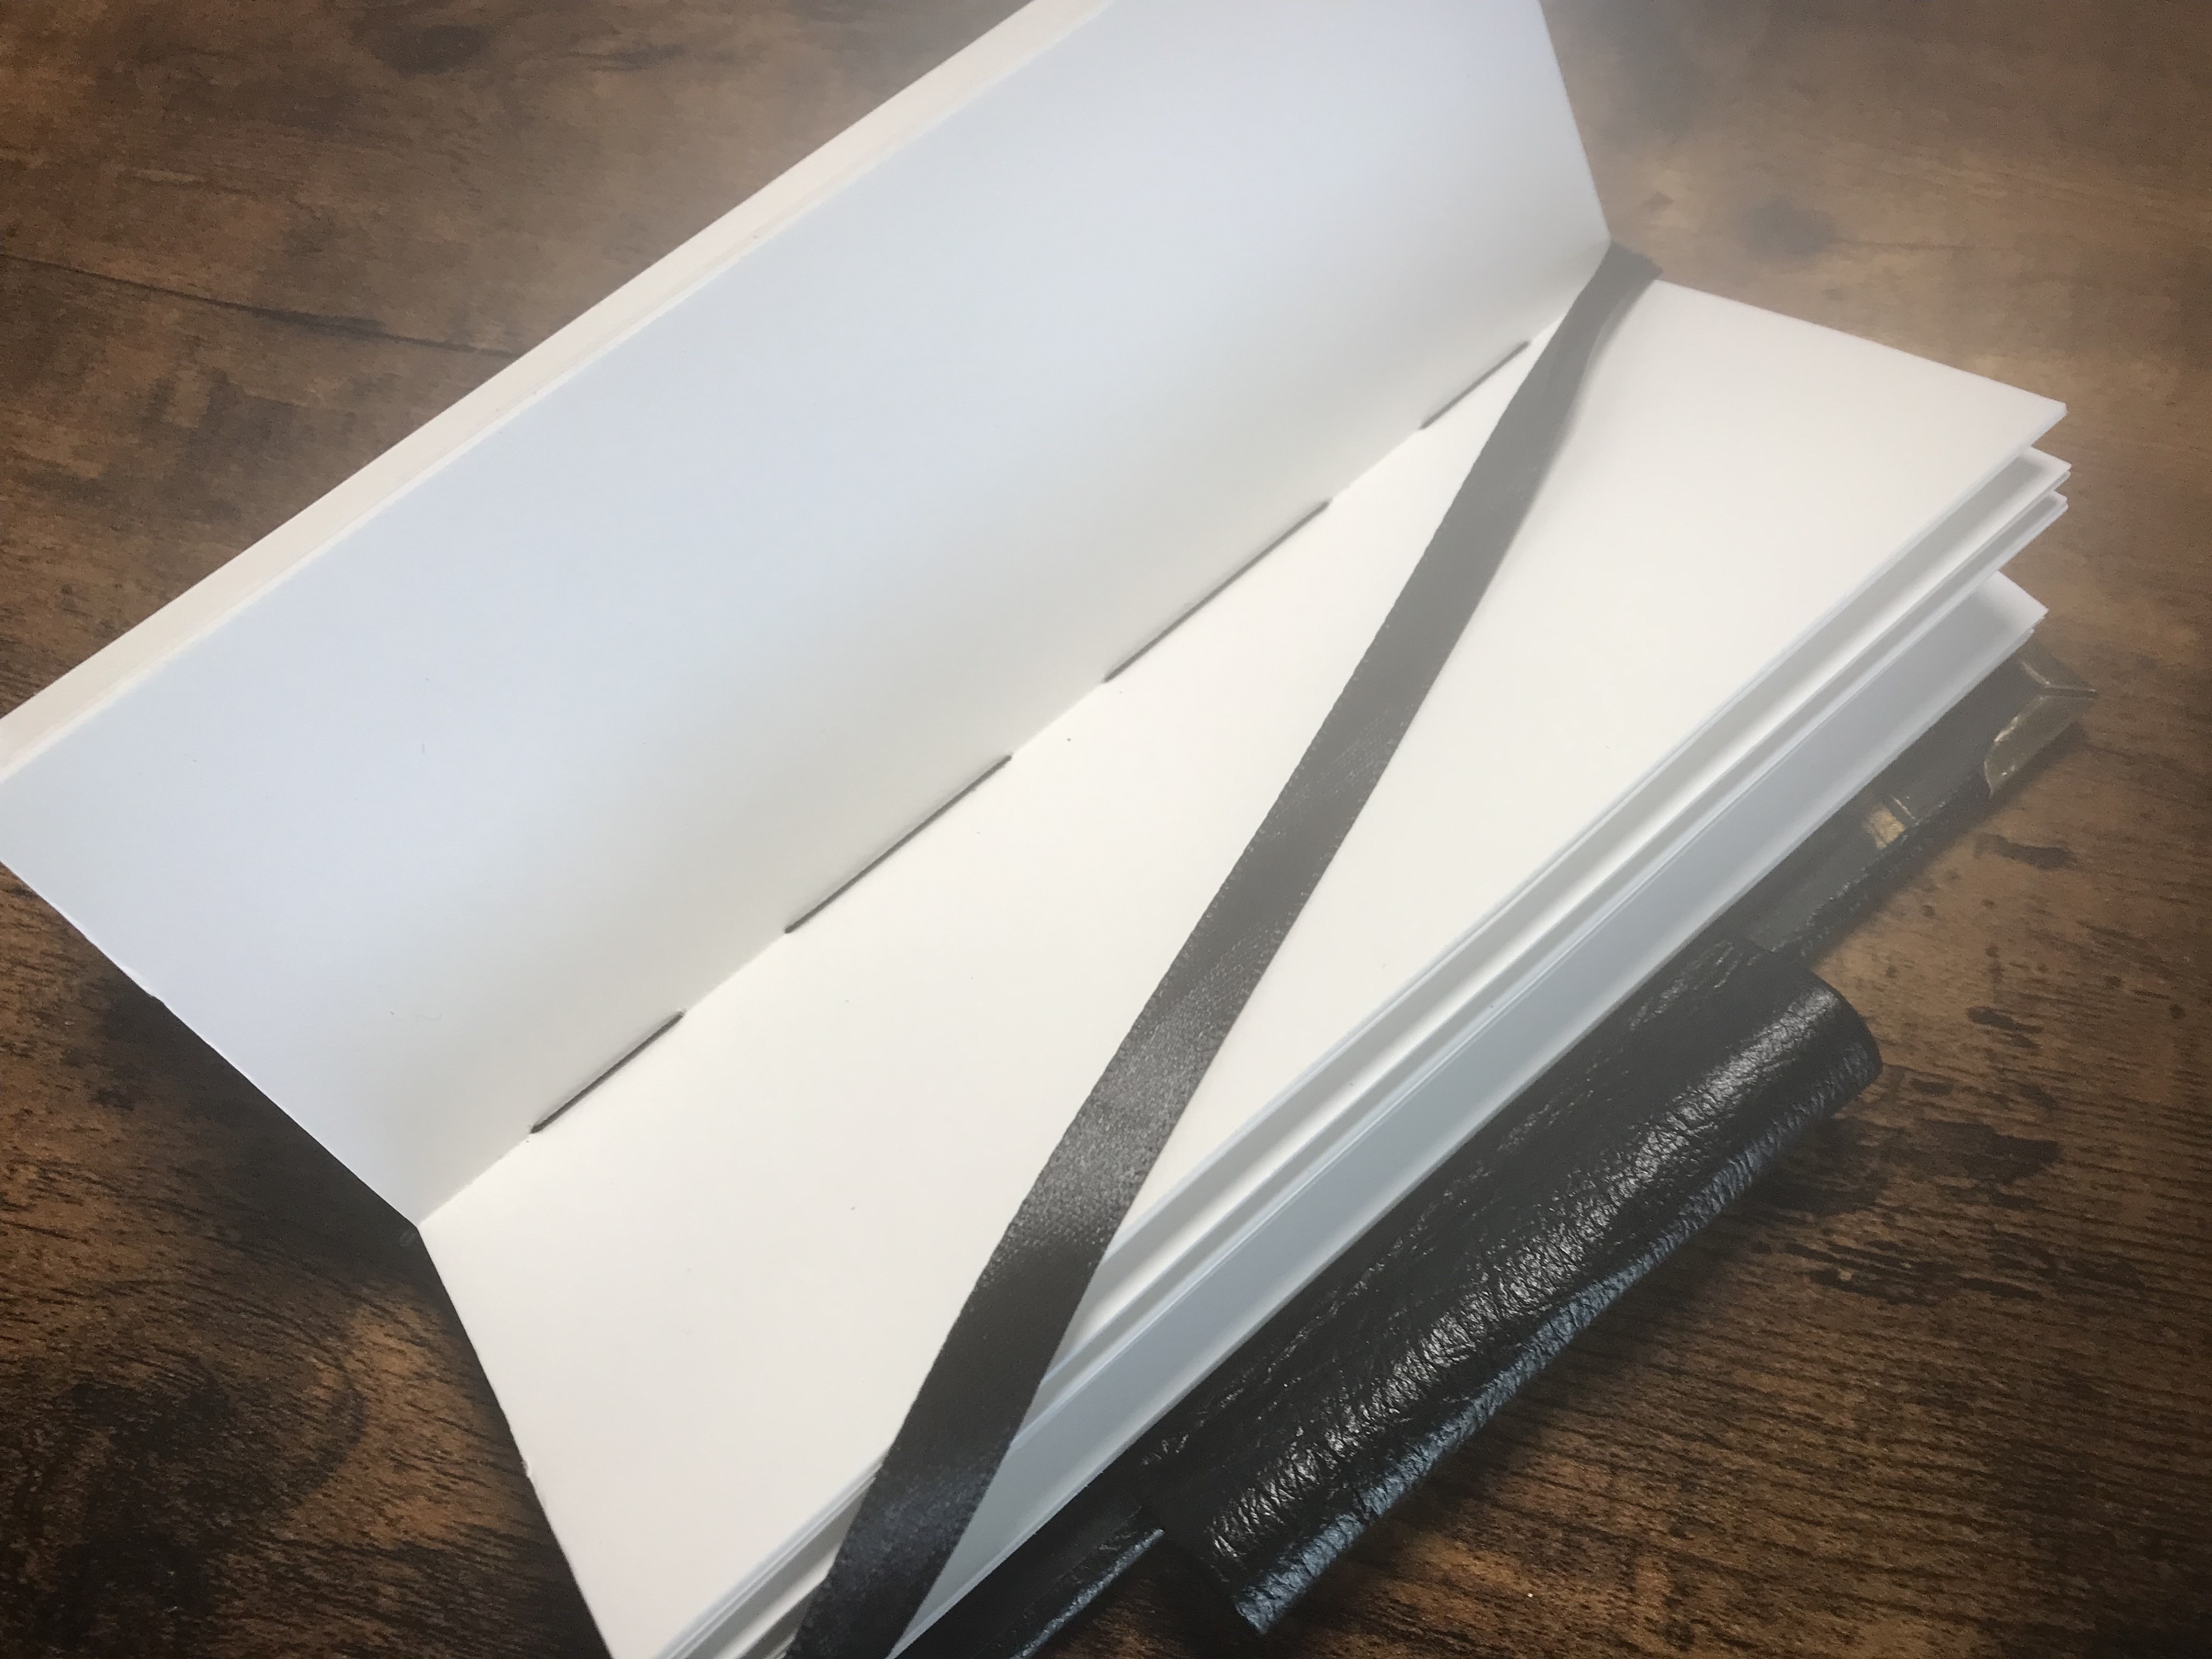
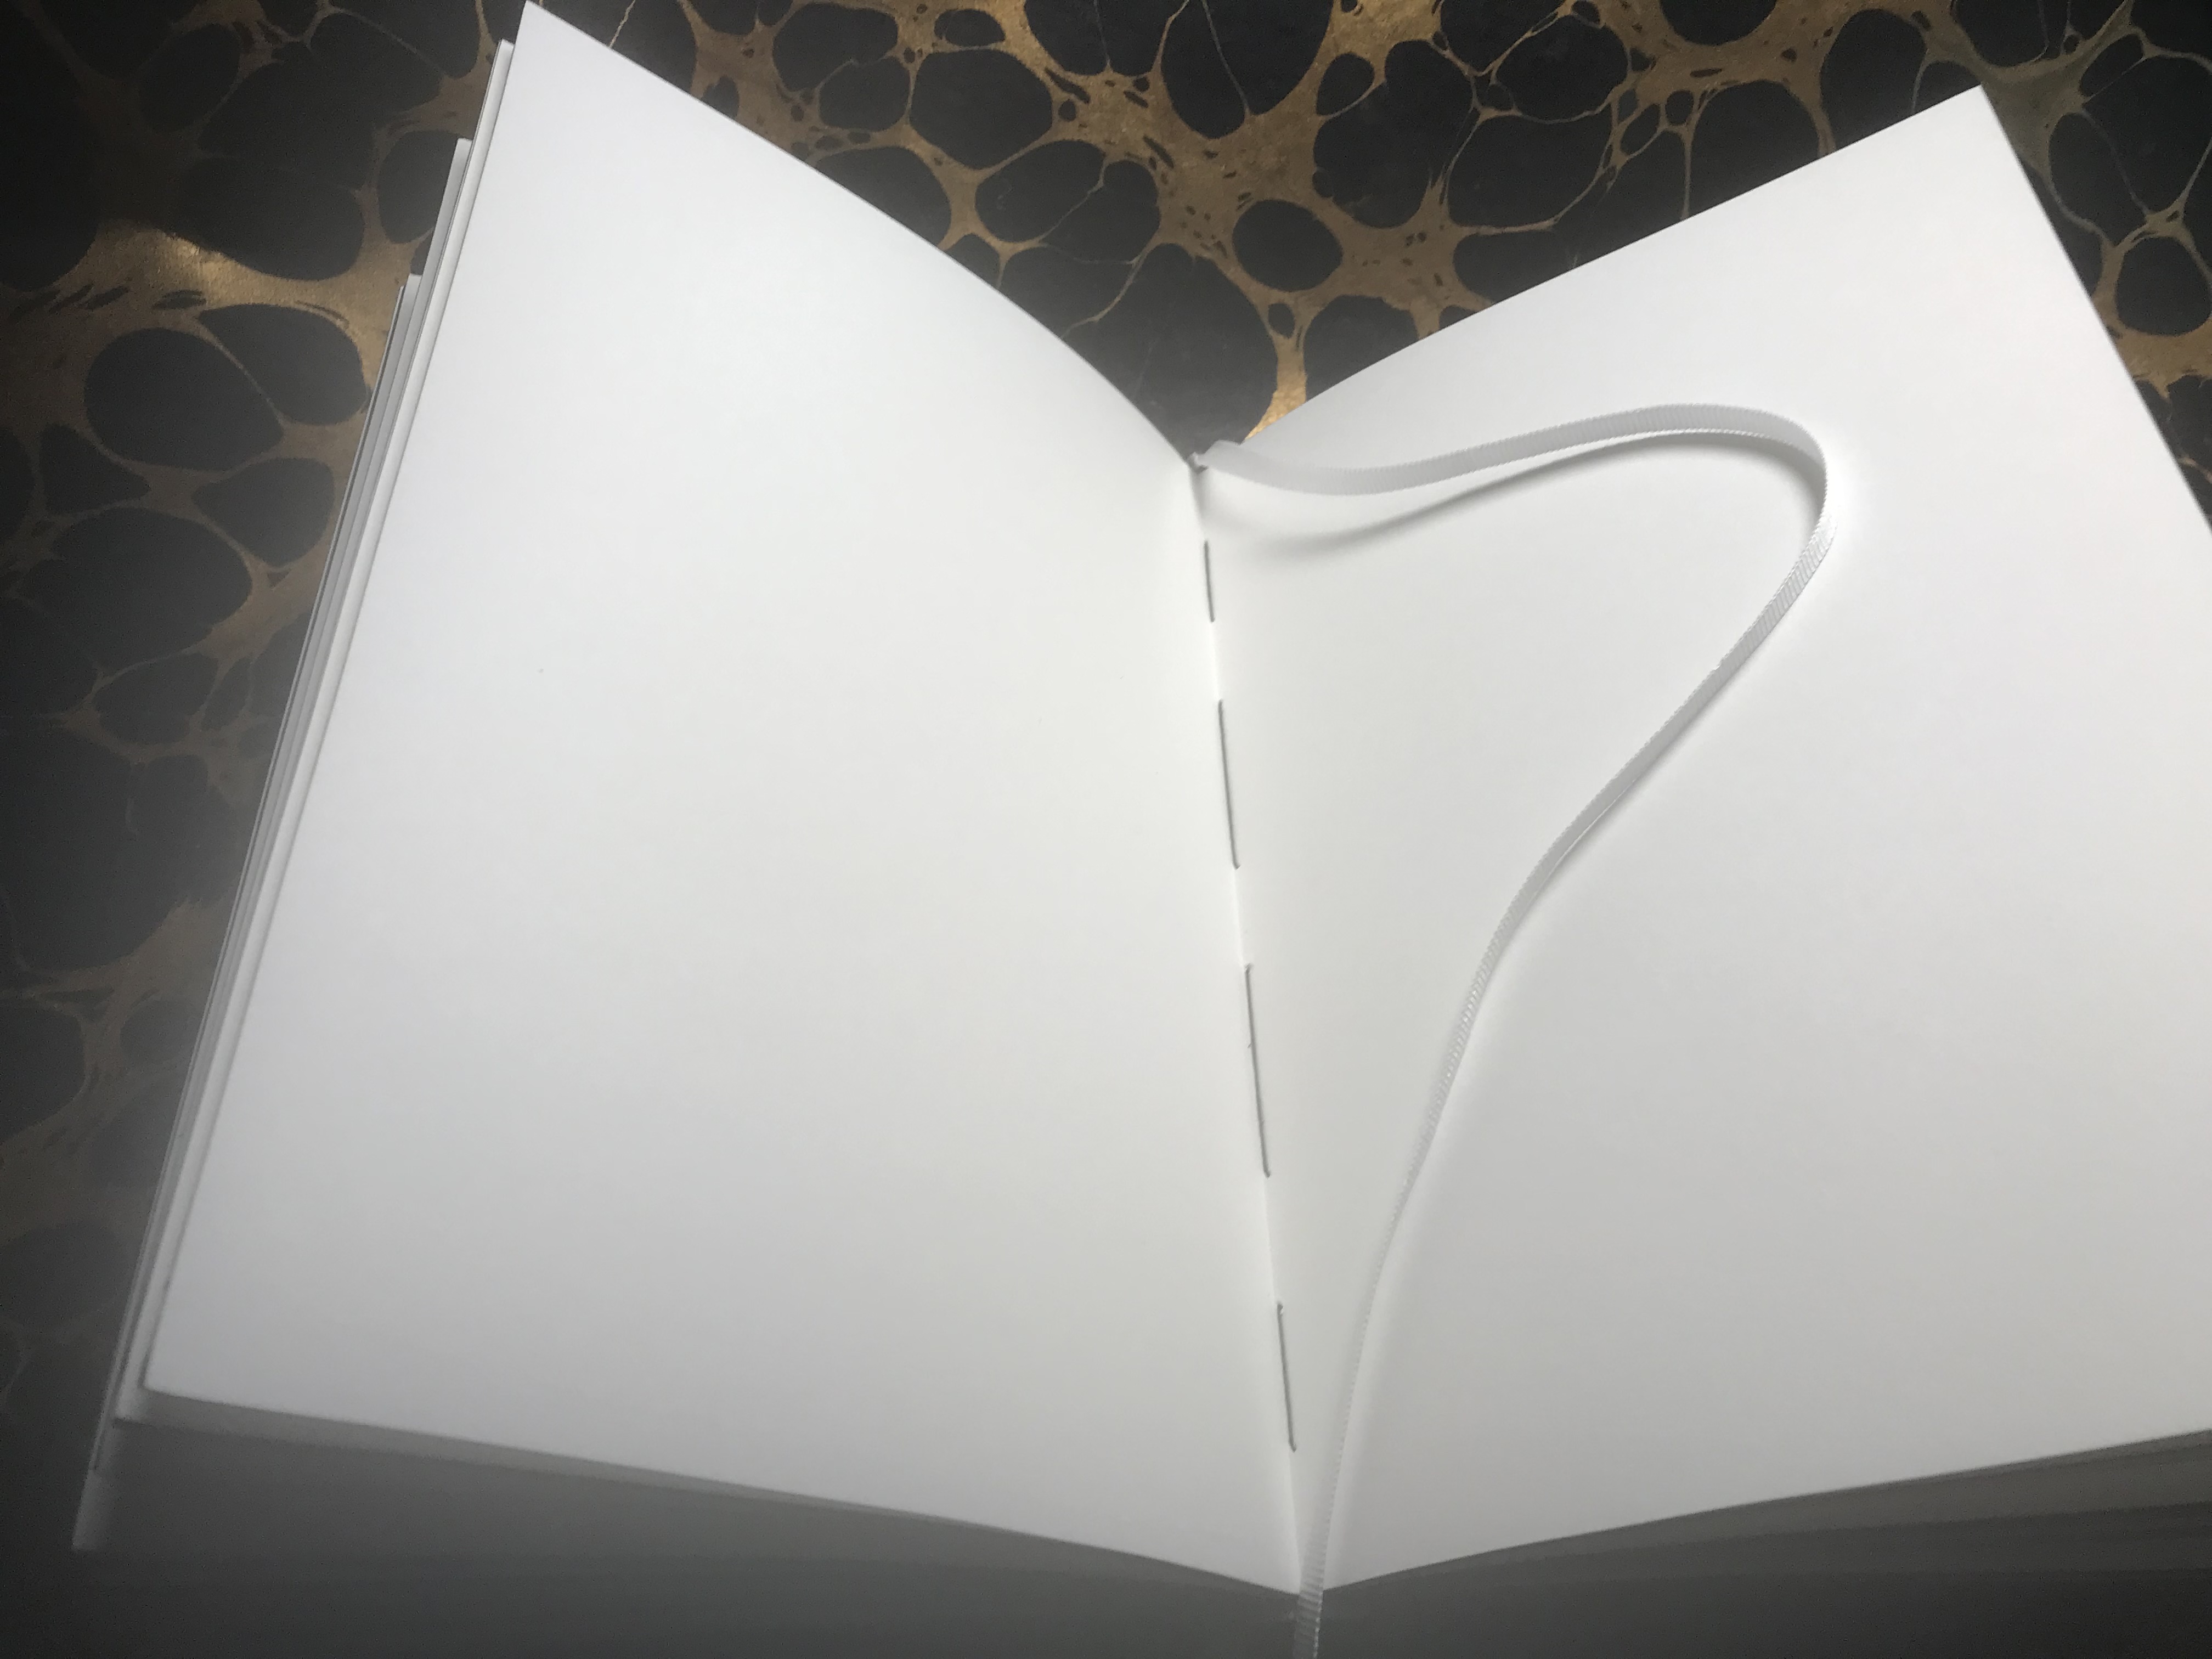
The centerfold: white reference ribbon, pristine pages and green French linen thread stitching
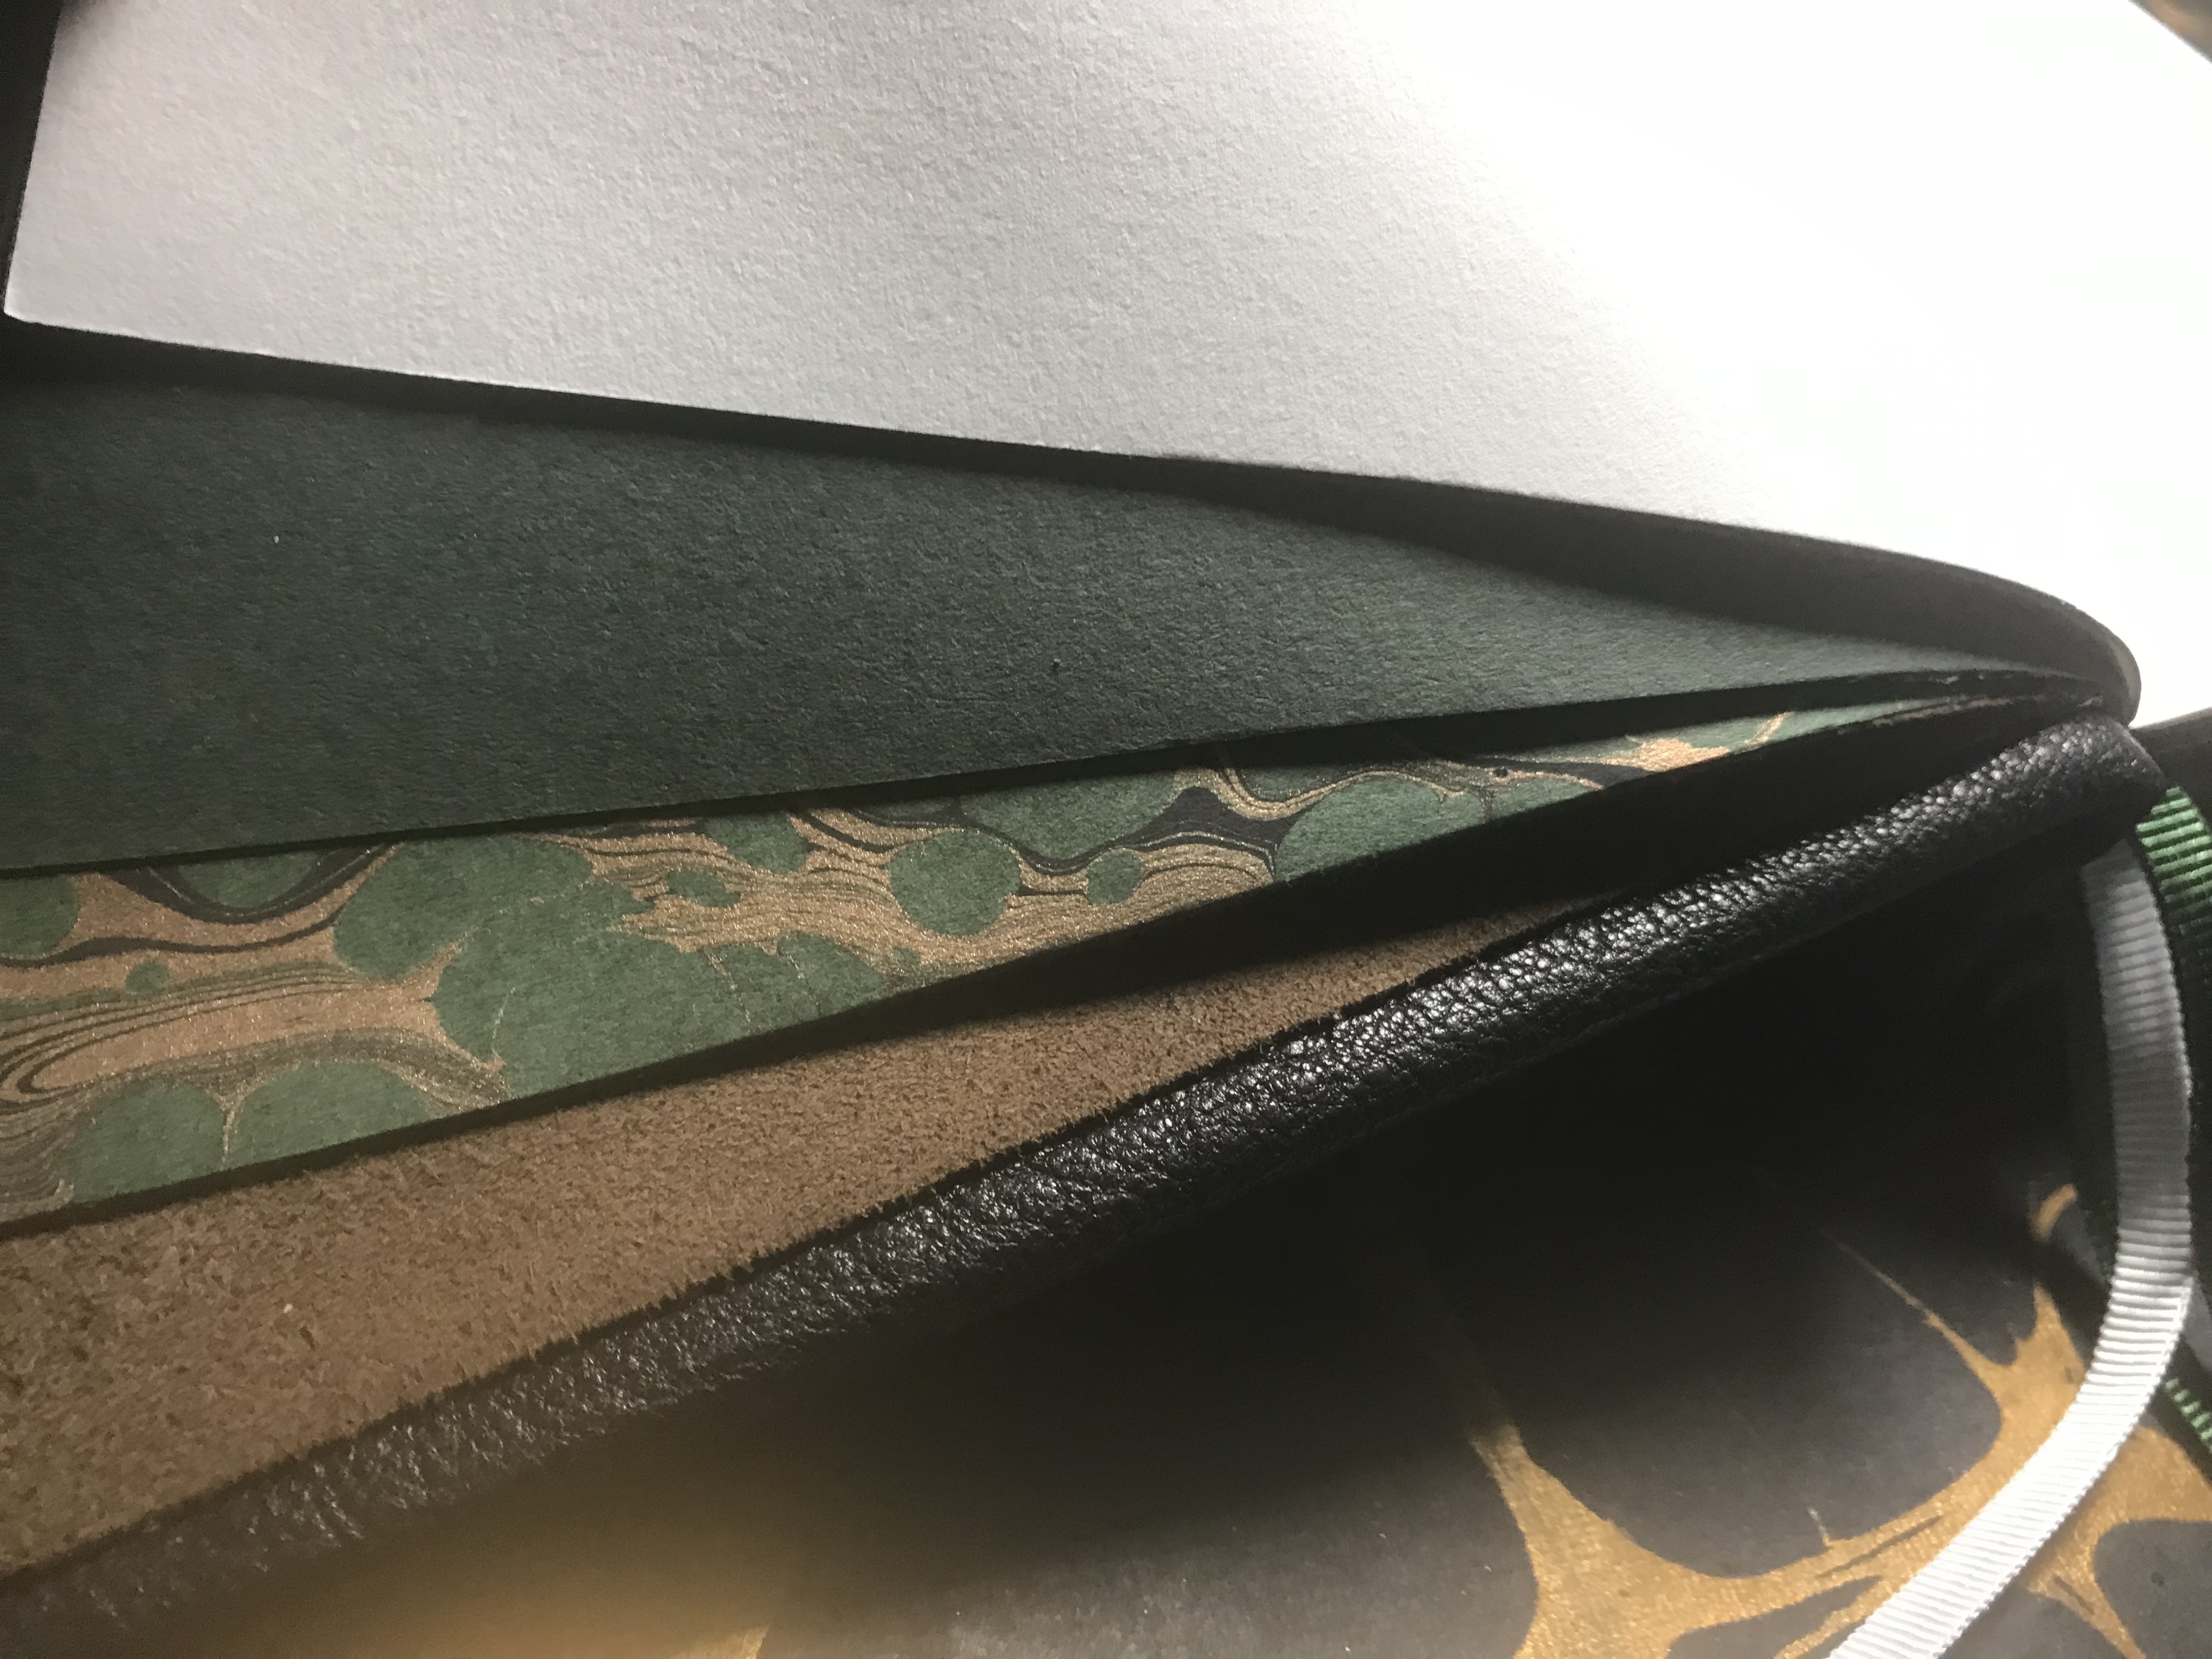
Totally tactile texturing
This blows my mind: leather, suede, marbled papers, fly leaves and text block